Nikon F55 Instruction Manual - Page 15
Set Exposure Mode - instruction manual
 |
UPC - 074101484663
View all Nikon F55 manuals
Add to My Manuals
Save this manual to your list of manuals |
Page 15 highlights
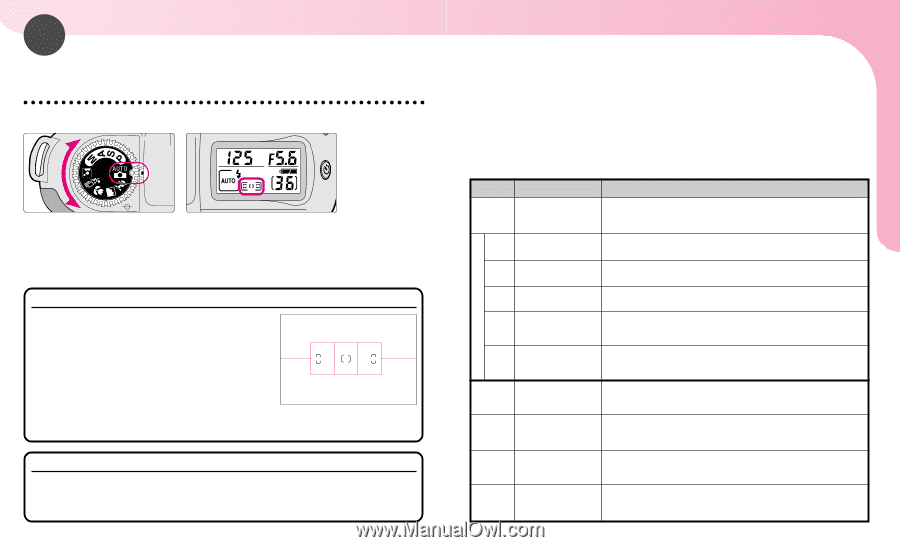
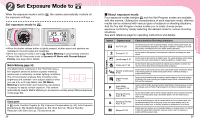
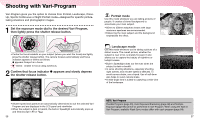
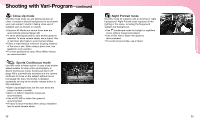
2 Set Exposure Mode to a When the exposure mode is set to a, the camera automatically controls all the exposure settings. Set exposure mode to a. • When the shutter release button is lightly pressed, shutter speed and aperture are indicated in the LCD panel and viewfinder. • When the exposure mode is set to a, Matrix Metering is automatically selected. • Check if the AF Area mode is set to Dynamic AF Mode with Closest-Subject Priority. See page 48 for details. Matrix Metering (page 34) The Matrix Meter employed in the F55/F55D uses a five-segment sensor to achieve superior metering results even in extremely complex lighting conditions. The microcomputer analyses data including scene brightness and contrast-and subject distance when you use a G- or D-type Nikkor lens (3D Matrix Metering is performed)-and makes the calculations necessary to assure correct exposure. This camera automatically selects Matrix Metering in all exposure modes except Manual exposure mode (page 60). Check point In a mode, Flexible Program (p. 55), Exposure Compensation (p. 64), Auto Exposure Bracketing (p. 66), Multiple Exposure (p. 69), Slow Sync (p. 78) and Red-Eye Reduction with Slow Sync (p. 79) cannot be set. 28 Vari-Program BASIC OPERATION 1 • About exposure mode Four exposure modes besides a and five Vari-Program modes are available with this camera. Utilising the characteristics of each exposure mode, effective results can be achieved with various types of subjects or shooting situations. And the five Vari-Program modes enable you to easily choose proper exposure controls by simply selecting the desired mode for various shooting situations. See each reference page for operating instructions and details. Symbol Exposure mode Characteristics/Shooting situations a AUTO P. 28 The easiest exposure mode for general shooting. Camera controls shutter speed and aperture automatically depending on the subject's brightness-allowing you to freely take pictures, concentrating only on the shutter release opportunity. s Portrait P. 37 Use this mode to take portraits. The background is blurred to accentuate your main subject. d Landscape P. 37 Use this mode to take pictures of distant scenes. The overall landscape will be sharply focused. This mode is also suitable for capturing nighttime or twilight scenes. f Close-Up P. 38 Use this mode to take up-close pictures of subjects such as flowers or insects. Your close-ups will be taken with an artistically blurred background. g Sports Continuous P. 38 Use this mode to take sports pictures. Using a fast shutter speed, it freezes the motion of fast-moving subjects to create exciting action photos. Continuous shooting is possible with this mode. h Night Portrait P. 39 P Auto-Multi Program P. 54 Use this mode for subjects with an evening or night background. This mode captures all lighting in the scene, including the foreground subject which is illuminated by the flash, and the background. Camera controls shutter speed and aperture automatically, while allowing you to make other settings, such as Flexible Program (page 55) or Exposure Compensation (page 64). S Shutter-Priority Auto P. 56 You set desired shutter speed, and the camera selects the correct aperture. Freeze the motion of a moving subject using a fast shutter speed or blur the subject using a slower speed. A Aperture-Priority Auto P. 58 You set the desired aperture, and the camera selects the correct shutter speed. Lets you determine depth of the in-focus area, so you can choose whether near or far subjects are in sharp focus, or whether foreground or background is to be blurred. M Manual P. 60 Shutter speed and aperture are set manually. Suitable for situations where it is difficult to attain the desired effect using other exposure modes. Long Time exposure is possible with this exposure mode. 29
-
 1
1 -
2
-
3
-
4
-
5
-
6
-
7
-
8
-
9
-
 10
10 -
 11
11 -
 12
12 -
 13
13 -
 14
14 -
 15
15 -
 16
16 -
 17
17 -
 18
18 -
 19
19 -
 20
20 -
21
-
22
-
23
-
24
-
25
-
26
-
27
-
28
-
29
-
30
-
31
-
32
-
33
-
34
-
35
-
36
-
37
-
38
-
39
-
40
-
41
-
42
-
43
-
44
-
45
-
46
-
47
-
48
-
49
-
50
-
51
-
52
-
53
-
54
-
55
-
56
-
57
-
58
-
59
-
60
-
61
 |
 |