Nokia N90 User Guide - Page 49
Tips on taking good photographs, Picture quality, Background, Depth
 |
View all Nokia N90 manuals
Add to My Manuals
Save this manual to your list of manuals |
Page 49 highlights
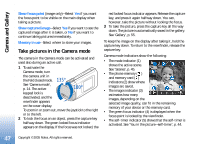
Camera and Gallery To reduce redness of the eyes in an image, select Options > Apply effect > Red eye reduction. Move the cross onto the eye, and press the joystick. A loop appears on the display. To resize the loop to fit the size of the eye, move the joystick. Press the joystick to reduce the redness. To add clip art to an image, select Options > Apply effect > Clip-art. Select the item you want to add from the list, and press the joystick. To move, rotate, and change the size of the item, select Options > Move, Resize, or Rotate. To add text to an image, select Options > Apply effect > Text. Enter the text, and select OK. To edit the text, select Options > Move, Resize, Rotate, or Select colour. Shortcuts in the Fold open mode: • To view an image in full screen, press . To return to the normal view, press again. • To rotate an image clockwise or counterclockwise, press and . • To zoom in or zoom out, press and . Tips on taking good photographs By turning the swing axis camera, capturing the views in demanding situations is easier. You can turn the camera unit clockwise or counterclockwise. See 'Camera mode', p. 14. Picture quality Use the appropriate picture quality. The camera has three picture quality modes (High 2M - Print, Med. 0.5M - Email, and Low 0.3M - MMS). Use the High 2M - Print setting to make sure that the camera produces the best picture quality available. Note however, that better picture quality requires more storage space. For MMS and e-mail attachments it may be necessary to use the Med. 0.5M Email or Low 0.3M - MMS setting. To define the quality in the image mode in the camera, select Options > Settings. Background Use a simple background. For portraits and other pictures with people, avoid having your subject in front of a cluttered, complex background that may distract attention from the subject. Move the camera, or the subject, when these conditions cannot be met. Move the camera closer to the object to take clearer portraits. Depth When shooting landscapes and sceneries, add depth to your pictures by placing objects into the foreground. Note however, that if the foreground object is too close to camera, it may be blurred. 49 Copyright © 2005 Nokia. All rights reserved.
-
 1
1 -
2
-
3
-
4
-
5
-
6
-
7
-
8
-
9
-
10
-
11
-
12
-
13
-
14
-
15
-
16
-
17
-
18
-
19
-
20
-
21
-
22
-
23
-
24
-
25
-
26
-
27
-
28
-
29
-
30
-
31
-
32
-
33
-
34
-
35
-
36
-
37
-
38
-
39
-
40
-
41
-
42
-
43
-
 44
44 -
 45
45 -
 46
46 -
 47
47 -
 48
48 -
 49
49 -
 50
50 -
 51
51 -
 52
52 -
 53
53 -
 54
54 -
55
-
56
-
57
-
58
-
59
-
60
-
61
-
62
-
63
-
64
-
65
-
66
-
67
-
68
-
69
-
70
-
71
-
72
-
73
-
74
-
75
-
76
-
77
-
78
-
79
-
80
-
81
-
82
-
83
-
84
-
85
-
86
-
87
-
88
-
89
-
90
-
91
-
92
-
93
-
94
-
95
-
96
-
97
-
98
-
99
-
100
-
101
-
102
-
103
-
104
-
105
-
106
-
107
-
108
-
109
-
110
-
111
-
112
-
113
-
114
-
115
-
116
-
117
-
118
-
119
-
120
-
121
-
122
-
123
-
124
-
125
-
126
-
127
-
128
-
129
-
130
-
131
-
132
 |
 |
