NordicTrack 360 Canadian English Manual - Page 12
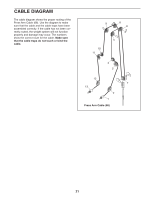
Insert the Press Arm Cable 66 into the Cable
 |
View all NordicTrack 360 manuals
Add to My Manuals
Save this manual to your list of manuals |
Page 12 highlights
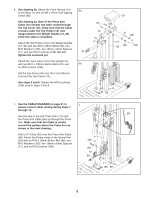
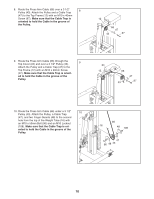
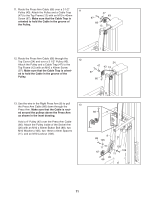
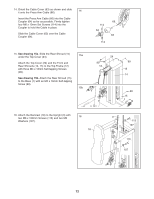
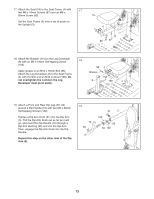
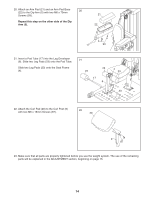
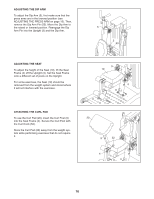
14. Orient the Cable Cover (63) as shown and slide it onto the Press Arm Cable (66). 14 Insert the Press Arm Cable (66) into the Cable Coupler (64) as far as possible. Firmly tighten four M6 x 10mm Set Screws (114) into the Coupler to hold the Cable in place. Slide the Cable Cover (63) over the Cable Coupler (64). 15. See drawing 15a. Slide the Rear Shroud (15) under the Top Cover (24). 15a Attach the Top Cover (24) and the Front and Rear Shrouds (14, 15) to the Top Frame (12) with three M4 x 16mm Self-tapping Screws (99). See drawing 15b. Attach the Rear Shroud (15) to the Base (1) with an M4 x 16mm Self-tapping Screw (99). 15b 66 114 64 63 114 24 99 12 99 15 14 99 15 1 16. Attach the Backrest (18) to the Upright (3) with two M6 x 100mm Screws (113) and two M6 Washers (107). 16 18 3 113 107 113 107 12
-
 1
1 -
2
-
3
-
4
-
5
-
6
-
 7
7 -
 8
8 -
 9
9 -
 10
10 -
 11
11 -
 12
12 -
 13
13 -
 14
14 -
 15
15 -
 16
16 -
 17
17 -
18
-
19
-
20
-
21
-
22
-
23
-
24
-
25
-
26
-
27
-
28
 |
 |
