NordicTrack Elite 9500 Pro Treadmill User Manual - Page 12
Lower the Frame 56 see HOW TO LOWER
 |
View all NordicTrack Elite 9500 Pro Treadmill manuals
Add to My Manuals
Save this manual to your list of manuals |
Page 12 highlights
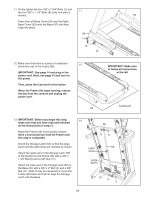
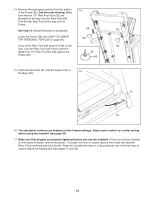
14. Remove the packaging material from the bottom of the Frame (56). See the inset drawing. Make sure that the 1/2" Rear Foot Nuts (30) are threaded all the way onto the Rear Feet (60). Turn the two Rear Feet all the way into the Frame. See step 12. Discard the piece of cardboard. Lower the Frame (56) (see HOW TO LOWER THE TREADMILL FOR USE on page 29). If one of the Rear Feet (60) doesnʼt sit flat on the floor, turn the Rear Foot until it does and then tighten the 1/2" Rear Foot Nut (30) against the Frame (56). 14 56 60 30 60 15. Press the Grommet (81) into the square hole in 15 the Base (97). 56 60 97 81 16. The adjustable cushions are shipped at their firmest settings. Adjust each cushion to a softer setting before using the treadmill (see page 28). 17. Make sure that all parts are properly tightened before you use the treadmill. If there are sheets of plastic on the treadmill decals, remove the plastic. To protect the floor or carpet, place a mat under the treadmill. Note: Extra hardware may be included. Keep the included hex keys in a secure place; one of the hex keys is used to adjust the walking belt (see pages 31 and 32). 12
-
 1
1 -
2
-
3
-
4
-
5
-
6
-
 7
7 -
 8
8 -
 9
9 -
 10
10 -
 11
11 -
 12
12 -
 13
13 -
 14
14 -
 15
15 -
 16
16 -
 17
17 -
18
-
19
-
20
-
21
-
22
-
23
-
24
-
25
-
26
-
27
-
28
-
29
-
30
-
31
-
32
-
33
-
34
-
35
-
36
-
37
-
38
-
39
-
40
 |
 |
