NordicTrack Walkfit 5000 Owners Guide - Page 8
Connect, Tension, Spring, Attach, Sensor
 |
View all NordicTrack Walkfit 5000 manuals
Add to My Manuals
Save this manual to your list of manuals |
Page 8 highlights
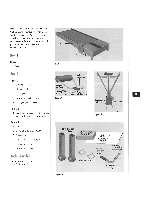
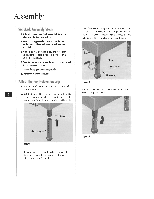
Connect the Tension Spring and Sensor Cord I. Lay the WalkFit Classic:" aerobic exerciser on its left side (the side opposite the flywheel). Attach the tension spring below the upper-body exerciser to the small hole in the tension rod (Figure 7). Be sure that the hole in the tension rod extends toward the rear of the base. Attach the Hip Pad 1. Remove the hip-pad knob and carriage boll from the hip-pad bracket (Figure 9). Hip pad Cylindrical U-shaped plastic sleeve plastic sleeve Hip-pad knob Tension spring Carriage bob Hip-pad bracket Hole in the tension rod Figure 7 3. Houle the sensor cord under the center frame support. 4. Snap the sensor cord to the underside receptacle of the flywheel sensor (Figure 8). The connection should be tight. Figure 9 2. Make sure that the u-shaped plastic sleeve is inserted into the hip-pad bracket. 3. Increase the treadmill resistance by turning the treadmill tension control knob clockwise so Ihat the treadmill belt does not move when you stand on it. Upright tube Flywheel sensor receptacle Center frame support 4 Figure 8 Sensor - cable Figure 10 4. Stand on the treadmill belt. Fil the hip-pad bracket around the upright tube (Figure 10). The hip pad should angle upward. 5. Hold the hip pad assembly in position with one hand. With the other hand position the cylindrical plastic sleeve between the two holes on the hip-pad bracket.
-
 1
1 -
2
-
 3
3 -
 4
4 -
 5
5 -
 6
6 -
 7
7 -
 8
8 -
 9
9 -
 10
10 -
 11
11 -
 12
12 -
 13
13 -
14
-
15
-
16
-
17
-
18
-
19
-
20
-
21
-
22
-
23
-
24
-
25
-
26
-
27
-
28
-
29
-
30
 |
 |
