NordicTrack Walkfit 5000 Owners Guide - Page 9
Install, Workout, Computer
 |
View all NordicTrack Walkfit 5000 manuals
Add to My Manuals
Save this manual to your list of manuals |
Page 9 highlights
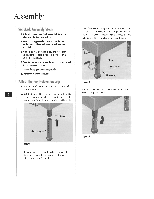
6. Insert the carriage bolt through the holes in die hippad bracket and through the cylindrical plastic slees.v. The bolt may be inserted front the kill or (he right. 7. 'Fighter, the hip-pad knob onto the threaded end of the carriage bolt. This will secure the hip pad in place. 8. Locate the jack on the forward side of the upright tube (near the top). Plug the other end of the electronics cable into (his lack (Figure 12). Workout computer Install the Workout Computer 1. Remove the comenls of lite electronics package. Press on the tab of (he battery-ease cover and remove it from the back of the compuler. 3. Insert two AA-size batteries (not included) so the negative ends rest. against. Ole springs in the batter} compartment. Make sure the batteries conneet on both the positive mid negative ends. WARNING: The batteries must be installed as instructed. Do not carry batteries loose, such as in a purse or pocket. Batteries may explode or leak and cause injury if inserted improperly, misused, disposed of in fire or recharged. 4. Replace the battery-case cover. 5. Plug one end of the electronics cable into tile jack on the back of the computer. 6. Bring the electronics cable through the opening in the workout-computer faceplalc. 7. Sol the computer into the opening in the workoulc.omputer faceplate (Figure 1 11. Workout-computer faceplate . Workout computer WaikFif • Workout Computer 'DC I.A-TANcc CMC MIL= Electronics cable Figure 12 Upright tube 9. Follow the instructions included with your electronics package to program and use your computer. I apse the slol on the light side of the. faccplale if you have a radio or tape player you wand to use during your workout Figure 11 Slot for radio
-
 1
1 -
2
-
3
-
 4
4 -
 5
5 -
 6
6 -
 7
7 -
 8
8 -
 9
9 -
 10
10 -
 11
11 -
 12
12 -
 13
13 -
 14
14 -
15
-
16
-
17
-
18
-
19
-
20
-
21
-
22
-
23
-
24
-
25
-
26
-
27
-
28
-
29
-
30
 |
 |
