Oki PRO510DW Pro510DW Quick Start Guide
Oki PRO510DW Manual
 |
View all Oki PRO510DW manuals
Add to My Manuals
Save this manual to your list of manuals |
Oki PRO510DW manual content summary:
- Oki PRO510DW | Pro510DW Quick Start Guide - Page 1
- Oki PRO510DW | Pro510DW Quick Start Guide - Page 2
the IP Address at the Feeder 4 3.) Setting the IP Address at the Printer 7 4.) Setup of the Printer Port 9 5.) Setup of the Printer, Feeder and Feeder Port on the Printer Media Manager_____14 6.) Connect the Workflow with the Printer ______16 7.) Setup of the Media in the Media Manager 21 - Oki PRO510DW | Pro510DW Quick Start Guide - Page 3
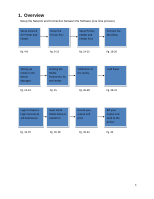
the Software (one time process) Setup network for Printer and Feeder Setup the Printer Port Setup Printer, Feeder and Feeder Port Connect the Workflow Pg. Pg. 26-28 Load Paper Pg. 29-31 Login to Express Login Services & Job Submission Input Job & Media Setup in LabelPrint Create your output - Oki PRO510DW | Pro510DW Quick Start Guide - Page 4
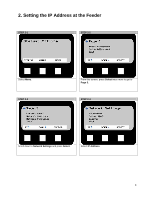
2. Setting the IP Address at the Feeder STEP 2-1 STEP 2-2 Select Menu. STEP 2-3 From this screen, press Select twice more to get to Page 3. STEP 2-4 Scroll down to Network Settings and press Select. Select IP Address. 4 - Oki PRO510DW | Pro510DW Quick Start Guide - Page 5
. The first three zero's will be highlighted. Press Up and Down to get to the appropriate number. Press Save. Press Select, then the next set is now ready to be entered and you can use the Up and Down arrows to continue this process until - Oki PRO510DW | Pro510DW Quick Start Guide - Page 6
STEP 2-9 From the Apply Settings screen, press Select then Up. The screen will now say Yes. Save then Exit to Offline. The Feeder will take a moment to update. 6 - Oki PRO510DW | Pro510DW Quick Start Guide - Page 7
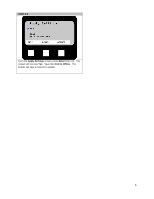
3. Setting the IP Address at the Printer STEP 3-1 STEP 3-2 Enter the printer menu. Scroll down and select Admin Setup to enter. Using the up and down arrow keys, enter the password aaaaaa (six lower case a's). Select Enter. - Oki PRO510DW | Pro510DW Quick Start Guide - Page 8
STEP 3-5 Using the up and down arrow keys to enter the IP Address, hitting enter to move right to the next column. When a * (asterisk) symbol appears, the IP Address has been saved. Select Online to finish. 8 - Oki PRO510DW | Pro510DW Quick Start Guide - Page 9
4. Setup of the Printer Port STEP 4-1 From the Start menu, select Devices and Printers. STEP 4-2 Select Add a Printer. 9 - Oki PRO510DW | Pro510DW Quick Start Guide - Page 10
STEP 4-3 Select Add a Local Printer. STEP 4-4 Click Create a New Port. From the drop down menu, select Standard TCP/IP Port and click Next. 10 - Oki PRO510DW | Pro510DW Quick Start Guide - Page 11
STEP 4-5 Under Hostname or IP Address, enter the IP Address and select Next. STEP 4-6 Select Next to bypass the Additional Port Information Required screen. 11 - Oki PRO510DW | Pro510DW Quick Start Guide - Page 12
STEP 4-7 Under the Manufacturer menu, select Microsoft. From the Printers menu, click Microsoft XPS Document Writer and select Next. STEP 4-8 Select Use the Driver that is Currently Installed and click Next. 12 - Oki PRO510DW | Pro510DW Quick Start Guide - Page 13
STEP 4-9 Enter the Printer Name and click Next. STEP 4-10 You`ve successfully added the printer. Select Finish. 13 - Oki PRO510DW | Pro510DW Quick Start Guide - Page 14
5. Setup of the Printer, Feeder and Feeder Port on the Printer Media Manager STEP 5-1 Open the LabelPrint Printer Media Manager. Select Preferences from the General Options on the side bar. STEP 5-2 Highlight the media and click Edit. 14 - Oki PRO510DW | Pro510DW Quick Start Guide - Page 15
STEP 5-3 Ensure the info is correct and click Save. STEP 5-4 Click Save. Leave the LabelPrint Printer media Manager running in the background. 15 - Oki PRO510DW | Pro510DW Quick Start Guide - Page 16
6. Connect the Workflow with the Printer STEP 6-1 Click on the ELP for OKI icon on the desktop to open. Login using the Username and Password created when installing the software. STEP 6-2 This screen will pop up. Click Allow Access. 16 - Oki PRO510DW | Pro510DW Quick Start Guide - Page 17
STEP 6-3 Open the Workflow. STEP 6-4 This screen will pop up. Click Allow Access. 17 - Oki PRO510DW | Pro510DW Quick Start Guide - Page 18
STEP 6-5 Right-click the Printer Output icon and select Setup. STEP 6-6 Select Edit. 18 - Oki PRO510DW | Pro510DW Quick Start Guide - Page 19
STEP 6-7 Highlight the Printer Config and select Edit. STEP 6-8 Enter the Name and select the Printer and Printer Name created from the drop down menu and click OK. Exit the previous screen, and click OK on the LabelPrint Printer Setup screen. 19 - Oki PRO510DW | Pro510DW Quick Start Guide - Page 20
STEP 6-9 Start the Workflow by selecting the Start button from the top left-hand corner. Leave the Workflow running in the background. 20 - Oki PRO510DW | Pro510DW Quick Start Guide - Page 21
the Active Media List and select the appropriate sized media from the Printer Media List. Ensure both lines are highlighted. If the appropriate media is on the Printer Media List, please proceed to step # 11. If the appropriate media is not on the list, you can get the latest version by visiting - Oki PRO510DW | Pro510DW Quick Start Guide - Page 22
STEP 7-3 Select Import Certified Media. STEP 7-4 Click the "....." and select the certified media list. 22 - Oki PRO510DW | Pro510DW Quick Start Guide - Page 23
STEP 7-5 Click Open. STEP 7-6 Ensure the Set the Import Media to Enabled box is checked and click OK. 23 - Oki PRO510DW | Pro510DW Quick Start Guide - Page 24
STEP 7-7 Click Close. STEP 7-8 From the General Options side bar, click Update Stock Database. 24 - Oki PRO510DW | Pro510DW Quick Start Guide - Page 25
Submit. STEP 7-10 Click OK. STEP 7-11 With both the Active Media and appropriate media from the Printer Media List selected, click Change Media To from the Media Control Menu. The printer will send the media parameters to the Feeder. A screen will appear saying Roll Settings Have Been Successfully - Oki PRO510DW | Pro510DW Quick Start Guide - Page 26
STEP 7-12 On the Feeder, there will be a screen displaying Clear the Guide Path. Please remove the current roll if one is installed, and load the new roll on to the Feeder before printing your job. Select Done. The Guide will adjust to the proper roll width. STEP 7-13 The media now needs - Oki PRO510DW | Pro510DW Quick Start Guide - Page 27
STEP 7-14 Place the media between the two Guide Channels while covering the sensor on the right hand side exactly as shown in the picture STEP 7-15 Close the Guide Channels, Load Door and then the Guide Cover. 27 - Oki PRO510DW | Pro510DW Quick Start Guide - Page 28
STEP 7-16 From the Media Control menu, select Sensor Calibration. STEP 7-17 The Feeder will then calibrate the media. If this is not done properly, a screen will show saying Auto Registration Failed. Repeat the process using a longer section of media. STEP 7-18 When the media is calibrated, the - Oki PRO510DW | Pro510DW Quick Start Guide - Page 29
8. Loading the Media Spindle Pin Cutter Cover Guide Cover Extension Arm Media Door Load Door Identify the three doors and two covers of the OKI pro510DW feeder. Guide Door 29 - Oki PRO510DW | Pro510DW Quick Start Guide - Page 30
does not cone. If this is not done properly, there will be tracking problems. Ensure the roll is pushed all the way into the feeder against the front of the feeder by releasing the two yellow latches. Open the Guide Cover and Guide Channels. Feed the media under the orange Tension Swing as shown. - Oki PRO510DW | Pro510DW Quick Start Guide - Page 31
should lay flat against the back of the feeder. Use the Open and Close buttons to make an adjustment if necessary. Close the Guide Channels, Load Door and Guide Cover. Press the Load button to load the media. The roll will begin to load and cut off a section for proper alignment. Open the - Oki PRO510DW | Pro510DW Quick Start Guide - Page 32
9. Job Submission STEP 9-1 Click the Compose LabelPrint icon on the desktop to open an internet explorer screen. Login to the Express Login Server. STEP 9-2 Select Submission from the bottom left hand side of the screen. 32 - Oki PRO510DW | Pro510DW Quick Start Guide - Page 33
STEP 9-3 Click Jobs (+) icon to create a job. STEP 9-4 Create an ID and quantity, media type and paper part number to create the custom Job. 33 - Oki PRO510DW | Pro510DW Quick Start Guide - Page 34
STEP 9-5 Under the File window, click the (+) icon and select the PDF graphic to be printed. Click OK. STEP 9-6 Click Submit. 34 - Oki PRO510DW | Pro510DW Quick Start Guide - Page 35
STEP 9-7 After the job has finished submitting, click Close. 35 - Oki PRO510DW | Pro510DW Quick Start Guide - Page 36
10. Input Job and Media Setup STEP 10-1 Open Express LabelPrint and click on the Start Job Input arrow on the top left of the screen, or go to the Advanced menu to Start Job Input. The graphic will now appear in the bar on the left. STEP 10-2 Select Advanced then Roll Papers. 36 - Oki PRO510DW | Pro510DW Quick Start Guide - Page 37
STEP 10-3 Select Add from the Paper Manager popup. STEP 10-4 Under Paper Name, select the media part number from the Media List. After doing so, the parameters will change. 37 - Oki PRO510DW | Pro510DW Quick Start Guide - Page 38
STEP 10-5 Enter the pre-cut size, and horizontal and vertical gutters. Ensure the parameters are correct. Click Save the Close. 38 - Oki PRO510DW | Pro510DW Quick Start Guide - Page 39
11. Creating a Label Job STEP 11-1 From the File menu, select Roll Layout, the allotted paper name, the weight, and width. STEP 11-2 Enter the Layout Name and click OK. 39 - Oki PRO510DW | Pro510DW Quick Start Guide - Page 40
STEP 11-3 Click on Ready from the side bar. STEP 11-4 Drag and drop the graphic from the side bar on to the new layout. 40 - Oki PRO510DW | Pro510DW Quick Start Guide - Page 41
STEP 11-5 From the File menu, select Print. STEP 11-6 Select OK. 41 - Oki PRO510DW | Pro510DW Quick Start Guide - Page 42
-8 On the Workflow screen, ensure the file travels from the Job Input to the Print Queue. Once this is done, select the arrow under the Printer Output icon. The job will now be sent to the
-
 1
1 -
 2
2 -
 3
3 -
 4
4 -
 5
5 -
 6
6 -
 7
7 -
8
-
9
-
10
-
11
-
12
-
13
-
14
-
15
-
16
-
17
-
18
-
19
-
20
-
21
-
22
-
23
-
24
-
25
-
26
-
27
-
28
-
29
-
30
-
31
-
32
-
33
-
34
-
35
-
36
-
37
-
38
-
39
-
40
-
41
-
42
 |
 |