Olympus FE 115 FE-115 Advanced Manual (English) - Page 32
Flash shooting, Auto-flash No indication, Red-eye reduction flash, Fill-in flash, Flash off
 |
UPC - 050332157743
View all Olympus FE 115 manuals
Add to My Manuals
Save this manual to your list of manuals |
Page 32 highlights
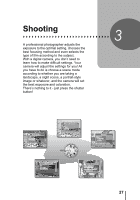
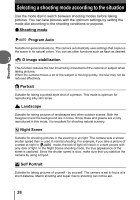
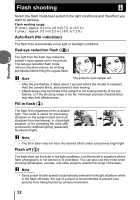
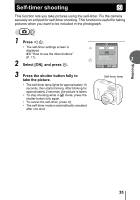
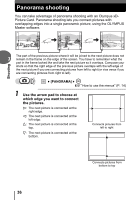
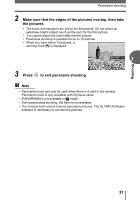
Shooting Flash shooting Select the flash mode best suited to the light conditions and the effect you want to achieve. Flash working range: W (max.): Approx. 0.2 m to 3.8 m (0.7 ft. to 12.5 ft.) T (max.) : Approx. 0.5 m to 2.2 m (1.6 ft. to 7.2 ft.) Auto-flash (No indication) The flash fires automatically in low light or backlight conditions. Red-eye reduction flash (!) 3 The light from the flash may make the subject's eyes appear red in the picture. The red-eye reduction flash mode reduces this phenomenon by emitting pre-flashes before firing the regular flash. Note The subject's eyes appear red. • After the pre-flashes, it takes about 1 second before the shutter is released. Hold the camera firmly, and prevent it from moving. • Effectiveness may be limited if the subject is not looking directly at the preflashes, or if the shooting range is too far. Individual physical characteristics may also limit effectiveness. Fill-in flash (#) The flash fires regardless of the available light. This mode is useful for eliminating shadows on the subject's face (such as shadows from tree leaves), in a backlight situation, or for correcting the color shift produced by artificial lighting (especially fluorescent light). Note • The fill-in flash may not have the desired effect under excessively bright light. Flash off ($) The flash does not fire even in low light conditions. Use this mode in situations where flash photography is not desired or is prohibited. You can also use this mode when shooting landscapes, sunsets, and other subjects outside the range of the flash. Note • Since a slow shutter speed is automatically selected in low light situations when in the flash off mode, the use of a tripod is recommended to prevent your pictures from being blurred by camera movement. 32
-
 1
1 -
2
-
3
-
4
-
5
-
6
-
7
-
8
-
9
-
10
-
11
-
12
-
13
-
14
-
15
-
16
-
17
-
18
-
19
-
20
-
21
-
22
-
23
-
24
-
25
-
26
-
 27
27 -
 28
28 -
 29
29 -
 30
30 -
 31
31 -
 32
32 -
 33
33 -
 34
34 -
 35
35 -
 36
36 -
 37
37 -
38
-
39
-
40
-
41
-
42
-
43
-
44
-
45
-
46
-
47
-
48
-
49
-
50
-
51
-
52
-
53
-
54
-
55
-
56
-
57
-
58
-
59
-
60
-
61
-
62
-
63
-
64
-
65
-
66
-
67
-
68
-
69
-
70
-
71
-
72
-
73
-
74
-
75
-
76
-
77
-
78
-
79
-
80
-
81
-
82
-
83
-
84
-
85
-
86
-
87
-
88
-
89
-
90
-
91
-
92
-
93
-
94
-
95
-
96
-
97
-
98
-
99
-
100
-
101
-
102
-
103
-
104
-
105
-
106
-
107
-
108
-
109
-
110
 |
 |