Onkyo 8555 Instruction Manual
Onkyo 8555 - TX AV Receiver Manual
 |
UPC - 751398008313
View all Onkyo 8555 manuals
Add to My Manuals
Save this manual to your list of manuals |
Onkyo 8555 manual content summary:
- Onkyo 8555 | Instruction Manual - Page 1
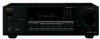
Stereo Receiver TX-8555 Instruction Manual Contents Introduction 2 Connections 13 Enjoying Audio Sources 22 Thank you for purchasing an Onkyo Stereo Receiver. Please read this manual thoroughly before making connections and plugging in the unit. Following the instructions in this manual will - Onkyo 8555 | Instruction Manual - Page 2
triangle is intended to alert the user to the presence of important operating and maintenance (servicing) instructions in the literature accompanying the appliance. Important Safety Instructions 1. Read these instructions. 2. Keep these instructions. 3. Heed all warnings. 4. Follow all - Onkyo 8555 | Instruction Manual - Page 3
sound by your Onkyo dealer. 8. instructions user is encouraged to try to correct the interference by one or more of the following measures: • Reorient or relocate the receiving antenna. • Increase the separation between the equipment and receiver. • Connect NORME NMB-003 DU CANADA. Sur les modèles - Onkyo 8555 | Instruction Manual - Page 4
cord of this unit should be performed only by qualified service personnel. IMPORTANT The wires in the mains lead are coloured in which is coloured blue must be connected to the terminal which is marked with the letter N or that the ONKYO product described in this instruction manual is in - Onkyo 8555 | Instruction Manual - Page 5
Recorder 40 Controlling a CD Player, CD Recorder, or MD Player 41 Controlling an RI Dock 42 Controlling a Cassette Recorder 43 Programming a remote control code for controlling components connected via RI 44 Resetting the Remote Controller 44 Others Troubleshooting 45 Specifications 47 5 - Onkyo 8555 | Instruction Manual - Page 6
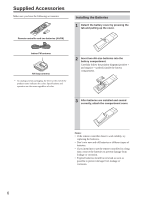
reliably, try replacing the batteries. • Don't mix new and old batteries or different types of batteries. • If you intend not to use the remote controller for a long time, remove the batteries to prevent damage from leakage or corrosion. • Expired batteries should be removed as soon as possible to - Onkyo 8555 | Instruction Manual - Page 7
❑ Banana Plug-Compatible Speaker Posts (North American model) ❑ Compatible with RI Dock for the iPod * XM Ready® is a registered trademark of XM Satellite Radio Inc. ©2008 XM Satellite Radio Inc. All rights reserved. ©2005 SIRIUS Satellite Radio Inc. "SIRIUS", Sirius Connect, the SIRIUS dog logo - Onkyo 8555 | Instruction Manual - Page 8
select satellite radio stations. N MASTER VOLUME control (23) Sets the volume of the receiver. O BALANCE control (25) This control is for adjusting the sound level balance between the left and right channel for speakers and headphones. P TREBLE control (25) This control is for adjusting the level of - Onkyo 8555 | Instruction Manual - Page 9
jack is for connecting a standard pair of stereo headphones for private listening. Rear Panel 1 B 3 4 567 89 J KL M NOP Q R S A REMOTE CONTROL jack This (Remote Interactive) jack can be connected to the jacks on your other Onkyo audio components. The receiver's remote controller can then - Onkyo 8555 | Instruction Manual - Page 10
A cable or satellite receiver can be connected here. There are composite video input jack and analog audio input jacks. P DVD IN These jacks are for connecting a DVD player. There are composite video input jack for connecting the video signal, and stereo (FRONT) jacks for connecting the analog audio - Onkyo 8555 | Instruction Manual - Page 11
Auto or Manual tuning mode for AM and FM radio. G TUNING [ ]/[ ] buttons (28) Used for radio tuning. H SP A/B button (23) Used for speaker A/B setting. [ ]/[ ] buttons (23) Adjusts the volume of the receiver regardless of the currently selected remote controller mode. R MUTING button (24) Mutes or - Onkyo 8555 | Instruction Manual - Page 12
Onkyo cassette recorder connected via can also be controlled in Receiver mode (see page "Controlling a Cassette Recorder" on page 44). Using the Remote Controller Point the remote controller toward the remote control sensor. Remote control sensor About 5 m (16 feet) Notes: • The remote controller - Onkyo 8555 | Instruction Manual - Page 13
model, when the speaker impedance is 4 or 6 ohms, set the speaker impedance setting on the receiver to 6 ohms (see page 15 for details). • When you connect speakers to both SPEAKER A and SPEAKER B terminal posts and output sound from both speaker sets simultaneously, use speakers whose impedance is - Onkyo 8555 | Instruction Manual - Page 14
OUT: SUBWOOFER to the amp's input. Powered subwoofer LINE INPUT LINE INPUT Connecting a Power Amplifier If you want to use a more powerful power amplifier and use the receiver as a preamp, connect it to the PRE OUT jacks, and connect all speakers and the subwoofer to the power amplifier. If you have - Onkyo 8555 | Instruction Manual - Page 15
for speaker impedance is "8 ohms." When you change the speaker impedance setting, read "Speaker Connection Precautions" on page 13 carefully before performing the procedures below. Note: Be sure to minimize the volume level on the receiver 3 before configuring the speaker impedance. RECEIVER Use - Onkyo 8555 | Instruction Manual - Page 16
. (The antenna's wires are not polarity sensitive, so they can be connected either way around.) Make sure that the wires are attached securely and that reception. Keep the antenna as far away as possible from your receiver, TV, speaker cables, and power cords. If you cannot achieve good reception - Onkyo 8555 | Instruction Manual - Page 17
available outdoor FM antenna instead. FM 75 Connecting an Outdoor AM Antenna If good reception cannot both FM and TV reception, as this can cause interference problems. If circumstances demand it, use a TV/FM antenna AM loop antenna should be left connected. Outdoor antenna must be grounded - Onkyo 8555 | Instruction Manual - Page 18
any Connections • Always refer to the instructions that came with the component that you are connecting. • Do not plug in the power cord until all connections have been properly made. • Do not bind audio cables with power cords and speaker cables. Doing so may adversely affect the sound quality - Onkyo 8555 | Instruction Manual - Page 19
analog audio output jacks. Then use an cable to connect the receiver's jack to the RI Dock's jack, as shown. When you change the input display name to "HDD," you can operate the RI Dock using the remote controller supplied with the receiver (see page 22). VIDEO IN L R AUDIO OUT VIDEO OUT TAPE - Onkyo 8555 | Instruction Manual - Page 20
Change When playback is started on an audio component connected via , the receiver will automatically select that component as the input source. Remote Control Operation You can control all components in your system by using the receiver's remote controller. See pages 11-12 for more information. 20 - Onkyo 8555 | Instruction Manual - Page 21
Your Components-Continued With (Remote Interactive), you can control your -compatible Onkyo CD player, RI Dock, and so on with the receiver's remote controller. • To use , you must make an analog audio connection between the receiver and each audio component. Receiver Connecting the Power Cords of - Onkyo 8555 | Instruction Manual - Page 22
remote controller's [ON/STANDBY] button. The receiver will enter Standby mode. To prevent any loud surprises when you next turn on the receiver, always turn down the volume changed. • TAPE button : TAPE→MD→CDR→DOCK • VCR/DVR button : VCR/DVR→DOCK 1 or Press the appropriate input selector button. - Onkyo 8555 | Instruction Manual - Page 23
button on the remote controller. To select the speaker set, press the [SP A/B] button repeatedly. Note for North American model: When you connect a set of speakers whose impedance is 4 or 6 ohms and output sound only from this speaker set, the speaker impedance setting on the receiver should be set - Onkyo 8555 | Instruction Manual - Page 24
remote controller's VOLUME buttons are pressed or the receiver is set to Standby. Using Headphones You can connect a pair of stereo headphones (1/4-inch phone plug) to the receiver's PHONES jack for private listening. Notes: • Always turn down the volume before connecting your headphones. • Sound - Onkyo 8555 | Instruction Manual - Page 25
the relative volume level of the left and right speaker systems or headphones. DIRECT PURE A Setting the DIRECT Function The [DIRECT] button on the remote controller turns the DIRECT function on and off. When the DIRECT function is off, the tone controls can be used to adjust the sound, and the - Onkyo 8555 | Instruction Manual - Page 26
you want to record the input from the TAPE IN jacks, you cannot record the sound on a recording component connected to the VCR/DVR OUT jacks. 1 Prepare the recorder: • Set the recorder so be recorded. Note: The volume, balance, mute and tone controls have no effect on the signal being recorded. 26 - Onkyo 8555 | Instruction Manual - Page 27
, the video source remains the same. In the following example, audio from the CD player connected to the CD IN jacks, and video from the camcorder connected to the DVD IN jack are recorded by the VCR connected to the VCR/DVR OUT jacks. Camcorder video signal audio signal CD player VCR 1 Prepare - Onkyo 8555 | Instruction Manual - Page 28
will receive the broadcast in stereo sound. Manual Tuning To activate this mode, press the [TUNING MODE] button to turn off the "AUTO" indicator. In this mode, you will receive the broadcast in monaural sound. Press the TUNING [ DOWN] or [UP ] button. You can also use the remote controller's TUNING - Onkyo 8555 | Instruction Manual - Page 29
Receiver Press the [DIRECT TUNING] button. Remote controller (Actual display depends on country.) 2 Receiver Remote controller . 2 Receiver While holding stereo FM station, the FM STEREO indicator also appears. TUNED AUTO FM STEREO Tuning into Weak FM Stereo Stations If the signal from a stereo - Onkyo 8555 | Instruction Manual - Page 30
to displaying text information, RDS can also help you find radio stations by type (e.g., news, sport, rock, etc.). The receiver supports four types of RDS information: PS (Program Service) When tuned to an RDS station that's broadcasting PS information, the station's name will be displayed. RT (Radio - Onkyo 8555 | Instruction Manual - Page 31
on the display, no RT information is available. Finding Stations by Type (PTY) TUNING DOWN/UP 4 To start the search, press [ENTER]. The receiver searches until it finds a station of the type you specified, at which point it stops briefly before continuing with the search. 5 When a station - Onkyo 8555 | Instruction Manual - Page 32
Naming Preset Channels While receiving a preset FM or AM station, a maximum of 8 characters a frequency of 89.50 MHz has been stored in preset number 2 and will be given the name "ONKYO." 1 Select the desired preset channel. (Refer to "Selecting Presets" on page 29.) 2 Press the [CHARACTER - Onkyo 8555 | Instruction Manual - Page 33
UP VOLUME ENTER 1 Turn on the power. 4 Use the Up and Down [ ]/[ ] buttons to select "Remote ID: 1" indication. 5 Change the Remote ID to "3" using the Left and Right [ ]/[ ] buttons. 6 Press the SETUP button on the remote controller to complete the setting. 2 Press the [RECEIVER - Onkyo 8555 | Instruction Manual - Page 34
several Onkyo components are used in the same room, their remote ID codes may overlap. To differentiate the receiver from the other components, you can change its remote ID from 1, the default, to 2 or 3. Note: • If you do change the receiver's remote ID, be sure to change the remote controller to - Onkyo 8555 | Instruction Manual - Page 35
input on your Zone 2 amp. • Connect your Zone 2 speakers to the speaker terminals on your Zone 2 amp. Main room Receiver Zone 2 IN R L Receiver/ integrated amp Notes: • The Zone 2 volume must be set on the Zone 2 amp. • If you're using a power amp with no volume control in Zone 2, you must set - Onkyo 8555 | Instruction Manual - Page 36
[SETUP] button. Setup closes. If you have connected your Zone 2 speakers to an amp with no volume control, set the Zone 2 Out setting to Variable so that you can set the zone's volume, balance, and tone on the receiver. 1 Press the [RECEIVER] Remote Mode button, followed by the [SETUP] button - Onkyo 8555 | Instruction Manual - Page 37
volume for Zone 2. Controlling Zone 2 from the receiver ZONE 2 LEVEL/TONE Notes: • Only analog input sources are output by Zone 2. Digital input sources are not output. If no sound is heard when an input source is selected, check to make sure it's connected the remote controller at the receiver and - Onkyo 8555 | Instruction Manual - Page 38
control Zone 2, you must press the remote controller's [ZONE 2] button first. Adjusting the Volume of Zone 2 1 On the remote controller, press the [ZONE 2] Remote Mode Balance of Zone 2 1 On the receiver, press the [ZONE 2] button. 2 Press the receiver's [TONE] button repeatedly to select - Onkyo 8555 | Instruction Manual - Page 39
be output to the IR OUT terminal. IR IN IR OUT Connecting block Receiver IR Emitter IR Receiver Remote controller Other component : Signal flow Making Sensor Connections The IR emitter should be connected to the receiver's IR OUT Terminal, as shown below. Other component : Signal flow Mini - Onkyo 8555 | Instruction Manual - Page 40
has been programmed with the remote control code for your DVD player (HD DVD, Blu-ray, or TV/DVD combination), you can control your player with the following buttons. The [DVD] Remote Mode button is preprogrammed with the remote control code for controlling an Onkyo DVD player. Press the appropriate - Onkyo 8555 | Instruction Manual - Page 41
programmed with the remote control code for your CD player, CD recorder, or MD player, you can control your player with the following buttons. The [CD] Remote Mode button is preprogrammed with the remote control code for controlling an Onkyo CD player. Press the appropriate Remote Mode button first - Onkyo 8555 | Instruction Manual - Page 42
. The [DOCK] Remote Mode button is preprogrammed with the remote control code for controlling an Onkyo RI Dock. When Using an RI Dock: • Connect the RI Dock to the TAPE IN or GAME/TV IN L/R jacks. • Set the RI Dock's RI MODE switch to HDD or HDD/DOCK. • See the RI Dock's instruction manual for more - Onkyo 8555 | Instruction Manual - Page 43
supported by 3rd generation iPod models. Controlling a Cassette Recorder An Onkyo cassette recorder connected via controlled in Receiver mode. can be Press the appropriate Remote button (23) Adjusts the volume of the AV receiver. E Muting button (24) Mutes or unmutes the AV receiver. F Play [ ] - Onkyo 8555 | Instruction Manual - Page 44
RI By default, the [DVD], [CD], and [DOCK] REMOTE MODE buttons have been programmed with the remote control codes for controlling Onkyo products. To control the components connected via RI, follow the steps below to program the appropriate remote control code for the component to be used. 1 Press - Onkyo 8555 | Instruction Manual - Page 45
and press the [ON/STANDBY] button again. If you can not resolve the problem, contact your Onkyo dealer. Audio There's no sound or it's very quiet • Make sure the speaker set A or B is on (page 23). • Make sure that all audio connecting plugs are pushed in all the way (pages 13-21). • Make sure that - Onkyo 8555 | Instruction Manual - Page 46
controller and the receiver's remote control sensor (page 12). • Make sure that the receiver is not subjected to direct sunshine or inverter-type florescent lights. Relocate if necessary (page 12). Can't control other components • If you have connected an -capable Onkyo DS-A1 Remote Interactive Dock - Onkyo 8555 | Instruction Manual - Page 47
) 2 ch × 125 W at 4 ohms, 1 kHz, 1 ch driven Maximum Output Power (JEITA) (Asian) 130 W at 4 ohms, 1 kHz, 2 ch driven Dynamic Power 100 kHz/ +1 dB-3 dB (CD) Tone Control ±10 dB, 100 Hz (BASS) ±10 dB, 10 kHz (TREBLE) Signal to Noise Ratio 100 dB (LINE, IHF-A) 80 dB (PHONO, IHF-A) Speaker - Onkyo 8555 | Instruction Manual - Page 48
Sales & Product Planning Div. : 2-1, Nisshin-cho, Neyagawa-shi, OSAKA 572-8540, JAPAN Tel: 072-831-8023 Fax: 072-831-8163 ONKYO U.S.A. CORPORATION 18 Park Way, Upper Saddle River, N.J. 07458, U.S.A. Tel: 201-785-2600 Fax: 201-785-2650 http://www.us.onkyo.com/ ONKYO EUROPE ELECTRONICS GmbH
-
 1
1 -
 2
2 -
 3
3 -
 4
4 -
 5
5 -
 6
6 -
 7
7 -
8
-
9
-
10
-
11
-
12
-
13
-
14
-
15
-
16
-
17
-
18
-
19
-
20
-
21
-
22
-
23
-
24
-
25
-
26
-
27
-
28
-
29
-
30
-
31
-
32
-
33
-
34
-
35
-
36
-
37
-
38
-
39
-
40
-
41
-
42
-
43
-
44
-
45
-
46
-
47
-
48
 |
 |

E
n
Stereo Receiver
TX-8555
Instruction Manual
Thank you for purchasing an Onkyo Stereo Receiver.
Please read this manual thoroughly before making
connections and plugging in the unit.
Following the instructions in this manual will enable
you to obtain optimum performance and listening
enjoyment from your new Stereo Receiver.
Please retain this manual for future reference.
Contents
Introduction
....................................
2
Connections
.................................
13
Enjoying Audio Sources
..............
22
Others
Troubleshooting
..............................
45
Speci
fi
cations
..................................
47