Onkyo HT-RC440 Owner Manual - Page 49
En-49, IP Address, Subnet Mask, Gateway, DNS Server, Proxy URL, Network Standby, Update Notice
 |
View all Onkyo HT-RC440 manuals
Add to My Manuals
Save this manual to your list of manuals |
Page 49 highlights
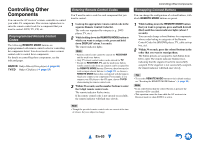
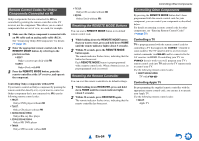
■ DHCP ` Enable ` Disable This setting determines whether or not the AV receiver uses DHCP to automatically configure its IP Address, Subnet Mask, Gateway, and DNS Server settings. Note • If you select "Disable", you must configure the "IP Address", "Subnet Mask", "Gateway", and "DNS Server" settings yourself. ■ IP Address ` Class A: "10.0.0.0" to "10.255.255.255" ` Class B: "172.16.0.0" to "172.31.255.255" ` Class C: "192.168.0.0" to "192.168.255.255" Enter a static IP address provided by your Internet Service Provider (ISP). Most routers use Class C IP addresses. ■ Subnet Mask Enter the subnet mask address provided by your ISP (typically 255.255.255.0). ■ Gateway Enter the gateway address provided by your ISP. ■ DNS Server Enter the DNS server address provided by your ISP. ■ Proxy URL To use a Web proxy, enter its URL here. ■ Proxy Port If you're using a Web proxy, enter a proxy port number here. ■ Network Standby ` On ` Off This setting enables or disables control over the network. When enabled, the NET indicator will be dimly-lit while the AV receiver is in standby mode. Note that the indicator may not light under certain conditions (➔ page 40). Note • When set to "On", the power consumption slightly increases in standby mode. ■ Update Notice ` Enable ` Disable When this setting is enabled, you will be notified if a firmware update via network is available. Note • Selecting "Never Remind me" on the notification window will switch this setting to "Disable" (➔ page 18). • For details on the update notification, see "If the "Update New F/W" window appears." (➔ page 18). En-49 Advanced Operations
-
 1
1 -
2
-
3
-
4
-
5
-
6
-
7
-
8
-
9
-
10
-
11
-
12
-
13
-
14
-
15
-
16
-
17
-
18
-
19
-
20
-
21
-
22
-
23
-
24
-
25
-
26
-
27
-
28
-
29
-
30
-
31
-
32
-
33
-
34
-
35
-
36
-
37
-
38
-
39
-
40
-
41
-
42
-
43
-
 44
44 -
 45
45 -
 46
46 -
 47
47 -
 48
48 -
 49
49 -
 50
50 -
 51
51 -
 52
52 -
 53
53 -
 54
54 -
55
-
56
-
57
-
58
-
59
-
60
-
61
-
62
-
63
-
64
-
65
-
66
-
67
-
68
-
69
-
70
-
71
-
72
-
73
-
74
-
75
-
76
-
77
-
78
-
79
-
80
-
81
-
82
-
83
-
84
-
85
-
86
-
87
-
88
-
89
-
90
-
91
-
92
-
93
-
94
-
95
-
96
-
97
-
98
-
99
-
100
-
101
-
102
-
103
-
104
-
105
-
106
-
107
-
108
-
109
-
110
-
111
-
112
-
113
-
114
-
115
-
116
-
117
-
118
-
119
-
120
 |
 |