Onkyo HT-SR800 Owner Manual - Page 20
Speaker Connection Precautions, Using the Speaker Terminal Tool, Connecting Speaker Set - black
 |
View all Onkyo HT-SR800 manuals
Add to My Manuals
Save this manual to your list of manuals |
Page 20 highlights
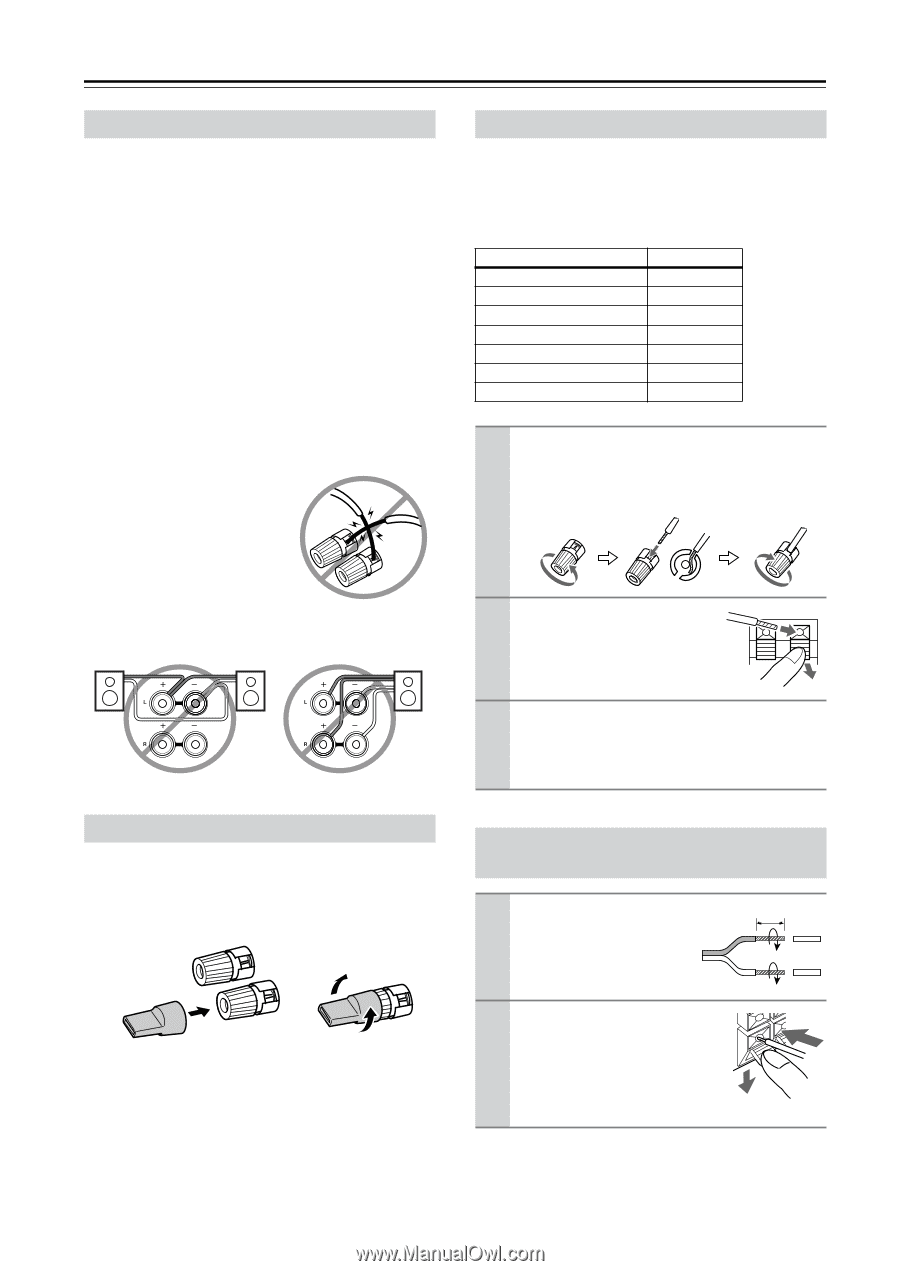
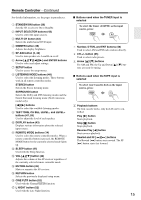
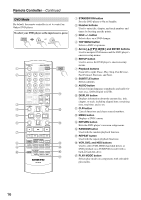
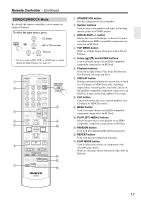
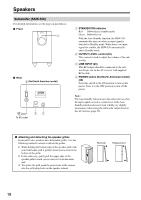
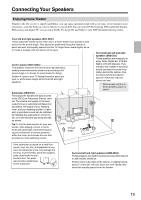
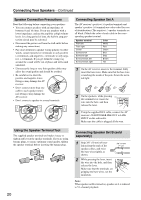
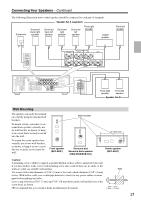
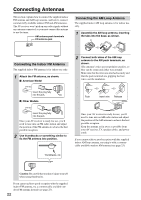
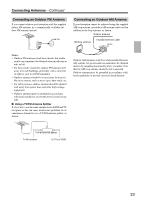
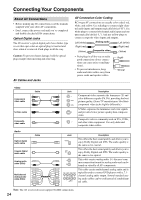
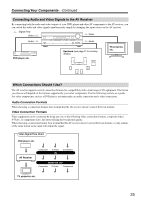
Connecting Your Speakers-Continued Speaker Connection Precautions Read the following before connecting your speakers: • You can connect speakers with an impedance of between 8 and 16 ohms. If you use speakers with a lower impedance, and use the amplifier at high volume levels for a long period of time, the built-in amp protection circuit may be activated. • Disconnect the power cord from the wall outlet before making any connections. • Pay close attention to speaker wiring polarity. In other words, connect positive (+) terminals to only positive (+) terminals, and negative (-) terminals to only negative (-) terminals. If you get them the wrong way around, the sound will be out of phase and will sound unnatural. • Unnecessarily long or very thin speaker cables may affect the sound quality and should be avoided. • Be careful not to short the positive and negative wires. Doing so may damage the AV receiver. • Don't connect more than one cable to each speaker terminal. Doing so may damage the AV receiver. • Don't connect a speaker to several terminals. Connecting Speaker Set A The AV receiver's positive (+) speaker terminals and speaker's positive (+) terminals are color-coded for ease of identification. (The negative (-) speaker terminals are all black.) Match the color of each cable to the corresponding speaker terminal. Speaker terminal Front left Front right Center Surround left Surround right Surround back left Surround back right Color White Red Green Blue Gray Brown Tan 1 On the AV receiver, unscrew the terminal. Fully insert the bare wires. Make sure that the bare wire is touching the inside of the pole. Screw the terminal tight. 2 On the speakers, while pressing the terminal lever, insert the wire into the hole, and then release the lever. 3 Using the supplied RCA cable, connect the AV receiver's SUBWOOFER PRE OUT to LINE INPUT on the subwoofer. Make sure the cable is plugged all the way. Using the Speaker Terminal Tool The supplied speaker terminal tool makes it easy to tighten and loosen the speaker terminals. If you are using banana plugs, to ensure optimum sound quality, tighten the speaker terminal before inserting the banana plug. 20 Connecting Speaker Set B (sold separately) 1 Strip 3/8" (10 mm) of insulation from the ends of the speaker cables, and twist the bare wires tightly, as shown. 2 While pressing the lever, insert the wire into the hole, and then release the lever. Make sure that the terminals are gripping the bare wires, not the insulation. 3/8" (10 mm) Note: When speaker set B is turned on, speaker set A is reduced to 5.1-channel playback.
-
 1
1 -
2
-
3
-
4
-
5
-
6
-
7
-
8
-
9
-
10
-
11
-
12
-
13
-
14
-
 15
15 -
 16
16 -
 17
17 -
 18
18 -
 19
19 -
 20
20 -
 21
21 -
 22
22 -
 23
23 -
 24
24 -
 25
25 -
26
-
27
-
28
-
29
-
30
-
31
-
32
-
33
-
34
-
35
-
36
-
37
-
38
-
39
-
40
-
41
-
42
-
43
-
44
-
45
-
46
-
47
-
48
-
49
-
50
-
51
-
52
-
53
-
54
-
55
-
56
-
57
-
58
-
59
-
60
-
61
-
62
-
63
-
64
-
65
-
66
-
67
-
68
-
69
-
70
-
71
-
72
 |
 |