Pioneer BDP-140 Owner's Manual - Page 44
Setting the IP address, Setting the proxy server, Displaying the network settings, Testing - service manual
 |
View all Pioneer BDP-140 manuals
Add to My Manuals
Save this manual to your list of manuals |
Page 44 highlights
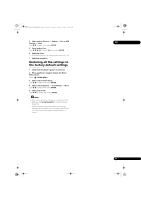
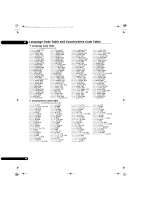
BDP-140_UCXCNSM_IBD_EN.book Page 44 Tuesday, July 19, 2011 10:54 AM 07 Setting the IP address 1 Select and set Network IP setting Next Screen. Use / to select, then press ENTER. 4 Input IP Address or Server Name. Use the number buttons (0 to 9) to input the number if you select IP address in step 3. Use / to move the cursor. Use the number buttons (0 to 9) to input characters if you select Server Name in step 3. 2 Set IP address. Use to set the IP address of the player or DNS server, then press ENTER. The characters that can be input for the server name are listed on the table below. Pressing a button repeatedly cycles through the characters shown. • Auto Set IP Address On - The player's IP address is obtained automatically. Select this when using a broadband router or broadband modem that has a DHCP (Dynamic Host Configuration Protocol) server function. This player's IP address will automatically be allocated from the DHCP server. Off - The player's IP address must be set manually. Use the number buttons (0 to 9) to input the IP address, subnet mask and default gateway. • Auto Set DNS Server Address On - The DNS server's IP address is obtained automatically. • If you want to enter two characters in succession that are both on the same button (for example a P and an R), press after inputting the first character then input the second character. • Use CLEAR to delete the last character. • Use / to move the displayed characters when all the input characters cannot be displayed. Key Characters Key Characters 1 1. - 6 m n o 6 2 a b c 2 7 p q r s 7 3 d e f 3 8 t u v 8 Off - The DNS server's IP address must be set manually. Use the number buttons (0 to 9) to input the DNS server's IP address stipulated by your Internet service provider. Note • When Auto Set IP Address is set to Off, Auto Set DNS Server Address is also set to Off. 4 g h i 4 9 w x y z 9 5 j k l 5 0 0 5 Input Port Number. Press , then use the number buttons (0 to 9) to input the number. 6 Press ENTER to set. • For information on the DHCP server function, refer to the operating instructions for the network device. • You may need to contact your Internet service provider or network administrator when inputting the IP address manually. Displaying the network settings Select and set Network Information Next Screen. Use / to select, then press ENTER. Setting the proxy server Only set the proxy server if so instructed by your Internet service provider. 1 Select and set Network Proxy Server Next Screen. Use / to select, then press ENTER. The MAC address, IP address, subnet mask, default gateway and DNS server (primary and secondary) settings are displayed. When Auto Set IP Address is set to On, the values obtained automatically are displayed. Note 2 Select and set Use or Not use at Proxy Server. Use / to change, then press . • "0.0.0.0" is displayed when each IP address has not been set. • Use - Select this when using a proxy server. • Not use - Select this when not using a proxy server. If you have selected Use, proceed to step 3. 3 Select and set Server Select Method. Use / to change, then press . • IP Address - Input the IP address. • Server Name - Input the server name. Testing the network connection Select and set Network Connection Test Start. Use / to select, then press ENTER. "Network connection test completed successfully." is displayed once the test is completed. If any other message is displayed, check the connections and/or settings (page 22). 44 En
-
 1
1 -
2
-
3
-
4
-
5
-
6
-
7
-
8
-
9
-
10
-
11
-
12
-
13
-
14
-
15
-
16
-
17
-
18
-
19
-
20
-
21
-
22
-
23
-
24
-
25
-
26
-
27
-
28
-
29
-
30
-
31
-
32
-
33
-
34
-
35
-
36
-
37
-
38
-
 39
39 -
 40
40 -
 41
41 -
 42
42 -
 43
43 -
 44
44 -
 45
45 -
 46
46 -
 47
47 -
 48
48 -
 49
49 -
50
-
51
-
52
-
53
-
54
-
55
-
56
-
57
-
58
-
59
-
60
-
61
-
62
-
63
-
64
-
65
-
66
-
67
-
68
-
69
-
70
-
71
-
72
-
73
-
74
-
75
-
76
-
77
-
78
-
79
-
80
-
81
-
82
-
83
-
84
-
85
-
86
-
87
-
88
-
89
-
90
-
91
-
92
-
93
-
94
-
95
-
96
-
97
-
98
-
99
-
100
-
101
-
102
-
103
-
104
-
105
-
106
-
107
-
108
-
109
-
110
-
111
-
112
-
113
-
114
-
115
-
116
-
117
-
118
-
119
-
120
-
121
-
122
-
123
-
124
-
125
-
126
-
127
-
128
-
129
-
130
-
131
-
132
-
133
-
134
-
135
-
136
-
137
-
138
-
139
-
140
-
141
-
142
-
143
-
144
-
145
-
146
-
147
-
148
-
149
-
150
-
151
-
152
-
153
-
154
-
155
-
156
-
157
-
158
-
159
-
160
-
161
-
162
-
163
-
164
-
165
-
166
-
167
-
168
-
169
-
170
-
171
-
172
-
173
-
174
-
175
-
176
-
177
-
178
-
179
-
180
-
181
-
182
-
183
-
184
-
185
-
186
-
187
-
188
-
189
-
190
-
191
-
192
 |
 |