Pioneer BDP-140 Owner's Manual - Page 57
HDMI Audio Out
 |
View all Pioneer BDP-140 manuals
Add to My Manuals
Save this manual to your list of manuals |
Page 57 highlights
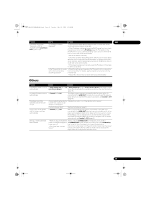
BDP-140_UCXCNSM_IBD_EN.book Page 57 Tuesday, July 19, 2011 10:54 AM Problem • No sound is output. • Sound is not output properly. Check Remedy 08 Is the disc played back in No sound is output during slow motion play and forward and reverse slow motion? scanning. Is the disc played back in fast forward or fast reverse? Are the audio cables properly • Connect the cable properly according to the connected devices connected? (page 16). • Insert the cable firmly and all the way in. Is the audio cable damaged? If the cable is damaged, replace it with a new one. Are the connected Read the operating instructions for the connected components and components (AV receiver or check the volume, input, speaker settings, etc. amplifier, etc.) properly set? Are you trying to listen to the Audio signals are not output from the HDMI OUT terminal when video sound of the HDMI OUT signals are being output from the VIDEO output terminals. When terminal while watching the watching the picture of the VIDEO output terminals, connect an optical picture from the VIDEO digital audio cable or regular audio cables to listen to the sound output terminals? (page 20). Once connections are completed, use Setup Navigator to make the player's settings (page 24). Is HDMI Audio Out properly Set HDMI Audio Out to Auto or PCM. (page 41). set? Is a DVI device connected? The sound will not be output from the HDMI OUT terminal if a DVI device is connected. Connect the device to a DIGITAL OUT terminal or the AUDIO OUT terminals (page 20). For some BDs, audio signals are only output from DIGITAL OUT terminal or the HDMI OUT terminal. Multi-channel sound is not output. Is the audio output of the Read the operating instructions for the connected AV receiver or connected AV receiver or amplifier and check the audio output settings of the AV receiver or amplifier, etc., properly set? amplifier. Is multi-channel sound selected? Use the menu screen or AUDIO to switch the disc's sound to multichannel. Noise can be heard when Is the connected AV receiver If an AV receiver or amplifier that is not compatible with DTS Digital outputting DTS Digital Audio or amplifier compatible with Surround is connected to the DIGITAL OUT terminal, set Digital signals from the DIGITAL DTS Digital Surround? Output to PCM (page 41). OUT terminal. 192 kHz or 96 kHz digital audio signals cannot be output from the DIGITAL OUT terminal. It is not possible to output 192 kHz or 96 kHz digital audio signals from this player's DIGITAL OUT terminal. The signals are automatically converted to 48 kHz or less for output. Secondary audio or interactive audio is not output. Is HDMI Audio Out properly When listening to the sound from an HDMI OUT terminal, set HDMI set? Audio Out to PCM (page 41). Are Digital Output properly When listening to the sound from an DIGITAL OUT terminal, set set? Digital Output to Re-encode or PCM (page 41). Sound is fast or slow. (Only for BDP-440) When an HDMI cable is When a Pioneer AV receiver or amplifier compatible with the PQLS connected, are audio signals function is connected directly to the player's HDMI OUT terminal using being output from devices an HDMI cable, the PQLS function is activated when playing an audio connected with cables other CD (CD-DA). Because of this, the sound output from components other than HDMI cables? than the ones connected by an HDMI cable may be fast or slow. If this happens, set Control to Off (page 41). After a disc is inserted, Are there too many files Loading stays displayed and recorded on the disc? playback does not start. When a disc on which files are recorded is inserted, depending on the number of files recorded on the disc, loading may take several dozen minutes. is displayed in file names, etc. The characters that cannot be displayed on this player are displayed in . A message indicating low memory appears while playing a BD-ROM disc. • Connect a USB memory device (page 21). • Erase the data stored on the connected USB memory device from BUDA Setup (page 45). 57 En
-
 1
1 -
2
-
3
-
4
-
5
-
6
-
7
-
8
-
9
-
10
-
11
-
12
-
13
-
14
-
15
-
16
-
17
-
18
-
19
-
20
-
21
-
22
-
23
-
24
-
25
-
26
-
27
-
28
-
29
-
30
-
31
-
32
-
33
-
34
-
35
-
36
-
37
-
38
-
39
-
40
-
41
-
42
-
43
-
44
-
45
-
46
-
47
-
48
-
49
-
50
-
51
-
 52
52 -
 53
53 -
 54
54 -
 55
55 -
 56
56 -
 57
57 -
 58
58 -
 59
59 -
 60
60 -
 61
61 -
 62
62 -
63
-
64
-
65
-
66
-
67
-
68
-
69
-
70
-
71
-
72
-
73
-
74
-
75
-
76
-
77
-
78
-
79
-
80
-
81
-
82
-
83
-
84
-
85
-
86
-
87
-
88
-
89
-
90
-
91
-
92
-
93
-
94
-
95
-
96
-
97
-
98
-
99
-
100
-
101
-
102
-
103
-
104
-
105
-
106
-
107
-
108
-
109
-
110
-
111
-
112
-
113
-
114
-
115
-
116
-
117
-
118
-
119
-
120
-
121
-
122
-
123
-
124
-
125
-
126
-
127
-
128
-
129
-
130
-
131
-
132
-
133
-
134
-
135
-
136
-
137
-
138
-
139
-
140
-
141
-
142
-
143
-
144
-
145
-
146
-
147
-
148
-
149
-
150
-
151
-
152
-
153
-
154
-
155
-
156
-
157
-
158
-
159
-
160
-
161
-
162
-
163
-
164
-
165
-
166
-
167
-
168
-
169
-
170
-
171
-
172
-
173
-
174
-
175
-
176
-
177
-
178
-
179
-
180
-
181
-
182
-
183
-
184
-
185
-
186
-
187
-
188
-
189
-
190
-
191
-
192
 |
 |