Pioneer DVR-550H-S Operating Instructions - Page 31
time zone.
 |
UPC - 012562852980
View all Pioneer DVR-550H-S manuals
Add to My Manuals
Save this manual to your list of manuals |
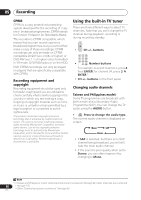
Page 31 highlights
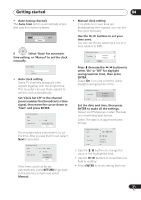
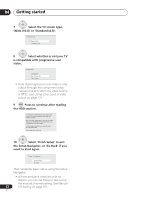
Getting started 04 • Auto-tuning channels The Auto Scan option automatically scans and sets the channel presets. Tuning Cancel 32/68 ENTER 6 Select 'Auto' for automatic time setting, or 'Manual' to set the clock manually. k SCetloticnkg Setting Line System er Save Auto P Manual • Auto clock setting Some TV channels broadcast time signals together with the programme. This recorder can use these signals to set the clock automatically. Set 'Clock Set CH' to the channel preset number that broadcasts a time signal, then move the cursor down to 'Start' and press ENTER. k SAetuttiongClock Setting LinDe aStyestem er Save P Time p NaCvilgoactkoSr et CH AM 2 Start The recorder takes a short while to set the time. After you see that it's set, select Next to proceed. k SAetuttiongClock Setting LinDe aStyestem er Save P Time 1 / 01 / 2007 MON 12 : 00 AM p NaCvilgoactkoSr et CH 2 Start Next If the time could not be set automatically, press RETURN to go back to the previous screen and select Manual. • Manual clock setting If no stations in your area are broadcasting time signals, you can set the clock manually. Use the / buttons to set your time zone. You can set this by selecting a city or a time relative to GMT. k SMetatinnugal Clock Setting 1/2 Line System er SaTvieme Zone P Singapore Singapore p NaDvi.gSa.Ttor Off Press then use the / buttons to select 'On' or 'Off' for daylight saving/summer time, then press ENTER. Select On if you are currently using daylight saving/summer time. k SMetatinnugal Clock Setting 1/2 Line System er SaTvieme Zone P Singapore Singapore p NaDvi.gSa.Ttor On Set the date and time, then press ENTER to make all the settings. Taiwan and Philippines model: The date is in month/day/year format. Other: The date is in day/month/year format. k SMetatinnugal Clock Setting LinDe aStyestem er Save P Time p Navigator Time Zone 2/2 1 / 01 / 2007 MON 12 : 00 AM Singapore Singapore D.S.T On • Use the / buttons to change the value in the highlighted field. • Use the / buttons to move from one field to another. • Press ENTER to finish setting the time. 31 En
-
 1
1 -
2
-
3
-
4
-
5
-
6
-
7
-
8
-
9
-
10
-
11
-
12
-
13
-
14
-
15
-
16
-
17
-
18
-
19
-
20
-
21
-
22
-
23
-
24
-
25
-
 26
26 -
 27
27 -
 28
28 -
 29
29 -
 30
30 -
 31
31 -
 32
32 -
 33
33 -
 34
34 -
 35
35 -
 36
36 -
37
-
38
-
39
-
40
-
41
-
42
-
43
-
44
-
45
-
46
-
47
-
48
-
49
-
50
-
51
-
52
-
53
-
54
-
55
-
56
-
57
-
58
-
59
-
60
-
61
-
62
-
63
-
64
-
65
-
66
-
67
-
68
-
69
-
70
-
71
-
72
-
73
-
74
-
75
-
76
-
77
-
78
-
79
-
80
-
81
-
82
-
83
-
84
-
85
-
86
-
87
-
88
-
89
-
90
-
91
-
92
-
93
-
94
-
95
-
96
-
97
-
98
-
99
-
100
-
101
-
102
-
103
-
104
-
105
-
106
-
107
-
108
-
109
-
110
-
111
-
112
-
113
-
114
-
115
-
116
-
117
-
118
-
119
-
120
-
121
-
122
-
123
-
124
-
125
-
126
-
127
-
128
-
129
-
130
-
131
-
132
-
133
-
134
-
135
-
136
-
137
 |
 |
