Pioneer DVR-550H-S Operating Instructions - Page 42
Press ENTER.
 |
UPC - 012562852980
View all Pioneer DVR-550H-S manuals
Add to My Manuals
Save this manual to your list of manuals |
Page 42 highlights
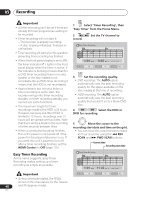
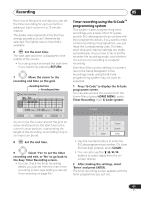
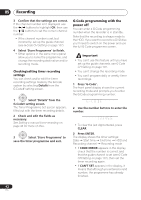
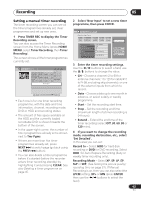
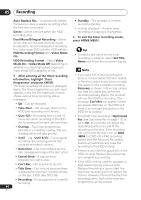
05 Recording 3 Confirm that the settings are correct. If the channel number isn't displayed, use the / buttons to highlight CH, then use the / buttons to set the correct channel number. • If the channel number is set, but incorrectly, set up the guide channel (see G-Code CH Setting on page 107). 4 Select 'Store Programme' to finish. • Other options in the same menu panel allow you to name the programme, and change the recording destination and/or recording mode. Checking/editing timer recording settings You can check and/or edit the timer recording settings made by the G-Code system by selecting Details from the G-Code# setting screen. ENTER 1 Select 'Details' from the G-Code# setting screen. The Timer Programme Set screen appears, filled out with the timer recording details. 2 Check and edit the fields as necessary. See Setting a manual timer recording on page 43 for more on this. ENTER 3 Select 'Store Programme' to save the timer programme and exit. G-Code programming with the power off You can enter a G-Code programming number when the recorder is in standby. Note that the recording is always made to the HDD. If you want to record to a DVD disc, you'll need to switch on the power and use the full G-Code programme screen. Important • You can't use this feature until you have set up the guide channels. see G-Code CH Setting on page 107. • You can't change the recording mode. • You can't program daily or weekly timer recordings. 1 Press 'G-Code'. The front panel display shows the current recording mode and prompts you to enter the G-Code programming number. 2 Use the number buttons to enter the number. • To clear the last digit entered, press CLEAR. 3 Press ENTER. The display shows the timer settings: Date Start time End time HDD and Recording channel Recording mode • If CODE ERROR appears in the display, check that the number is correct and that the guide channel is set (see G-Code CH Setting on page 107), then set the timer recording again. • If CAN'T SET appears in the display, it means that although you entered a valid number, the programme has already finished. 42 En
-
 1
1 -
2
-
3
-
4
-
5
-
6
-
7
-
8
-
9
-
10
-
11
-
12
-
13
-
14
-
15
-
16
-
17
-
18
-
19
-
20
-
21
-
22
-
23
-
24
-
25
-
26
-
27
-
28
-
29
-
30
-
31
-
32
-
33
-
34
-
35
-
36
-
 37
37 -
 38
38 -
 39
39 -
 40
40 -
 41
41 -
 42
42 -
 43
43 -
 44
44 -
 45
45 -
 46
46 -
 47
47 -
48
-
49
-
50
-
51
-
52
-
53
-
54
-
55
-
56
-
57
-
58
-
59
-
60
-
61
-
62
-
63
-
64
-
65
-
66
-
67
-
68
-
69
-
70
-
71
-
72
-
73
-
74
-
75
-
76
-
77
-
78
-
79
-
80
-
81
-
82
-
83
-
84
-
85
-
86
-
87
-
88
-
89
-
90
-
91
-
92
-
93
-
94
-
95
-
96
-
97
-
98
-
99
-
100
-
101
-
102
-
103
-
104
-
105
-
106
-
107
-
108
-
109
-
110
-
111
-
112
-
113
-
114
-
115
-
116
-
117
-
118
-
119
-
120
-
121
-
122
-
123
-
124
-
125
-
126
-
127
-
128
-
129
-
130
-
131
-
132
-
133
-
134
-
135
-
136
-
137
 |
 |