RCA 36F530T User Guide & Warranty - Page 11
Complete Auto Channel Search, The GUIDE Plus+ System Setup
 |
UPC - 034909312421
View all RCA 36F530T manuals
Add to My Manuals
Save this manual to your list of manuals |
Page 11 highlights
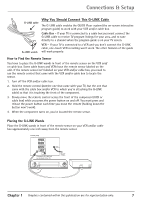
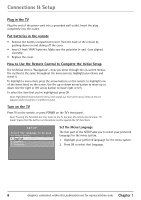
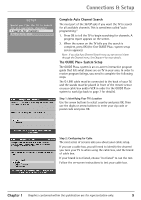
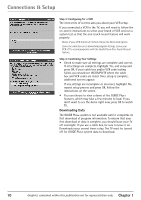
Connections & Setup SETUP Would you like the TV to search for all available channels? 1 Search for channels 2 Skip this step Complete Auto Channel Search The next part of the SETUP asks if you want the TV to search for all available channels. This is sometimes called "auto programming." 1. Press OK to tell the TV to begin searching for channels. A progress report appears on the screen. 2. When the screen on the TV tells you the search is complete, press OK (the first GUIDE Plus+ system setup screen appears). Note: If you skip Auto Channel Search now, you can access it later through the Channel menu. See Chapter 4 for more details. The GUIDE Plus+ System Setup The GUIDE Plus+ system is an on-screen interactive program guide that lists what shows are on TV in your area. In order to receive program listings, you need to complete the following steps. The G-LINK cable must be connected to the back of your TV, and the wands must be placed in front of the remote sensor on your cable box and/or VCR in order for the GUIDE Plus+ system to work (go back to page 7 for details). Step 1: Identifying Your TV's Location Use the arrow buttons to select country and press OK. Then use the digits or arrow buttons to enter your zip code or postal code and press OK. Step 2: Configuring for Cable The next series of screens asks you about your cable setup. If you use a cable box, you will need to identify the channel you tune your TV to when using the cable box, and the brand of cable box. If your brand is not listed, choose "not listed" to run the test. Follow the on-screen instructions to test your cable box. Chapter 1 Graphics contained within this publication are for representation only. 9
-
 1
1 -
2
-
3
-
4
-
5
-
 6
6 -
 7
7 -
 8
8 -
 9
9 -
 10
10 -
 11
11 -
 12
12 -
 13
13 -
 14
14 -
 15
15 -
 16
16 -
17
-
18
-
19
-
20
-
21
-
22
-
23
-
24
-
25
-
26
-
27
-
28
-
29
-
30
-
31
-
32
-
33
-
34
-
35
-
36
-
37
-
38
-
39
-
40
-
41
-
42
-
43
-
44
-
45
-
46
-
47
-
48
-
49
-
50
-
51
-
52
-
53
-
54
-
55
-
56
-
57
-
58
-
59
-
60
-
61
-
62
-
63
-
64
-
65
-
66
-
67
-
68
-
69
-
70
-
71
-
72
-
73
-
74
-
75
-
76
-
77
-
78
-
79
-
80
-
81
-
82
-
83
-
84
-
85
-
86
-
87
-
88
-
89
-
90
-
91
-
92
-
93
-
94
-
95
-
96
 |
 |
