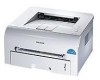
Samsung ML-1740 User Manual (ENGLISH) - Page 90
Cleaning the Printer - specs
 |
View all Samsung ML-1740 manuals
Add to My Manuals
Save this manual to your list of manuals |
Page 90 highlights
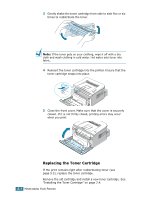
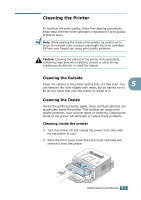
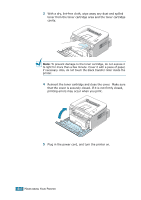
Cleaning the Printer To maintain the print quality, follow the cleaning procedures below each time the toner cartridge is replaced or if print quality problems occur. Note: While cleaning the inside of the printer, be careful not to touch the transfer roller (located underneath the toner cartridge). Oil from your fingers can cause print quality problems. Caution: Cleaning the cabinet of the printer with surfactants containing large amounts of alcohol, solvent or other strong substances can discolor or crack the cabinet. Cleaning the Outside Clean the cabinet of the printer with a soft, lint-free cloth. You 5 can dampen the cloth slightly with water, but be careful not to be let any water drip onto the printer or inside of it. Cleaning the Inside During the printing process, paper, toner, and dust particles can accumulate inside the printer. This buildup can cause print quality problems, such as toner specs or smearing. Cleaning the inside of the printer will eliminate or reduce these problems. Cleaning inside the printer 1 Turn the printer off and unplug the power cord, then wait for the printer to cool. 2 Open the front cover. Push down the toner cartridge and remove it from the printer. MAINTAINING YOUR PRINTER 5.5
-
 1
1 -
2
-
3
-
4
-
5
-
6
-
7
-
8
-
9
-
10
-
11
-
12
-
13
-
14
-
15
-
16
-
17
-
18
-
19
-
20
-
21
-
22
-
23
-
24
-
25
-
26
-
27
-
28
-
29
-
30
-
31
-
32
-
33
-
34
-
35
-
36
-
37
-
38
-
39
-
40
-
41
-
42
-
43
-
44
-
45
-
46
-
47
-
48
-
49
-
50
-
51
-
52
-
53
-
54
-
55
-
56
-
57
-
58
-
59
-
60
-
61
-
62
-
63
-
64
-
65
-
66
-
67
-
68
-
69
-
70
-
71
-
72
-
73
-
74
-
75
-
76
-
77
-
78
-
79
-
80
-
81
-
82
-
83
-
84
-
 85
85 -
 86
86 -
 87
87 -
 88
88 -
 89
89 -
 90
90 -
 91
91 -
 92
92 -
 93
93 -
 94
94 -
 95
95 -
96
-
97
-
98
-
99
-
100
-
101
-
102
-
103
-
104
-
105
-
106
-
107
-
108
-
109
-
110
-
111
-
112
-
113
-
114
-
115
-
116
-
117
-
118
-
119
-
120
-
121
-
122
-
123
-
124
-
125
-
126
-
127
-
128
-
129
-
130
-
131
-
132
-
133
-
134
-
135
-
136
-
137
-
138
-
139
-
140
-
141
-
142
-
143
-
144
-
145
-
146
-
147
-
148
-
149
-
150
 |
 |
