Samsung NC190-1 User Manual - Page 14
B. Wall Mount Kit - specifications
 |
View all Samsung NC190-1 manuals
Add to My Manuals
Save this manual to your list of manuals |
Page 14 highlights
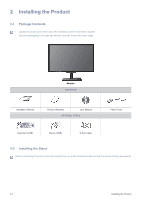
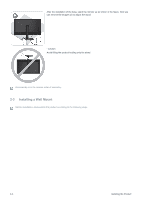
Lift up the monitor stand to the maximum angle with your left hand, and remove the back decoration cover with your right hand, as shown in the figure. Remove the two screws(A). Remove the stand arm in the direction shown in the figure. This product provides a wall mount of 100 mm x 100 mm(200 mm x 100 mm) that complies with the VESA specifications. 100 mm x 100 mm 200 mm x 100 mm A. Wall Mount Base B. Wall Mount Kit (Optional) 1. Turn the product off and unplug the power cord from the wall outlet. 2. Place a soft cloth or cushion on a flat surface to protect the panel and place the product face down. 3. Separate the stand. 4. Align the groove of the Monitor's wall mount base with the groove in the wall mount ki and firmly fix the wall mount kit by fastening the screws. Installing the Product 2-3
-
 1
1 -
2
-
3
-
4
-
5
-
6
-
7
-
8
-
 9
9 -
 10
10 -
 11
11 -
 12
12 -
 13
13 -
 14
14 -
 15
15 -
 16
16 -
 17
17 -
 18
18 -
 19
19 -
20
-
21
-
22
-
23
-
24
-
25
-
26
-
27
-
28
-
29
-
30
-
31
-
32
-
33
-
34
-
35
-
36
-
37
-
38
-
39
-
40
-
41
-
42
-
43
-
44
-
45
-
46
-
47
-
48
-
49
-
50
-
51
-
52
-
53
-
54
-
55
-
56
-
57
-
58
-
59
-
60
-
61
-
62
-
63
-
64
-
65
 |
 |
