Samsung PPM42M7HB Owners Instructions
Samsung PPM42M7HB - 42" Plasma Panel Manual
 |
UPC - 729507801841
View all Samsung PPM42M7HB manuals
Add to My Manuals
Save this manual to your list of manuals |
Samsung PPM42M7HB manual content summary:
- Samsung PPM42M7HB | Owners Instructions - Page 1
PDP Display (PLASMA DISPLAY PANEL) PPM42M7H PPM50M7H Owner's Instructions Before operating the unit, please read this manual thoroughly, and retain it for future reference. Intended for Commercial Use and Operation ON-SCREEN MENUS Picture In Picture (PIP) VIDEO WALL MDC (Multiple Display Control - Samsung PPM42M7HB | Owners Instructions - Page 2
User Instructions ◆ Screen Image retention Do not display a still image (such as on a video game or when hooking up a PC to this PDP Display) on the plasma PDP Display the vent hole in the upper part of the product. This is an authorized service center, when installing your PDP Display in a location - Samsung PPM42M7HB | Owners Instructions - Page 3
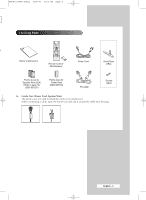
BN68-01304A-01Eng 6/28/07 3:50 PM Page 3 Checking Parts a Owner's Instructions Remote Control/ AAA Batteries Power Cord Stand-Base (2EA) Ferrite Cores for Ferrite Core for Screws Speaker Wire (2EA) Power Cord (4EA) (Refer to page 14) (3301-001110) h (3301-001201) PC Cable ➢ Ferrite - Samsung PPM42M7HB | Owners Instructions - Page 4
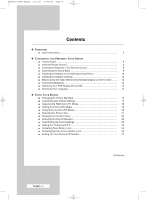
PM Page 4 Contents ◆ FOREWORD ■ User Instructions 2 ◆ CONNECTING AND PREPARING YOUR DISPLAY ■ Control Panel 6 ■ Infrared Remote Control 8 ■ Inserting the Batteries in the Remote Control 9 ■ Assembling the Stand-Base 9 ■ Installing the Display on the Wall Attachment Panel 10 - Samsung PPM42M7HB | Owners Instructions - Page 5
41 ■ Connecting to the PC Input 42 ■ Setting up Your PC Software (Windows only 43 ■ Input Mode (PC/DVI 44 ■ Power Saver (PC1 mode only 45 ◆ RECOMMENDATIONS FOR USE ■ Troubleshooting: Before Contacting Service Personnel 46 ■ Technical Specifications 47 Symbols ☛ ➢ Press Important Note - Samsung PPM42M7HB | Owners Instructions - Page 6
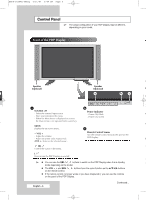
configuration of your PDP Display may be different, depending on your model. Front of the PDP Display Speaker (Optional) c Speaker (Optional) a turn the PDP Display on and off. ➢ ➢ ◆ You can use the SEL , buttons to switch on the PDP Display when it is in standby ➢ mode depending on the model - Samsung PPM42M7HB | Owners Instructions - Page 7
details about connection, refer to pages 39~42. ➢ Whenever you connect an audio or video system to your PDP Display, ensure that all elements are switched off. Refer to the documentation supplied with your equipment for detailed connection instructions and associated safety precautions. English - 7 - Samsung PPM42M7HB | Owners Instructions - Page 8
TO THE REQUIRED MENU OPTION/ ADJUST AN OPTION VALUE RESPECTIVELY PICTURE EFFECT SELECTION AUTO ADJUSTMENT IN PC MODE PIP FUNCTIONS: - PIP ACTIVATION OR DEACTIVATION (PIP) - SOURCE SELECTION (SOURCE) PDP DISPLAY OFF PICTURE STILL NEXT CHANNEL EXTERNAL INPUT SELECTION PREVIOUS CHANNEL INFORMATION - Samsung PPM42M7HB | Owners Instructions - Page 9
mix battery types, i.e. alkaline and manganese. Assembling the Stand-Base 1 Assemble the PDP Display with the stand and firmly secure the PDP Display using 4 screws provided. ➢ Two or more people should carry the PDP Display. Never lay the PDP Display on the floor because of possible damage to the - Samsung PPM42M7HB | Owners Instructions - Page 10
Display on the Wall Attachment Panel ➢ Refer to the correct installation guide according to your wall bracket. Installation Notes ◆ Contact a technician for installing the wall bracket. ◆ ◆ Samsung done, mount the wall bracket on the wall. Captive Screw 2 Before drilling into the wall, check - Samsung PPM42M7HB | Owners Instructions - Page 11
into the plastic hanger. (See the figure below) ☛ ◆ Mount the product on the wall bracket and make sure it is properly fixed to the left and Display Wall Bracket Angle Adjustment ➢ Adjust the bracket angle to -2o before installing it on the wall. Wall Bracket Wall 1 Fix the product to the wall - Samsung PPM42M7HB | Owners Instructions - Page 12
Display Vertically ❋ Samsung shall not be liable for damages caused by installing the product at the different direction from the figure below. ➢ You can install the PDP Display 2x2 Video Wall function Rear of the PDP Display Example for 2x2 Video Wall connections Rear of the PDP Display ② ① - Samsung PPM42M7HB | Owners Instructions - Page 13
on the rear of the PDP Display. PPM50M7H PPM42M7H PPM50M7H 3 Tighten the PDP Display and the speaker bracket using the screws removed from the PDP Display. PPM42M7H PPM50M7H ➢ When moving your PDP Display, do NOT hold the speaker connected to your PDP Display. It may damage the bracket clamping - Samsung PPM42M7HB | Owners Instructions - Page 14
"-" ends of the cable with the diagram on the PDP Display. ➢ ◆ The speakers MUST have a power handling capability of 10 watts minimum (impedance 8Ω). ◆ When you connect the speaker wire to the external speaker out connector, first bind the speaker wire round the ferrite core to secure it. Ferrite - Samsung PPM42M7HB | Owners Instructions - Page 15
again (or the OFF ( ) button on the remote control). Front of the PDP Display Choosing Your Language When you start using your PDP Display for the first time, you must select the language which will be used for displaying menus and indications. 1 Press the MENU ( ) button. Result: The main menu is - Samsung PPM42M7HB | Owners Instructions - Page 16
Picture You can select the type of picture which best corresponds to your Y viewing requirements. co Mode : Dynamic Color Control Size : 16:9 PIP 1 Press the MENU ( ) button. Result: The main menu is displayed. 2 Press the ... or † button to select Picture. Result: The Picture menu is - Samsung PPM42M7HB | Owners Instructions - Page 17
displayed. 3 Press the ENTER ( ) button. Result: The Mode is selected. 4 Press the ENTER ( ) button again. Result: The Mode menu is displayed EXIT button to exit. Picture Mode : Dynamic Color Control Size : 16:9 PIP Move Enter Return Mode Mode Contrast Brightness Sharpness Color Tint G - Samsung PPM42M7HB | Owners Instructions - Page 18
by pressing the SOURCE button. Picture Mode : Dynamic Color Control Size : 16:9 PIP Move Enter Return Color Control Red 50 Green 50 Blue 50 Move Enter Return Red 50 1 Press the MENU ( ) button. Result: The main menu is displayed. 2 Press the ... or † button to select Picture - Samsung PPM42M7HB | Owners Instructions - Page 19
setting. ➢ Press the ... or † button to select other option(s). 7 Press the ENTER ( ) button. 8 Press the MENU ( ) button. Result: The PC menu is displayed again. 9 Press the ... or † button to select Position. Press the ENTER ( ) button. 10 Adjust the position by pressing the or √ button. 11 - Samsung PPM42M7HB | Owners Instructions - Page 20
BN68-01304A-00Eng 5/31/07 3:51 PM Page 20 Using Zoom function (PC Mode) ➢ Preset to the PC mode by pressing the SOURCE button. a Y 1 Press the MENU ( ) button. re Setup Result: The main menu is displayed. Time Language PC : English 2 Press the ... or † button to select Setup. Result: The - Samsung PPM42M7HB | Owners Instructions - Page 21
requirements. 1 Press the MENU ( ) button. Result: The main menu is displayed. Picture Mode : Dynamic Color Control Size : 16:9 PIP 2 Press the ... or † button to select Picture. Result: The Picture menu is displayed. 3 Press the ENTER ( ) button. Move Enter Return 4 Press the ... or - Samsung PPM42M7HB | Owners Instructions - Page 22
return to normal viewing, press th it again. ➢ In PIP mode, Still function will be applied to the main and sub picture at the main menu is displayed. 2 Press the ▲ or ▼ button to select Sound. Result: The Sound menu is displayed. 3 Press the ENTER ( ) button. Result: The Mode is selected. 4 - Samsung PPM42M7HB | Owners Instructions - Page 23
Equalizer. Press the ENTER ( ) button. Result: The Equalizer menu is displayed. 5 Select the required option (balance or equalizer) by pressing the œ or settings, the sound standard is automatically switched to Custom. Sound Mode Equalizer SRS TS XT : Custom : Off Move Enter Return Equalizer - Samsung PPM42M7HB | Owners Instructions - Page 24
solves the T problem of playing 5.1 multichannel content over two speakers. th Sound TruSurround delivers a compelling, virtual surround sound h Mode : Custom experience through any two-speaker playback system, including co Equalizer SRS TS XT : Off internal PDP Display speakers. It is - Samsung PPM42M7HB | Owners Instructions - Page 25
users. 1 Press the MENU ( ) button. Result: The main menu is displayed. 2 Press the ▲ or ▼ button to select Function. Result: The Function menu is displayed to exit. Function Screen Burn Protection Safety Lock Multi Control Video Wall Fan : Off Move Enter Return Safety Lock Key Lock IR - Samsung PPM42M7HB | Owners Instructions - Page 26
Button Lock Function Screen Burn Protection Safety Lock Multi Control Video Wall Fan : Off This feature allows you to lock the remote be a operated via the PDP Display Panel buttons. Id 1 Press the MENU ( ) button. Result: The main menu is displayed. Move Enter Return 2 Press the - Samsung PPM42M7HB | Owners Instructions - Page 27
enter your current 4-digit pin number. ➢ The default pin number for a new PDP Display set is "0000". d. 7 Press the numeric buttons to enter your new 4-digit 8, 6. Function Screen Burn Protection Safety Lock Multi Control Video Wall Fan : Off Move Enter Return Safety Lock Key Lock IR - Samsung PPM42M7HB | Owners Instructions - Page 28
program guide. 0 .. 9: Enter ID Input Number ➢ You can select these options by simply pressing the MDC (Multiple Display Control) button on the remote control. ➢ Refer to the following Web site for information about MDC programs and protocol documents: http://www.samsung.com/support/productsupport - Samsung PPM42M7HB | Owners Instructions - Page 29
Press the ENTER ( ) button. Result: The Screen Burn Protection menu is displayed with the Pixel Shift selected. 5 Press the ENTER ( ) button again. exit. Function Screen Burn Protection Safety Lock Multi Control Video Wall Fan : Off Move Enter Return Screen Burn Protection Pixel Shift - Samsung PPM42M7HB | Owners Instructions - Page 30
main menu is displayed. Video Wall Fan : Off 2 Press the ... or † button to select Function. Result: The Function menu is displayed. Move Enter PDP Display. Using the bar mode function when you watch PDP Display can cause poor picture quality with the vertical white bar appeared on some parts - Samsung PPM42M7HB | Owners Instructions - Page 31
to select Timer. Press the ENTER ( ) button. Result: The Timer menu is displayed. 6 Press the ENTER ( ) button again. 7 Select On by pressing the ... the ... or † button. . Result: The following options are available. ◆ Mode ◆ Period ◆ Time : All White, Signal Pattern, Inverse, Bar, Bar & - Samsung PPM42M7HB | Owners Instructions - Page 32
1x5 Move Enter Return 11 Press the œ or √ button to select the position of the screens. 12 Press the EXIT button to exit. ➢ ◆ The PIP function and Picture Size do not work during the Video Wall operation. ◆ The VESA Format input does not support the Video Wall function in DVI mode. English - 32 - Samsung PPM42M7HB | Owners Instructions - Page 33
the "INFO" button on the remote control. AV Picture Sound SRS TS XT -- : -- : Dynamic : Custom : Off Setting and Displaying the Current Time You can set the PDP Display's clock so that the current time is displayed by pressing the "INFO" button. You must also set the time if you wish to use the - Samsung PPM42M7HB | Owners Instructions - Page 34
Hour 12 Minute 00 Source Component Volume Activation 10 Yes Move Adjust Return You can set the on or off timers so that the PDP Display will: ◆ Switch on automatically and tune source of your choice at the time you select. ◆ Switch off automatically at the time you select. ➢ The first - Samsung PPM42M7HB | Owners Instructions - Page 35
will eventually turn off, if no controls are operated for 3 hours after the PDP Display was turned on by timer. This function is only available in timer "On" mode and prevents overheating, which may occur if a PDP Display is on for too long. Time Language PC Setup : English Move Enter Return - Samsung PPM42M7HB | Owners Instructions - Page 36
Wall Fan : Off Fans inside the PDP Display are used to lower the temperature of the Y tops and the front of the PDP Display exit. ➢ ◆ If your PDP Display is displayed vertically, the fan automatically works. ◆ The message Check Fan is displayed if there is a fan problem. ◆ Please use the fan - Samsung PPM42M7HB | Owners Instructions - Page 37
/07 3:52 PM Page 37 Viewing the Picture in Picture (PIP) e You can display a sub picture within the main picture of external A/V n, devices. In this way you can PDP Display the video input from any connected devices while monitoring other video inputs. 1 Press the MENU ( ) button. Result: The - Samsung PPM42M7HB | Owners Instructions - Page 38
◆ You can also set these options simply by pressing the SOURCE button on the remote control. 6 Repeat steps 1 to 3. Result: The Input menu is displayed again. 7 Press the ... or † button to select Edit Name. Press the ENTER ( ) button. 8 Press the ... or † button to select external source to be - Samsung PPM42M7HB | Owners Instructions - Page 39
the AV OUT only when the signal source is AV. ☛ Whenever you connect an audio or video system to your PDP Display, ensure that all elements are switched off. Refer to the documentation supplied with your equipment for detailed connection instructions and associated safety precautions. English - 39 - Samsung PPM42M7HB | Owners Instructions - Page 40
Input The S-VIDEO and RCA (AUDIO-L/R) connectors are used for equipment with an S-Video output, such as a camcorder or VCR. Rear of the PDP Display Camcorder ① and VCR ① To play picture and sound, both the S-VIDEO and RCA connectors must be used. Connecting to the Component Input Rear of - Samsung PPM42M7HB | Owners Instructions - Page 41
BN68-01304A-00Eng 5/31/07 3:52 PM Page 41 Connecting to the DVD/DTV Receiver Input Rear of the PDP Display Y / PB / PR L / R The "COMPONENT IN" (or "Y/PB/PR" (video) and "AUDIO") connectors are used for equipment with a DVD/ DTV Receiver output. (480i, 576i, 480p, 576p, - Samsung PPM42M7HB | Owners Instructions - Page 42
BN68-01304A-00Eng 5/31/07 3:52 PM Page 42 Connecting to the PC Input The "PC 1" (or "PC IN2 (BNC)") and "AUDIO" connectors are used for interfacing with your PC. Rear of the PDP Display Personal Computer or Only when watching PDP Display in PC1 mode, you can use the RGB OUT port to connect - Samsung PPM42M7HB | Owners Instructions - Page 43
PC, and connect it to your PDP Display. ("Connecting to the PC Input" on page 42) ➢ ◆ The actual screens on your PC may look 4 different, depending on your particular version of Windows and the type of your PC. ◆ When you use your PDP Display as a PC monitor, it supports Colours up to 32 bits - Samsung PPM42M7HB | Owners Instructions - Page 44
) Both screen position and size will vary depending on the type of PC monitor and its resolution. T The table below shows all of the display modes that are supported: m n Resolution Vertical frequency (Hz) Horizontal frequency (kHz) PPM42M7H PPM50M7H u VGA 640 x 350 70 31.5 ✔ ✔ 85 - Samsung PPM42M7HB | Owners Instructions - Page 45
has a built-in power management system called Power Saver. This power management system saves energy by switching your PDP Display into a low-power mode when it has not been used for a certain amount of time. You use a software utility installed on your computer to set up this feature. See - Samsung PPM42M7HB | Owners Instructions - Page 46
Troubleshooting: Before Contacting Service Personnel Before contacting Samsung after-sales service, perform the following simple checks. D If you cannot solve the problem using the instructions below, note the model and serial number of the ( PDP Display control (transmission window). ◆ Check - Samsung PPM42M7HB | Owners Instructions - Page 47
-00Eng 5/31/07 3:52 PM Page 47 Technical Specifications Dimensions (W x D x H) Weight (Without stand) Screen aspect ratio Screen size Native pixel resolution (H x V) Color systems Sound Audio output power Video inputs PDP Display outputs Audio inputs Audio outputs External control PPM42M7H - 1027 - Samsung PPM42M7HB | Owners Instructions - Page 48
BN68-01304A-00Eng 5/31/07 3:52 PM Page 48 This page is intentionally left blank. - Samsung PPM42M7HB | Owners Instructions - Page 49
BN68-01304A-00Eng 5/31/07 3:52 PM Page 49 This page is intentionally left blank. - Samsung PPM42M7HB | Owners Instructions - Page 50
BN68-01304A-00Eng 5/31/07 3:52 PM Page 50 - Samsung PPM42M7HB | Owners Instructions - Page 51
1 Écran à plasma professionnel PPM42M7H PPM50M7H Guide de l'utilisateur Lisez attentivement le contenu de ce guide avant de faire fonctionner la brûlure d'écran SRS TruSurroundXT Enregistrez vos produits Samsung en vous connectant sur : www.samsung.com/global/register Inscrivez ici le modèle et le - Samsung PPM42M7HB | Owners Instructions - Page 52
de l'utilisateur ◆ Image rémanente Ne pas afficher une image fixe (par exemple, avec un jeu vidéo ou si un PC est connecté à l'écran à plasma) sur l'écran à plasma pendant plus de deux heures car cela pourrait causer une rémanence. Ce phénomène est aussi appelé "brûlure d'écran" Pour éliminer une - Samsung PPM42M7HB | Owners Instructions - Page 53
BN68-01304A-01CF 6/28/07 4:02 PM Page 3 Vérification des pièces Guide de l'utilisateur Télécommande et piles AAA Cordon d'alimentation Support (2EA) t Tores magnétiques pour fils Tore de ferrite pour le d'enceinte (2EA) câble d'alimentation (Reportez-vous à la page 14) (3301-001201) ( - Samsung PPM42M7HB | Owners Instructions - Page 54
Branchement de haut-parleurs 13 ■ Mise sous/hors tension de votre écran à plasma 15 ■ Choix de la langue 15 ◆ UTILISATION DE VOTRE ÉCRAN ■ image 17 ■ Réglage des couleurs RVB (en mode PC 18 ■ Réglage de l'image (en mode PC 18 ■ Utilisation du zoom (en mode PC 20 ■ Sélection du format de l' - Samsung PPM42M7HB | Owners Instructions - Page 55
l'heure actuelle 33 ■ Mise sous/hors tension automatique de l'écran à plasma 34 ■ Sélection du ventilateur 36 ■ Utilisation de la fonction image prise d'entrée PC 42 ■ Configuration du logiciel pour PC (Windows seulement 43 ■ Mode Entrée (PC/DVI 44 ■ Économie d'énergie (mode PC1 uniquement 45 - Samsung PPM42M7HB | Owners Instructions - Page 56
sous tension et hors tension. ➢ ➢ ◆ Sur certains modèles, les touches SEL , permettent également d'allumer l'écran à plasma lorsqu'il est en mode de veille. ➢ ◆ Les touches VOL -, + et SEL , du panneau de commande ont les mêmes fonctions que les touches de la télécommande. ◆ Utilisez les - Samsung PPM42M7HB | Owners Instructions - Page 57
HV d'un PC. ➢ Le terme "Mode PC" que nous employons dans le présent guide correspond au mode PC1/PC2 utilisant les sources d'entrée RGB1 42. ➢ Assurez-vous que tous les composants sont hors tension avant de raccorder l'écran à plasma à un système audio ou vidéo. Consultez également les instructions - Samsung PPM42M7HB | Owners Instructions - Page 58
PM Page 8 Télécommande à infrarouge ÉCRAN À PLASMA MARCHE V d ÉCRAN À PLASMA ARRÊT SYNTONISATION DIRECTE DE CANAUX NON DISPONIBLE AUGMENTATION SÉLECTION D'EFFET VIDÉO RÉGLAGE AUTOMATIQUE EN MODE PC FONCTIONS ISI : - ACTIVATION ET DÉSACTIVATION DU MODE ISI (PIP) - SÉLECTION DE LA SOURCE (SOURCE) - Samsung PPM42M7HB | Owners Instructions - Page 59
télécommande Vous devez insérer les piles dans la télécommande ou les remplacer dans les situations suivantes : ◆ À l'achat de votre écran à plasma ◆ Si votre télécommande fonctionne moins bien qu'auparavant 1 Enlevez le couvercle du compartiment des piles à l'arrière de la télécommande en appuyant - Samsung PPM42M7HB | Owners Instructions - Page 60
de l'écran sur le panneau pour fixation murale ➢ Consultez le guide d'installation correspondant à votre support mural. Remarques concernant l'installation ◆ Demandez à un technicien d'installer le support mural. ◆ ◆ Samsung Electronics n'est pas responsable des dommages causés au produit ni - Samsung PPM42M7HB | Owners Instructions - Page 61
la goupille de sécurité (#) afin que l'appareil soit bien fixé au support. Écran à plasma Réglage de l'angle du support mural ➢ Réglez l'angle du support à -2o avant de le fixer au mur. Support mural Mur 1 Fixez l'appareil au support mural. 2 Tenez la partie supérieure de l'appareil, au centre - Samsung PPM42M7HB | Owners Instructions - Page 62
PM Page 12 Installation de l'écran à la verticale ➢ ❋ Samsung décline toute responsabilité pour tout dommage résultant de l'installation mode d'écrans multiples" à la page 32. Exemple de branchement d'une mosaïque vidéo 2x2 Partie arrière de l'écran à plasma Partie arrière de l'écran à plasma - Samsung PPM42M7HB | Owners Instructions - Page 63
31/07 4:20 PM Page 13 Branchement de haut-parleurs ➢ Les enceintes acoustiques sont facultatives. Vous devrez acheter des enceintes à part. 1 Retirez les vis à l'arrière de l'écran à plasma. e PPM42M7H 2 2 Insérez les deux supports en format de T dans les orifices carrés à l'arrière de l'écran - Samsung PPM42M7HB | Owners Instructions - Page 64
4:02 PM Page 14 Le Connectez le câble des haut-parleurs à la prise de sortie pour haut-parleurs externes à l'arrière de l'écran à plasma en respectant les polarités + et -. ➢ ◆ Les haut-parleurs DOIVENT avoir une puissance admissible minimale de 10 watts (impédance de 8 Ω). ◆ Quand vous raccordez - Samsung PPM42M7HB | Owners Instructions - Page 65
alimentation à une prise électrique appropriée. Résultat: Le témoin de mise en attente situé à l'avant de l'écran à plasma s'allumera. ➢ Le mode d'alimentation électrique est spécifié à l'arrière de l'écran à plasma et la fréquence est de 50 ou 60 Hz. 2 Appuyez sur la touche " " à l'avant de l'écran - Samsung PPM42M7HB | Owners Instructions - Page 66
format normal de l'image V Vous pouvez choisir le type d'image qui correspond le plus à vos q Image exigences. Mode : Dynamique Contrôle Couleur Taille : 16:9 PIP 1 Appuyez sur la touche MENU ( ). Résultat: Le menu principal s'affiche. 2 Appuyez sur ... ou † pour choisir Image. Résultat - Samsung PPM42M7HB | Owners Instructions - Page 67
21 PM Page 17 Personnalisation des réglages de l'image Votre écran à plasma est doté de plusieurs options de réglage de la qualité de l' Image s'affiche. Image Mode : Dynamique Contrôle Couleur Taille : 16:9 PIP 3 Appuyez sur la touche ENTER ( ). Résultat: Le Mode est sélectionné. Déplacer - Samsung PPM42M7HB | Owners Instructions - Page 68
5/31/07 4:21 PM Page 18 Réglage des couleurs RVB (en mode PC) Image Mode : Dynamique Contrôle Couleur Taille : 16:9 PIP Déplacer Entrer Retour Contrôle Couleur Rouge 50 Vert 50 Bleu 50 ➢ Préréglez l'appareil au mode PC en appuyant sur la touche SOURCE. 1 Appuyez sur la touche MENU - Samsung PPM42M7HB | Owners Instructions - Page 69
la touche ENTER ( ). Résultat: La qualité et la position de l'image sont automatiquement réinitialisées. Les réglages sont complétés et l'écran à plasma reviendra automatiquement à l'image précédente. 13 Pour revenir aux réglages prédéfinis par défaut en usine, choisissez Réinitialiser Image en - Samsung PPM42M7HB | Owners Instructions - Page 70
( ). Sélectionnez l'option voulue en appuyant sur ... ou †. Résultat: Les options suivantes sont disponibles : 0-1-2-3 -4 -5 -6 ➢ ◆ L'option 0 représente un écran en mode d'affichage normal. Plus le chiffre est élevé, plus l'image est agrandie à l'écran. ◆ Vous pouvez sélectionner la position et les - Samsung PPM42M7HB | Owners Instructions - Page 71
sur ... ou † pour choisir Image. Résultat: Le menu Image s'affiche. 3 Appuyez sur la touche ENTER ( ). Image Mode : Dynamique Contrôle Couleur Taille : 16:9 PIP Déplacer Entrer Retour 4 Appuyez sur ... ou † pour choisir Taille. Appuyez sur la touche ENTER ( ). 5 Sélectionnez l'option - Samsung PPM42M7HB | Owners Instructions - Page 72
visionnement normal, appuyez de nouveau sur STILL. ➢ L'écran à plasma comporte plusieurs fonctions qui permettent de régler la qualité du Le menu Son s'affiche. 3 Appuyez sur la touche ENTER ( ). Résultat: Le Mode est sélectionné. 4 Appuyez à nouveau sur la touche ENTER ( ). Sélectionnez l'option - Samsung PPM42M7HB | Owners Instructions - Page 73
sur la touche EXIT pour quitter le menu. ➢ Si vous apportez des modifications à ces réglages, le mode son standard passera automatiquement au mode Personnalisé. Mode Egaliseur SRS TS XT Son : Personnalisé : Arrêt Déplacer Entrer Retour Egaliseur D + + 0 0 G - - Balance 100Hz 300Hz 1KHz - Samsung PPM42M7HB | Owners Instructions - Page 74
Egaliseur SRS TS XT : Arrêt haut-parleurs, y compris les haut-parleurs internes de l'écran à plasma. Elle est entièrement compatible avec tous les formats multicanaux. c u Déplacer Entrer Retour Mode Egaliseur SRS TS XT Son : Personnalisé : ArrêtArrêt Marche Déplacer Entrer Retour 1 Appuyez - Samsung PPM42M7HB | Owners Instructions - Page 75
25 Verrouillage des touches sur le panneau de commande Cette fonction permet de verrouiller les touches du panneau de commande de l'écran à plasma. L'écran peut toutefois toujours être commandé à l'aide de la télécommande. Seule la télécommande peut désactiver le verrouillage des touches sur le - Samsung PPM42M7HB | Owners Instructions - Page 76
BN68-01304A-00CF 5/31/07 4:21 PM Page 26 Verrouillage des touches de la télécommande Cette fonction permet de verrouiller les touches de la C télécommande. L'écran peut toutefois toujours être commandé à d Fonctions l'aide des touches du panneau de commande. d Protection brûlure écran - Samsung PPM42M7HB | Owners Instructions - Page 77
6 Saisissez votre mot de passe actuel à quatre caractères à l'aide des touches numériques. ➢ Le mot de passe par défaut d'un nouvel écran à plasma est "0000". z 7 Saisissez votre nouveau mot de passe à quatre caractères à l'aide des touches numériques. Saisissez à nouveau votre nouveau mot de passe - Samsung PPM42M7HB | Owners Instructions - Page 78
ID. Lorsque vous spécifiez le code ID de l'écran 1 en mode Entrée code ID, seul l'écran 1 affiche le menu et vous ➢ Pour des renseignements supplémentaires, consultez le guide du logiciel pour la commande à affichages multiples. samsung.com/support/productsupport/downloa d/index.aspx Français - 28 - Samsung PPM42M7HB | Owners Instructions - Page 79
BN68-01304A-00CF 5/31/07 4:22 PM Page 29 Prévention de la brûlure d'écran Pour réduire les risques de brûlure d'écran, cette unité est dotée ) d'une technologie de protection contre la brûlure d'écran. Cette technologie vous permet de régler le déplacement de l'image vers le haut et vers le - Samsung PPM42M7HB | Owners Instructions - Page 80
du signal (Signal Pattern), cette fonction permet de réduire la brûlure d'écran lorsque vous regardez l'écran à plasma. Si vous utilisez la fonction en mode barre lorsque vous regardez l'écran à plasma, il se peut que l'image soit de mauvaise qualité et la barre blanche verticale apparaît à l'écran - Samsung PPM42M7HB | Owners Instructions - Page 81
sur la touche ENTER ( ). nt x 8 Sélectionnez l'option voulue en appuyant sur ... ou †. a. Résultat: Les options suivantes sont disponibles : à x. ◆ Mode : Ecran blanc, Ex. de signal, Inverse, Barre, Barre et Inverse ◆ Période : 1 à 24 heures ◆ Horloge : 1 à 30 minutes a 9 Appuyez sur - Samsung PPM42M7HB | Owners Instructions - Page 82
PM Page 32 Réglage du mode d'écrans multiples Vous pouvez créer différents effets visuels en utilisant plusieurs écrans à plasma. P to Fonctions Protection brû d'une image sur plusieurs écrans mais en fonction de la dimension totale des écrans, comme si l'ensemble des écrans composait un - Samsung PPM42M7HB | Owners Instructions - Page 83
. AV Image Son SRS TS XT -- : -- : Dynamique : Personnalisé : Arrêt Réglage et affichage de l'heure actuelle Pour régler l'horloge de l'écran à plasma afin d'y afficher l'heure actuelle, appuyez sur la touche INFO. Vous devez d'ailleurs régler l'horloge si vous comptez utiliser les minuteries - Samsung PPM42M7HB | Owners Instructions - Page 84
Volume Activation 10 Oui Déplacer Réglage Retour Il est possible de régler des minuteries de mise en marche et d'arrêt afin que l'écran à plasma : ◆ se mette en marche automatiquement, tout en syntonisant la source de votre choix en fonction de l'heure. ◆ s'arrête automatiquement à l'heure que - Samsung PPM42M7HB | Owners Instructions - Page 85
. Cette fonction, qui est disponible seulement quand la minuterie est activée, prévient les surchauffes qui pourraient survenir si l'écran à plasma reste allumé pendant une longue période. 1, Configuration Horloge Langue PC : Français Déplacer Entrer Retour Horloge Réglage Horloge 12 : 00 - Samsung PPM42M7HB | Owners Instructions - Page 86
Arrêt ou Marche en appuyant sur ... ou †. Appuyez sur la touche ENTER ( ). 6 Appuyez sur la touche EXIT pour quitter le menu. ➢ ◆ Si l'écran à plasma est installé à la verticale, le ventilateur se mettra en marche automatiquement. ◆ Le message Vérif. Ventilateur apparaîtra si un problème lié au - Samsung PPM42M7HB | Owners Instructions - Page 87
O O X X X X Image Mode : Dynamique Contrôle Couleur Taille : 16:9 PIP Déplacer Entrer Retour PIP Source Position PIP : ArrêtArrêt : PC1Marche : Déplacer Entrer Retour PIP Source Position PIP : Marche : AV AV : S-Vidéo Déplacer Entrer Retour PIP Source Position PIP : Marche : AV - Samsung PPM42M7HB | Owners Instructions - Page 88
BN68-01304A-00CF 5/31/07 4:22 PM Page 38 Utilisation d'une source de signal externe Entrée Liste Source : AV Modif. Nom Déplacer Entrer Retour Liste Source AV S-Vidéo Composant PC1 PC2 DVI Déplacer Entrer Retour Entrée Liste Source : AV Modif. Nom Déplacer Entrer Retour Modif. Nom AV - Samsung PPM42M7HB | Owners Instructions - Page 89
sa source est AV. t, ☛ Assurez-vous que tous les composants sont hors tension avant de raccorder l'écran à plasma à un système audio ou vidéo. Consultez également les instructions de branchement et les consignes de sécurité contenues dans la documentation fournie avec chacun des appareils. Fran - Samsung PPM42M7HB | Owners Instructions - Page 90
AUDIO-L/R) sont utilisés avec les appareils dotés d'une sortie S-Vidéo, comme les caméscopes et les magnétoscopes. Partie arrière de l'écran à plasma Caméscopes ① et Magnétoscopes ① Pour pouvoir lire l'image et le son, les connecteurs S-Vidéo et RCA doivent tous deux être utilisés. Branchement - Samsung PPM42M7HB | Owners Instructions - Page 91
BN68-01304A-00CF 5/31/07 4:22 PM Page 41 Branchement à la prise d'entrée du lecteur DVD/récepteur TVN Partie arrière de l'écran à plasma Y / PB / PR Lecteurs DVD L / R Décodeur numérique Les connecteurs "COMPONENT IN" (ou "Y/PB/PR" (vidéo) et "AUDIO") sont utilisés avec les appareils dotés d' - Samsung PPM42M7HB | Owners Instructions - Page 92
" sont utilisés pour le raccordement à un PC. p ca m Partie arrière de l'écran à plasma Ordinateurs personnels ou Vous devez regarder l'écran à plasma en mode PC1 pour pouvoir utiliser le port RGB OUT afin de connecter l'écran actuel à un autre écran à plasma réglé au même mode. Français - 42 - Samsung PPM42M7HB | Owners Instructions - Page 93
taillant Samsung. 1 Cliquez avec le bouton droit sur le bureau de Windows, fonction de la table des modes d'affichage. Si possible, plasma. (consultez la section "Branchement à la prise d'entrée PC" à la page 42). ➢ ◆ Les écrans sur votre PC peuvent sembler différents selon la version de Windows - Samsung PPM42M7HB | Owners Instructions - Page 94
❉1600 x 1200 60 75.0 ✔ ✔ ◆ ❉ ce mode n'est pas disponible en mode DVI. ◆ Le mode entrelacé n'est pas pris en charge. ◆ L'écran à plasma peut ne pas fonctionner correctement si une résolution non standard est sélectionnée. ◆ La résolution 852 x 480 est supportée uniquement par la carte graphique - Samsung PPM42M7HB | Owners Instructions - Page 95
Power Saver. Ce système permet d'économiser l'énergie en mettant le moniteur en mode veille après un certain délai d'inactivité. La configuration de cette fonction s' conomie d'énergie maximale, éteignez le moniteur à plasma lorsqu'il n'est pas utilisé pendant une période prolongée. Français - 45 - Samsung PPM42M7HB | Owners Instructions - Page 96
service après-vente de D Samsung. ( Si le problème n'est pas réglé à l'aide des instructions ci-dessous, prenez en note le modèle et le P numéro de série de l'écran à plasma le d'alimentation clignote. câble vidéo. L'écran à plasma est en mode d'économie d'énergie. S Déplacez la souris ou - Samsung PPM42M7HB | Owners Instructions - Page 97
Poids (sans support) PPM42M7H - 35.0 kg PPM50M7H - 41.0 kg Format de l'image 16:9 Dimension de l'écran Résolution standard (H x V) PPM42M7H - 42 po PPM50M7H PC1/2) et entrée DVI, 2 x prise miniature) Sorties audio EXT SPEAKER (8Ω) - R+/-, L+/- Commande externe RS232C - IN/OUT (D-SUB, 9P - Samsung PPM42M7HB | Owners Instructions - Page 98
BN68-01304A-00CF 5/31/07 4:22 PM Page 48 - Samsung PPM42M7HB | Owners Instructions - Page 99
(PANTALLA DE PLASMA) PPM42M7H PPM50M7H Manual de instrucciones Antes de poner en funcionamiento la unidad, lea atentamente el presente manual y guá PIP) VÍDEO MURAL MDC (Control de varias pantallas) Protección pantalla inactiva SRS TruSurroundXT Gane premios cuando registre su producto en www.samsung - Samsung PPM42M7HB | Owners Instructions - Page 100
o al conectar un PC a esta pantalla PDP) visibles en el panel del monitor de plasma durante más de dos horas, ya que se podría producir la retención de disipa desde el panel a través de los orificios de ventilación de la parte superior del aparato. Esto es normal y no indica ningún defecto ni fallo - Samsung PPM42M7HB | Owners Instructions - Page 101
BN68-01304A-01Spa 6/28/07 4:05 PM Page 3 ) Accesorios entregados con el pantalla PDP a l Manual de instrucciones Mando a distancia / Pilas AAA Cable de alimentación Base del soporte (2EA) Núcleos de ferrita para cable de altavoz (2EA) (Consulte la página 14.) ( - Samsung PPM42M7HB | Owners Instructions - Page 102
■ Instalación de la pantalla en el accesorio de montaje mural 10 ■ Instalación vertical de la pantalla 12 ■ Antes de utilizar el Video Wall y la función Control de varias pantallas ........ 12 ■ Conexión de los altavoces 13 ■ Apagado y encendido de la pantalla PDP 15 ■ Elección del idioma - Samsung PPM42M7HB | Owners Instructions - Page 103
34 ■ Selección del ventilador 36 ■ Visualización de imagen sobre imagen (PIP 37 ■ Visualización de una fuente de señal externa 38 ◆ INFORMACIÓN a la entrada DVI 41 ■ Conexión a la entrada de PC 42 ■ Configuración del software del PC (sólo Windows 43 ■ Modo de entrada (PC / DVI 44 ■ Ahorro de - Samsung PPM42M7HB | Owners Instructions - Page 104
5/31/07 5:40 PM Page 6 Panel de control ➢ La configuración real de su pantalla PDP puede variar dependiendo del modelo. Parte frontal de la pantalla PDP Altavoz (opcional) Altavoz (opcional) a a) b b c c) ➢ a b SOURCE - Seleccionar la fuente de entrada externa. Indicador de encendido - Samsung PPM42M7HB | Owners Instructions - Page 105
- OUT : se utiliza para la función MDC al conectar la b) EXT SPEAKER (8Ω) entrada del RS-232C de otra pantalla PDP. c Conexión para los altavoces y RGB2(PC2). ➢ Encontrará más detalles sobre la conexión en las páginas 39~42. ➢ Al conectar un sistema de audio o vídeo a la pantalla PDP, asegúrese - Samsung PPM42M7HB | Owners Instructions - Page 106
/ AJUSTAR UN VALOR DE OPCIÓN RESPECTIVAMENTE SELECCIÓN DE EFECTOS DE IMAGEN AJUSTE AUTOMÁTICO EN EL MODO PC FUNCIONES PIP: - ACTIVACIÓN O DESACTIVACIÓN DE PIP (PIP) - SELECCIÓN DE FUENTE DE ENTRADA (SOURCE) D APAGADO DE LA PANTALLA PDP CONGELACIÓN DE IMAGEN SIGUIENTE CANAL SELECCIÓN DE ENTRADA - Samsung PPM42M7HB | Owners Instructions - Page 107
pilas del mando a distancia cuando: ◆ Adquiera la pantalla PDP ◆ El mando a distancia deje de funcionar correctamente 1 Retire la tapa de la parte posterior del mando a distancia pulsando ( ) y deslizando hacia abajo la tapa y, a continuación, tirando de ella con firmeza hasta sacarla. 2 Inserte dos - Samsung PPM42M7HB | Owners Instructions - Page 108
instalación del soporte mural, póngase en contacto con un técnico. ◆ ◆ Samsung Electronics no se hace responsable de los daños causados al producto o al usuario A continuación, monte el soporte en la de bloqueo de la parte posterior del producto es pared. correcta. Si la distancia es demasiado - Samsung PPM42M7HB | Owners Instructions - Page 109
Ajuste el ángulo del soporte a -2° antes de instalarlo en la pared. Soporte de pared Pared 1 Acople el aparato al soporte de pared. 2 Sostenga la parte superior del aparato por el centro y empújelo hacia delante (en la dirección de la flecha) para ajustar el ángulo. (Consulte la ilustración de la - Samsung PPM42M7HB | Owners Instructions - Page 110
4:46 PM Page 12 Instalación vertical de la pantalla ❋ Samsung no se hace responsable de los daños causados derivados de la la página 32. Ejemplo de la función Video Wall 2x2 Parte posterior de la pantalla PDP Ejemplo de conexiones Video Wall 2x2 Parte posterior de la pantalla PDP ② ① ➢ ◆ Puede - Samsung PPM42M7HB | Owners Instructions - Page 111
posterior de la pantalla PDP. e. a PPM42M7H 2 Cuelgue los dos ganchos con forma de "T" en los orificios cuadrados de la parte posterior de la pantalla PDP. PPM50M7H PPM42M7H PPM50M7H 3 Monte la pantalla PDP y el soporte del altavoz mediante los tornillos retirados de la pantalla PDP. s PPM42M7H - Samsung PPM42M7HB | Owners Instructions - Page 112
-01304A-01Spa 6/28/07 4:05 PM Page 14 E Conecte el cable de audio del altavoz a la toma externa de salida del altavoz de la parte posterior de la p pantalla PDP haciendo coincidir los extremos "+" y "-" del cable con el diagrama de la pantalla PDP. ➢ ◆ Los altavoces DEBEN tener una capacidad - Samsung PPM42M7HB | Owners Instructions - Page 113
Page 15 Apagado y encendido de la pantalla PDP El enchufe de la red eléctrica se conecta a la parte posterior de la a pantalla PDP. 1 Conecte el cable de alimentación en una toma eléctrica Parte frontal de la pantalla PDP adecuada. Resultado: Se enciende el indicador de modo en espera de la - Samsung PPM42M7HB | Owners Instructions - Page 114
p Imagen Modo : Dinámico Control de color Tamaño : 16:9 PIP 1 Pulse el botón MENU ( ). Resultado: Aparece el menú principal necesaria pulsando los botones ... o †. 7 Pulse el botón ENTER ( ). Mode Mode Contraste Brillo Nitidez Color Matiz V 50 Tono de color Restablecer : DDyinnaámmiicco - Samsung PPM42M7HB | Owners Instructions - Page 115
. 2 Pulse los botones ... o † para seleccionar Imagen. Resultado: Aparece el menú Imagen. Imagen Modo : Dinámico Control de color Tamaño : 16:9 PIP 3 Pulse el botón ENTER ( ). Resultado: Se selecciona la opción Modo. Mover Entrar Volver 4 Pulse de nuevo el botón ENTER ( ). Resultado - Samsung PPM42M7HB | Owners Instructions - Page 116
Ajuste del color RGB (modo PC) ➢ Preseleccione el modo PC pulsando el botón SOURCE. Imagen Modo : Dinámico Control de color Tamaño : 16:9 PIP Mover Entrar Volver Control de color Rojo 50 Verde 50 Azul 50 Mover Entrar Volver Rojo 50 1 Pulse el botón MENU ( ). Resultado: Aparece - Samsung PPM42M7HB | Owners Instructions - Page 117
BN68-01304A-00Spa 5/31/07 5:53 PM Page 19 6 Pulse los botones ... o † para seleccionar la opción (Grueso o Fino) que va a ajustar. Pulse el botón ENTER ( ). Resultado: Aparece la barra horizontal. Pulse los botones œ o √ hasta llegar al valor óptimo. ➢ Pulse los botones ... o † para seleccionar - Samsung PPM42M7HB | Owners Instructions - Page 118
BN68-01304A-00Spa 5/31/07 5:53 PM Page 20 Uso de la función de ampliación (modo PC) ➢ Preseleccione el modo PC pulsando el botón SOURCE. P 1 Pulse el botón MENU ( ). re Configuración Resultado: Aparece el menú principal. Hora Idioma PC : Español 2 Pulse los botones ... o † para seleccionar - Samsung PPM42M7HB | Owners Instructions - Page 119
el botón EXIT para salir. ➢ ◆ Puede seleccionar estas opciones pulsando el botón P.SIZE del mando a distancia. ◆ Si cambia el tamaño de la imagen cuando PIP está ajustado como Enc., esta función se apagará automáticamente. ◆ Según la fuente de entrada, las opciones de P.SIZE pueden variar. ◆ En los - Samsung PPM42M7HB | Owners Instructions - Page 120
ver la imagen en el ca modo normal, vuelva a pulsar el botón. ➢ En el modo PIP, la función de imagen fija se aplica en la imagen principal y en la secundaria al mismo para salir. ➢ Puede seleccionar estas opciones con sólo pulsar el botón S.MODE (modo Sonido) del mando a distancia. Español - 22 - Samsung PPM42M7HB | Owners Instructions - Page 121
BN68-01304A-00Spa 6/25/07 12:31 PM Page 23 Personalización del sonido La pantalla PDP tiene varios valores que permiten controlar la calidad de la imagen. 1 Pulse el botón MENU ( ). Resultado: Aparece el menú principal. 2 Pulse los botones ... o † para seleccionar Sonido. Resultado: Aparece el menú - Samsung PPM42M7HB | Owners Instructions - Page 122
/07 12:31 PM Page 24 Ajuste de TruSurround XT TV Sonido TruSurround XT es una tecnología SRS patentada que solventa d totalmente compatible con todos los formatos multicanal. p Mover Entrar Volver TV Sonido Modo : Personal Ecualizador SRS TS XT : DDeesacttiivvaaddoo Activado Mover - Samsung PPM42M7HB | Owners Instructions - Page 123
el botón ENTER ( ). 7 Pulse el botón EXIT para salir. Función Protección pantalla inactiva Bloqueo de seguridad Control múltiple Video Wall Ventilador : Desactivado Mover Entrar Volver Bloqueo de seguridad Bloqueo mandos : Desactivado Bloqueo de IR Cambiar PIN Mover Entrar Volver Bloqueo de - Samsung PPM42M7HB | Owners Instructions - Page 124
distancia de forma que a Es través de éste no se pueda accionar el monitor. P Función Sin embargo, sí se puede accionar a través de los botones inactiva de la pantalla PDP. p Bloqueo de seguridad Control múltiple Video Wall Ventilador : Desactivado 1 Pulse el botón MENU ( ). Resultado: - Samsung PPM42M7HB | Owners Instructions - Page 125
la siguiente secuencia para reiniciar el código a 0-0-0-0: MUTE, 1, 8, 6. Función Protección pantalla inactiva Bloqueo de seguridad Control múltiple Video Wall Ventilador : Desactivado Mover Entrar Volver Bloqueo de seguridad Bloqueo mandos : Desactivado Bloqueo de IR Cambiar PIN Mover Entrar - Samsung PPM42M7HB | Owners Instructions - Page 126
varias pantallas) Esta función permite controlar fácilmente los monitores conectados Es del PC especificando sus ID. re Función botón MENU ( ). p Control múltiple Video Wall Resultado: Aparece el menú principal. im Ventilador : .samsung.com/support/productsupport/download/ index.aspx Español - - Samsung PPM42M7HB | Owners Instructions - Page 127
4 / Hora 4 min. 4 min. 9 Pulse el botón EXIT para salir. Función Protección pantalla inactiva Bloqueo de seguridad Control múltiple Video Wall Ventilador : Desactivado Mover Entrar Volver Protección pantalla inactiva Cambio píxel Pantalla blanca Patrón de señal Inverso Barra Barra & Inverso - Samsung PPM42M7HB | Owners Instructions - Page 128
Resultado: Aparece el menú principal. d Bloqueo de seguridad Control múltiple 2 Pulse los botones ... o † para seleccionar Función. a Video Wall Resultado: Aparece el menú Función. Ventilador : Desactivado 3 Pulse el botón ENTER ( ). Mover Entrar Volver Protección pantalla inactiva - Samsung PPM42M7HB | Owners Instructions - Page 129
BN68-01304A-00Spa 5/31/07 5:54 PM Page 31 Ajuste del temporizador de la función Protección pantalla inactiva Puede ajustar el temporizador de la Protección pantalla inactiva (horas o minutos). Si inicia el borrado imágenes residuales, la operación se realizará durante el período establecido y - Samsung PPM42M7HB | Owners Instructions - Page 130
: Esta opción muestra imágenes divididas en a varios monitores sin que falte parte alguna, como si la parte visible de cada uno de los Mover Entrar Volver monitores formara parte de un único monitor grande. Video Wall Video Wall : Activado Formato : LlenaLlena Divisor de pantalla Natural - Samsung PPM42M7HB | Owners Instructions - Page 131
BN68-01304A-00Spa 6/25/07 12:32 PM Page 33 Visualización de la información sobre ajustes Puede ver el estado de configuración de la fuente seleccionada pulsando el botón "INFO" del mando a distancia. AV Imagen Sonido SRS TS XT -- : -- : Dinámico : Personal : Desactivado Ajuste y visualización de - Samsung PPM42M7HB | Owners Instructions - Page 132
BN68-01304A-00Spa 5/31/07 5:54 PM Page 34 Apagado y encendido automáticos de la pantalla PDP Configuración Hora Idioma PC : Español Mover Entrar Volver Hora Ajustar hora 12: 00 Temp. de encen. 12: 00 Des. Temp. de apag. 12: 00 Des. Mover Entrar Volver Temp. de encen. Hora 12 Minuto - Samsung PPM42M7HB | Owners Instructions - Page 133
BN68-01304A-00Spa 5/31/07 5:54 PM Page 35 P: 10 Pulse los botones ... o † para seleccionar Temp. de apag.. Pulse el botón ENTER ( ). Resultado: Aparece el menú Temp. de apag.. 11 Seleccione Hora o Minuto pulsando los botones œ o √. Ajústelos pulsando los botones ... o †. ➢ Puede ajustar la hora, - Samsung PPM42M7HB | Owners Instructions - Page 134
internos de la pantalla PDP se utilizan para disminuir la temperatura de la parte superior y frontal de la pantalla PDP. Para reducir el ruido del ventilador aumentar si durante un período prolongado la pantalla PDP Video Wall funciona con el ventilador parado, pero la pantalla PDP funcionará - Samsung PPM42M7HB | Owners Instructions - Page 135
Pulse el botón ENTER ( ). 10 Pulse el botón EXIT para salir. Funciones rápidas del mando a distancia. Botones PIP Función Se utiliza para activar o desactivar directamente la función PIP. SOURCE Se utiliza para asignar la fuente de la imagen secundaria (AV, S-Vídeo). Tabla de configuración de - Samsung PPM42M7HB | Owners Instructions - Page 136
BN68-01304A-00Spa 5/31/07 5:54 PM Page 38 Visualización de una fuente de señal externa Entrada Fuentes : AV Editar nombre Mover Entrar Volver Fuentes AV S-Vídeo Componente PC1 PC2 DVI Mover Entrar Volver Entrada Fuentes : AV Editar nombre Mover Entrar Volver Editar nombre AV - Samsung PPM42M7HB | Owners Instructions - Page 137
Dispositivo decodificador/ videojuegos Los conectores "AV OUT" se utilizan en equipos con entrada de vídeo compuesta, como una cámara o un vídeo. Parte posterior de la pantalla PDP (Salida) Reproductor de videodiscos Videocámara Receptor de satélite ② ① Si tiene un segundo vídeo y desea copiar - Samsung PPM42M7HB | Owners Instructions - Page 138
pantalla PDP Videocámara ① y APARATO DE VÍDEO ① Utilice los conectores S-VIDEO y RCA para reproducir imágenes y sonido. Conexión a la entrada de componentes Parte posterior de la pantalla PDP DVD Receptor de DTV Los conectores de COMPONENT IN se utilizan para receptores DTV o DVD. (480i,p/576i - Samsung PPM42M7HB | Owners Instructions - Page 139
BN68-01304A-00Spa 5/31/07 5:54 PM Page 41 Conexión a la entrada del receptor de DVD/DTV Parte posterior de la pantalla PDP Y / PB / PR L / R Los conectores "COMPONENT IN" (o "Y/PB/PR" (vídeo) y "AUDIO") se utilizan en equipos con una salida de receptor DVD/ - Samsung PPM42M7HB | Owners Instructions - Page 140
"PC 1" (o "PC IN2 (BNC)") y "AUDIO" se utilizan como interfaz con un PC. P d la co Parte posterior de la pantalla PDP Ordenador personal o Sólo cuando vea la pantalla PDP en modo PC1 podrá utilizar el puerto RGB OUT para conectar la pantalla actual a otro monitor PDP del mismo modo. Español - Samsung PPM42M7HB | Owners Instructions - Page 141
o con el distribuidor de Samsung.) 1 Haga clic con el botón derecho del ratón sobre el escritorio de Windows y después haga clic en Propiedades. Aparece la ventana Display Properties (Propiedades de pantalla). 2 Haga clic en Settings (Configuración) y defina Display Mode (Modo de pantalla) con - Samsung PPM42M7HB | Owners Instructions - Page 142
x 768 60 47.8 ✔/ UXGA ❉1600 x 1200 60 75.0 ✔ ✔ ◆ "❉" Este modo no funciona con el modo DVI. ◆ No se admite el modo entrelazado. ◆ El monitor PDP puede funcionar incorrectamente si se selecciona un formato de vídeo que no sea estándar. ◆ Solamente una tarjeta de vídeo concreta (PIXEL PERFECT - Samsung PPM42M7HB | Owners Instructions - Page 143
incorpora un sistema de gestión de energía llamado Ahorro de energía. Este sistema ahorra energía al cambiar el monitor a modo de baja alimentación si no se usa durante un tiempo determinado. Se usa una utilidad de software instalada en el ordenador para configurar esta - Samsung PPM42M7HB | Owners Instructions - Page 144
problemas: Antes de ponerse en contacto con el personal del servicio técnico Antes de ponerse en contacto con el servicio posventa de Samsung, realice estas sencillas comprobaciones. D Si no puede resolver el problema con las instrucciones que se ofrecen a continuación, anote los ( números de - Samsung PPM42M7HB | Owners Instructions - Page 145
pantalla Tamaño de pantalla PPM42M7H - 42 pulgadas PPM50M7H - 50 pulgadas Resolución - VGA~UXGA (R/G/B/H/V) DVI IN - tipo DVI-D Salidas de monitor VIDEO OUT - VIDEO/L/R (RCA, 3P) Entradas de audio 2 x miniclavijas) Salidas de audio EXT SPEAKER (8Ω) - R+/-, L+/- Control externo RS232C - - Samsung PPM42M7HB | Owners Instructions - Page 146
BN68-01304A-00Spa 5/31/07 5:54 PM Page 48 - Samsung PPM42M7HB | Owners Instructions - Page 147
Tela PDP Profissional (PLASMA DISPLAY PANEL) PPM42M7H PPM50M7H Manual do Usuário Leia atentamente este manual antes de operar a unidade, e guarde-o para referência futura. Para uso e operação comerciais MENUS NA TELA Picture-In-Picture (PIP) VIDEO WALL MDC (Multiple Display Control) Proteção contra - Samsung PPM42M7HB | Owners Instructions - Page 148
(como no videogame ou na conexão de um PC a esta Tela PDP) no monitor de plasma por mais de 2 horas para não causar retenção da imagem na tela. Essa um longo período de tempo pode deixar traços de bordas exibidos nas partes esquerda, direita e central da tela, causados pela diferença da emissão de - Samsung PPM42M7HB | Owners Instructions - Page 149
BN68-01304A-01BP 6/28/07 4:02 PM Page 3 Verificação das peças ar Manual do Usuário Controle remoto / pilhas AAA Cabo de força Base (2 de cada) Núcleos de ferrite para o cabo do alto-falante (2 para cada) (Consulte a página - Samsung PPM42M7HB | Owners Instructions - Page 150
as pilhas no controle remoto 9 ■ Como montar a base 9 ■ Como instalar o monitor no painel de parede 10 ■ Como instalar o monitor na posição vertical 12 ■ Antes de usar as funções Video Wall e Multiple Display Control 12 ■ Como conectar alto-falantes 13 ■ Ligando e desligando a Tela - Samsung PPM42M7HB | Owners Instructions - Page 151
COMO UTILIZAR O MONITOR (CONTINUAÇÃO) ■ Como configurar o MDC (Multiple Display Control 28 ■ 36 ■ Como visualizar Picture in Picture (PIP 37 ■ Como visualizar uma origem de sinal Como conectar a entrada do PC 42 ■ Como configurar o software do PC (somente Windows 43 ■ Modo de Entrada ( - Samsung PPM42M7HB | Owners Instructions - Page 152
-00BP 5/31/07 4:10 PM Page 6 Painel de controle ➢ A configuração da Tela PDP poderá ser diferente, dependendo do modelo. Parte frontal da Tela PDP Alto-falante (opcional) a) Alto-falante b (opcional) a b c c) a b SOURCE Indicador de energia d - Selecione a origem de entrada externa - Samsung PPM42M7HB | Owners Instructions - Page 153
MDC ao conectar a um PC ou a uma saída RS-232C de outra Tela b) EXT SPEAKER (8Ω) PDP. Para conectar alto-falantes externos. - OUT : Usada para a função MDC ao (PC2). ➢ Para obter detalhes sobre a conexão, consulte as páginas 39~42. ➢ Sempre que conectar um sistema de áudio ou de vídeo à - Samsung PPM42M7HB | Owners Instructions - Page 154
DO PIP (PIP) - SELEÇÃO DE ORIGEM (SOURCE) V TELA PDP DESLIGADA IMAGEM ESTÁTICA PRÓXIMO CANAL SELEÇÃO DE ENTRADA EXTERNA CANAL ANTERIOR EXIBIÇÃO DE INFORMAÇÕES SAIR DE QUALQUER EXIBIÇÃO CONFIRMAR SUA ESCOLHA (ARMAZENAR OU ENTRAR) SELEÇÃO DO EFEITO DO SOM TAMANHO DA IMAGEM MULTIPLE DISPLAY CONTROL - Samsung PPM42M7HB | Owners Instructions - Page 155
ou substituir as pilhas no controle remoto ao: ◆ Comprar a Tela PDP ◆ Observar que o controle não está mais operando corretamente 1 Remova a tampa na parte traseira do controle remoto, pressionando o símbolo ( ) para baixo e puxando-a firmemente para removê-la. 2 Coloque duas pilhas R03, UM4, "AAA - Samsung PPM42M7HB | Owners Instructions - Page 156
monitor no painel de parede ➢ Consulte o guia de instalação correto, de acordo com o seu suporte de parede. Notas sobre a instalação ◆ Entre em contato com um técnico, para instalar o suporte de parede. ◆ ◆ A Samsung orifícios de bloqueio, parede. na parte traseira do produto, está correto. Se - Samsung PPM42M7HB | Owners Instructions - Page 157
parede ◆ O formato do produto pode variar, dependendo do modelo. (A montagem do gancho plástico e do parafuso é igual) 1 Remova os 4 parafusos da parte traseira do produto. 2 Insira o parafuso no gancho plástico. (Veja a figura abaixo) ☛ ◆ Monte o produto no suporte de parede e verifique se ele - Samsung PPM42M7HB | Owners Instructions - Page 158
monitor na posição vertical ➢ ❋ A Samsung Wall e Multiple Display Control 1 monitores instalados muito próximos entre si. 2 Para obter informações sobre a configuração e operação do Video Wall, consulte "Como configurar a Multiple Screen" na página 32. Exemplo de função Video Wall 2x2 Parte - Samsung PPM42M7HB | Owners Instructions - Page 159
trás da Tela PDP. r PPM42M7H 2 Encaixe os dois ganchos em forma de "T" nos orifícios quadrados na parte traseira da Tela PDP. PPM50M7H PPM42M7H PPM50M7H 3 Prenda o suporte do alto-falante à Tela PDP usando os parafusos removidos da Tela PDP. PPM42M7H PPM50M7H ➢ Ao mover a - Samsung PPM42M7HB | Owners Instructions - Page 160
BN68-01304A-01BP 6/28/07 3:59 PM Page 14 O Conecte o cabo de áudio do alto-falante à tomada de saída de alto-falante externo na parte traseira da Tela PDP, com as extremidades marcadas "+" e "-" correspondentes ao diagrama na Tela PDP. ➢ ◆ Os alto-falantes DEVEM suportar uma potência de, no mínimo, - Samsung PPM42M7HB | Owners Instructions - Page 161
ON ( ) no controle remoto) para ligar a Tela PDP. 3 Para desligar a Tela PDP, pressione o botão " " novamente (ou o botão OFF ( ) no controle remoto). Parte frontal da Tela PDP Como alterar o idioma Ao utilizar a Tela PDP pela primeira vez, é preciso selecionar o idioma no qual os menus e indica - Samsung PPM42M7HB | Owners Instructions - Page 162
imagem mais adequado às suas necessidades. q Modo : Dinâmico Controlo de cor Tamanho : 16:9 PIP 1 Pressione o botão MENU ( ). Resultado: O menu principal é exibido. 2 Pressione o sair. ➢ Defina também essas opções pressionando o botão P.MODE (modo Imagem) no controle remoto. Português - 16 - Samsung PPM42M7HB | Owners Instructions - Page 163
Cores frias1, Normal, Cores quentes1, ou Cores quentes2). 14 Pressione o botão EXIT para sair. Imagem Modo : Dinâmico Controlo de cor Tamanho : 16:9 PIP Mover Enter Voltar Modo Modo Contraste Brilho Nitidez Cor Matiz Vr 50 Tonalidade Reiniciar Mover : Dinâmico 100 50 75 55 Vm 50 : Cores - Samsung PPM42M7HB | Owners Instructions - Page 164
ajustar as cores RGB (Modo PC) ➢ Selecione o modo PC, pressionando o botão SOURCE. Imagem Modo : Dinâmico Controlo de cor Tamanho : 16:9 PIP Mover Enter Voltar Controlo de cor Vermelho 50 Verde 50 Azul 50 Mover Enter Voltar Vermelho 50 1 Pressione o botão MENU ( ). Resultado - Samsung PPM42M7HB | Owners Instructions - Page 165
BN68-01304A-00BP 5/31/07 4:11 PM Page 19 6 Pressione o botão ... ou † para selecionar a opção (Grosso ou Fino) a ser ajustada. Pressione o botão ENTER ( ). Resultado: A barra horizontal é exibida. Pressione o botão œ ou √ até atingir o ajuste ideal. ➢ Pressione o botão ... ou † para selecionar - Samsung PPM42M7HB | Owners Instructions - Page 166
BN68-01304A-00BP 5/31/07 4:11 PM Page 20 Como usar a função de zoom (Modo PC) ➢ Selecione o modo PC, pressionando o botão SOURCE. Se Tempo Idioma PC Configurar : Português 1 Pressione o botão MENU ( ). Resultado: O menu principal é exibido. 2 Pressione o botão ... ou † para selecionar Configurar - Samsung PPM42M7HB | Owners Instructions - Page 167
para sair. ➢ ◆ Você pode selecionar essas opções, pressionando simplesmente o botão P.SIZE no controle remoto. ◆ Se o tamanho da imagem for alterado quando PIP está ligada, ela será desligada automaticamente. ◆ Dependendo da origem da entrada, as opções do P.SIZE podem variar. ◆ Nos modos PC e DVI - Samsung PPM42M7HB | Owners Instructions - Page 168
STILL". Para retornar a visualização normal, pressione q novamente o botão. ➢ No modo PIP, a função "Still" será aplicada à imagem principal e à subimagem ao mesmo tempo EXIT para sair. ➢ Você pode selecionar essas opções pressionando o botão S.MODE (modo Som) no controle remoto. Português - 22 - Samsung PPM42M7HB | Owners Instructions - Page 169
BN68-01304A-00BP 6/25/07 11:41 AM Page 23 Personalizando o som o A Tela PDP tem diversos ajustes que permitem controlar a qualidade do som. 1 Pressione o botão MENU ( ). Resultado: O menu principal é exibido. 2 Pressione o botão ... ou † para selecionar Som. Resultado: O menu Som é exibido. 3 - Samsung PPM42M7HB | Owners Instructions - Page 170
BN68-01304A-00BP 6/25/07 11:41 AM Page 24 Ajustando o modo TruSurround XT TruSurround XT é uma tecnologia patenteada SRS que resolve o Es Som problema de reprodução de conteúdo em múltiplos canais 5.1 em p Modo : Personalizar dois alto-falantes. A tecnologia TruSurround possibilita uma So - Samsung PPM42M7HB | Owners Instructions - Page 171
ão ... ou †. Pressione o botão ENTER ( ). 7 Pressione o botão EXIT para sair. Função Protecção de ecrã Bloqueio de segurança Multi-controlo Video Wall Ventoinha : Deslig. Mover Enter Voltar Bloqueio de segurança Bloq. teclas Bloqueio IR Alterar PIN : Deslig. Mover Enter Voltar Bloqueio de - Samsung PPM42M7HB | Owners Instructions - Page 172
possível, porém, a operar a Tela PDP o usando os botões do painel. Id Bloqueio de segurança Multi-controlo Video Wall 1 Pressione o botão MENU ( ). Ventoinha : Deslig. Resultado: O menu principal é exibido. Mover Enter Voltar 2 Pressione o botão ... ou † para selecionar Função. Resultado - Samsung PPM42M7HB | Owners Instructions - Page 173
, na seqüência a seguir, para voltar à senha inicial 0-0-0-0: MUTE, 1, 8, 6. Função Protecção de ecrã Bloqueio de segurança Multi-controlo Video Wall Ventoinha : Deslig. Mover Enter Voltar Bloqueio de segurança Bloq. teclas Bloqueio IR Alterar PIN : Deslig. Mover Enter Voltar Alterar PIN - Samsung PPM42M7HB | Owners Instructions - Page 174
MDC. ➢ Você pode selecionar essas opções pressionando o botão MDC (Multiple Display Control) no controle remoto. ➢ Consulte o seguinte website para obter informação sobre programas MDC e documentos de protocolo: http://www.samsung.com/support/productsupport/download/ index.aspx Português - 28 - Samsung PPM42M7HB | Owners Instructions - Page 175
Linha vertical 4 4 Tempo 4 min. 4 min. 9 Pressione o botão EXIT para sair. Função Protecção de ecrã Bloqueio de segurança Multi-controlo Video Wall Ventoinha : Deslig. Mover Enter Voltar Protecção de ecrã Mudar pixels Tudo branco Padrão do sinal Inversão Barra Barra e inversão Temporizador - Samsung PPM42M7HB | Owners Instructions - Page 176
de tela Função Protecção de ecrã Bloqueio de segurança Multi-controlo Video Wall Ventoinha : Deslig. Se a queima de tela ocorreu, é possível selecionar qualidade da imagem pois a barra vertical em branco é exibida em algumas partes da tela. ➢ Barra e inversão: Esta função remove as pós-imagens - Samsung PPM42M7HB | Owners Instructions - Page 177
BN68-01304A-00BP 5/31/07 4:12 PM Page 31 Como ajustar o timer da proteção de queima de tela É possível ajustar o timer da proteção de queima de tela (horas, minutos). Se você iniciar uma operação para apagar qualquer imagem residual, ela será realizada pelo período definido e então terminará - Samsung PPM42M7HB | Owners Instructions - Page 178
monitores múltiplos, sem a ausência de qualquer parte da imagem, como se apenas a parte visualizável dos diferentes monitores fosse uma parte de um único monitor maior. Video Wall Video Wall ➢ ◆ As funções PIP e Tamanho da imagem não funcionam durante a operação Video Wall. ◆ A entrada em formato - Samsung PPM42M7HB | Owners Instructions - Page 179
exibida, pressionando o botão "INFO". Também é necessário ajustar a hora para usar os timers automáticos para ligar e desligar o monitor. er 1 Pressione o botão MENU ( ). Resultado: O menu principal é exibido. 2 Pressione o botão ... ou † para selecionar Configurar. Resultado: O menu Configurar - Samsung PPM42M7HB | Owners Instructions - Page 180
BN68-01304A-00BP 5/31/07 4:12 PM Page 34 Ligando e desligando automaticamente a Tela PDP Tempo Idioma PC Configurar : Português Mover Enter Voltar Tempo Ajuste o Relógio 12 : 00 T. ligado 12 : 00 Desactivado T. desligado 12 : 00 Desactivado Mover Enter Voltar T. ligado Hora 12 - Samsung PPM42M7HB | Owners Instructions - Page 181
BN68-01304A-00BP 5/31/07 4:12 PM Page 35 10 Pressione o botão ... ou † para selecionar T. desligado. Pressione o botão ENTER ( ). Resultado: O menu T. desligado é exibido. 11 Selecione Hora ou Minuto pressionando o botão œ ou √. Selecione-os pressionando o botão ... ou †. ➢ Defina diretamente a - Samsung PPM42M7HB | Owners Instructions - Page 182
36 Como selecionar o ventilador Função Protecção de ecrã Bloqueio de segurança Multi-controlo Video Wall Ventoinha : Deslig. Os ventiladores dentro da Tela PDP são usados para reduzir a É temperatura das partes superior e frontal da Tela PDP. Para reduzir o ex ruído do ventilador, você pode - Samsung PPM42M7HB | Owners Instructions - Page 183
X X PC2 DVI X X X X X X X X X X X X Imagem Modo : Dinâmico Controlo de cor Tamanho : 16:9 PIP Mover Enter Voltar PIP Fonte Posição PIP : DeslDige.slig. : PC1 Lig. : Mover Enter Voltar PIP Fonte Posição PIP : Lig. : PC1 AV : S-Vídeo Mover Enter Voltar IP Fonte Posi - Samsung PPM42M7HB | Owners Instructions - Page 184
BN68-01304A-00BP 5/31/07 4:12 PM Page 38 Como visualizar uma origem de sinal externo Entrada Lista de fontes : AV Editar nome Mover Enter Voltar Lista de fontes AV S-Vídeo Componente PC1 PC2 DVI Mover Enter Voltar Entrada Lista de fontes : AV Editar nome Mover Enter Voltar Editar - Samsung PPM42M7HB | Owners Instructions - Page 185
"AV OUT" são usados para equipamentos com entrada Composite Video (Vídeo composto), como câmera de vídeo ou aparelho de videocassete. Aparelho de video disc o Parte traseira da Tela PDP (Saída) Câmera de vídeo Receptor de satélite ② ① Se você tiver um segundo VCR e desejar copiar fitas de - Samsung PPM42M7HB | Owners Instructions - Page 186
da Tela PDP Câmera de vídeo ① e VCR ① Para obter imagem e som, é necessário usar os conectores S-VIDEO e RCA. Como conectar a entrada do componente Parte traseira da Tela PDP DVD DTV Receiver Os conectores COMPONENT IN são usados para o DTV receiver ou o DVD. (480i,p/576i,p/720p/1080i) Portugu - Samsung PPM42M7HB | Owners Instructions - Page 187
BN68-01304A-00BP 5/31/07 4:12 PM Page 41 Como conectar a entrada de DVD/DTV Receiver Parte traseira da Tela PDP Y / PB / PR L / R Os conectores "COMPONENT IN" (ou "Y/PB/PR" (vídeo) e "AUDIO") são usados para equipamentos com saída DVD/ DTV Receiver. (480i, - Samsung PPM42M7HB | Owners Instructions - Page 188
BN68-01304A-00BP 5/31/07 4:12 PM Page 42 Como conectar a entrada do PC Os conectores "PC 1" (ou "PC IN2 (BNC)") e "AUDIO" são usados para uma interface com o seu PC. O te d q Parte traseira da Tela PDP re Computador Pessoal ou Só quando vir a Tela PDP em modo PC1 será possível usar a porta - Samsung PPM42M7HB | Owners Instructions - Page 189
Samsung.) 1 Clique com o botão direito do mouse na Área de trabalho do Windows botão OK e da janela Display Properties (Propriedades de exibição). 42). ➢ ◆ As telas no seu PC podem parecer 4 diferentes, dependendo da sua versão do Windows e do tipo do PC. ◆ Ao utilizar a Tela PDP como um monitor - Samsung PPM42M7HB | Owners Instructions - Page 190
-00BP 6/25/07 11:41 AM Page 44 Modo de Entrada (PC/DVI) A posição e o tamanho da tela variam dependendo do tipo e da resolução do monitor do PC. Es A tabela abaixo mostra todos os modos de exibição compatíveis: (E d Resolução Freqüência vertical (Hz) Freqüência horizontal (kHz) PPM42M7H - Samsung PPM42M7HB | Owners Instructions - Page 191
possui um sistema interno de gerenciamento de energia denominado Power Saver (Economizador de energia). Este sistema economiza energia elétrica colocando o monitor em um modo de espera com baixa energia, quando o produto não é utilizado por um determinado período de tempo. É preciso utilizar um - Samsung PPM42M7HB | Owners Instructions - Page 192
assistência técnica Antes de entrar em contato com o serviço pós-venda da Samsung, faça as verificações a seguir. D ( Se não for possível com defeito ◆ Substitua as pilhas do controle remoto. ◆ Limpe a parte superior do controle remoto (janela de transmissão). ◆ Verifique os terminais das - Samsung PPM42M7HB | Owners Instructions - Page 193
tela 16:9 Tamanho da tela PPM42M7H - 42 polegadas PPM50M7H - 50 polegadas Resolução nativa VGA~UXGA (R/G/B/H/V) DVI IN - tipo DVI-D a. Saídas do monitor VIDEO OUT - VIDEO/L/R (RCA, 3P) Entradas de áudio mini plugue) Saídas de áudio EXT SPEAKER (8Ω) - R+/-, L+/- Controle externo RS232C - Samsung PPM42M7HB | Owners Instructions - Page 194
BN68-01304A-00BP 5/31/07 4:12 PM Page 48
-
 1
1 -
 2
2 -
 3
3 -
 4
4 -
 5
5 -
 6
6 -
 7
7 -
8
-
9
-
10
-
11
-
12
-
13
-
14
-
15
-
16
-
17
-
18
-
19
-
20
-
21
-
22
-
23
-
24
-
25
-
26
-
27
-
28
-
29
-
30
-
31
-
32
-
33
-
34
-
35
-
36
-
37
-
38
-
39
-
40
-
41
-
42
-
43
-
44
-
45
-
46
-
47
-
48
-
49
-
50
-
51
-
52
-
53
-
54
-
55
-
56
-
57
-
58
-
59
-
60
-
61
-
62
-
63
-
64
-
65
-
66
-
67
-
68
-
69
-
70
-
71
-
72
-
73
-
74
-
75
-
76
-
77
-
78
-
79
-
80
-
81
-
82
-
83
-
84
-
85
-
86
-
87
-
88
-
89
-
90
-
91
-
92
-
93
-
94
-
95
-
96
-
97
-
98
-
99
-
100
-
101
-
102
-
103
-
104
-
105
-
106
-
107
-
108
-
109
-
110
-
111
-
112
-
113
-
114
-
115
-
116
-
117
-
118
-
119
-
120
-
121
-
122
-
123
-
124
-
125
-
126
-
127
-
128
-
129
-
130
-
131
-
132
-
133
-
134
-
135
-
136
-
137
-
138
-
139
-
140
-
141
-
142
-
143
-
144
-
145
-
146
-
147
-
148
-
149
-
150
-
151
-
152
-
153
-
154
-
155
-
156
-
157
-
158
-
159
-
160
-
161
-
162
-
163
-
164
-
165
-
166
-
167
-
168
-
169
-
170
-
171
-
172
-
173
-
174
-
175
-
176
-
177
-
178
-
179
-
180
-
181
-
182
-
183
-
184
-
185
-
186
-
187
-
188
-
189
-
190
-
191
-
192
-
193
-
194
 |
 |

BN68-01304A-01
Contact SAMSUNG WORLD-WIDE
If you have any questions or comments relating to Samsung products, please contact the SAMSUNG
customer care center.
Communiquez avec SAMSUNG WORLD-WIDE
Pour toute question ou commentaire se rapportant aux produits Samsung, veuillez communiquer avec le
centre de service à la clientèle SAMSUNG.
Contacte con SAMSUNG WORLD-WIDE
Si tiene alguna pregunta o comentario referente a nuestros productos, por favor contacte con nuestro
Servicio de Atención al Cliente.
Contate a SAMSUNG EM TODO O MUNDO
Caso tenha dúvidas ou comentários sobre os produtos da Samsung, entre em contato com o centro de
atendimento ao cliente da SAMSUNG.
Country
CANADA
U.S.A
Customer Care Center
±
1-800-SAMSUNG (7267864)
1-800-SAMSUNG (7267864)
Web Site
www.samsung.com/ca
www.samsung.com
Address
Samsung Electronics Canada Inc., Customer Service
55 Standish Court Mississauga, Ontario L5R 4B2
Canada
Samsung Electronique Canada Inc., Service à la Clientèle
55 Standish Court Mississauga, Ontario L5R 4B2
Canada
Samsung Electronics America, Inc.
105 Challenger Road
Ridgefield Park, NJ 07660-0511
Country
ARGENTINE
BRAZIL
CHILE
COLOMBIA
COSTA RICA
ECUADOR
EL SALVADOR
GUATEMALA
JAMAICA
MEXICO
PANAMA
PUERTO RICO
REP. DOMINICA
TRINIDAD & TOBAGO
VENEZUELA
Customer Care Center
±
0800-333-3733
4004-0000
800-726-7864 (SAMSUNG)
01-8000-112-112
0-800-507-7267
1-800-10-7267
800-6225
1-800-299-0013
1-800-234-7267
01-800-SAMSUNG (7267864)
800-7267
1-800-682-3180
1-800-751-2676
1-800-7267-864
1-800-100-5303
Web Site
www.samsung.com/ar
www.samsung.com/br
www.samsung.com/cl
www.samsung.com/co
www.samsung.com/latin
www.samsung.com/latin
www.samsung.com/latin
www.samsung.com/latin
www.samsung.com/latin
www.samsung.com/mx
www.samsung.com/latin
www.samsung.com/latin
www.samsung.com/latin
www.samsung.com/latin
www.samsung.com/latin
Address
N/A
Professional PDP
Display
(P
LASMA
D
ISPLAY
P
ANEL
)
PPM42M7H
PPM50M7H
Owner’s Instructions
Before operating the unit,
please read this manual thoroughly,
and retain it for future reference.
ON-SCREEN MENUS
Picture In Picture (PIP)
VIDEO WALL
MDC
(Multiple Display Control)
Screen Burn Protection
SRS TruSurroundXT
Intended for Commercial Use and Operation
Register your product at www.samsung.com/global/register
Record your Model and Serial number here for future reference.
■
Model ________________
■
Serial No. ________________
BN68-01304A-01Eng_cover
6/25/07
5:12 PM
Page 1