Sanyo PLC XU78 Owners Manual - Page 25
Computer Input, Input Source Selection
 |
UPC - 086483068287
View all Sanyo PLC XU78 manuals
Add to My Manuals
Save this manual to your list of manuals |
Page 25 highlights
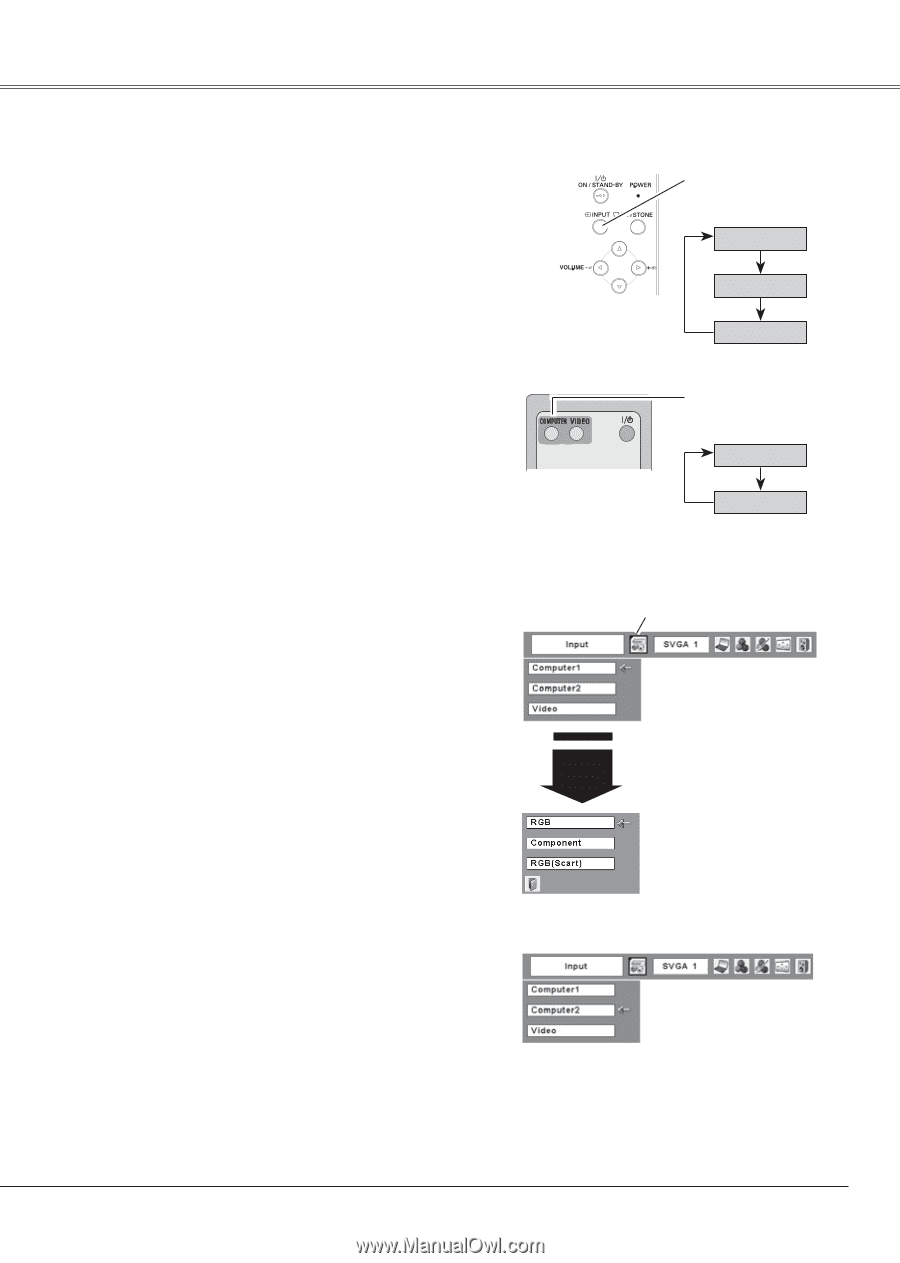
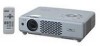
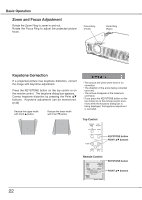
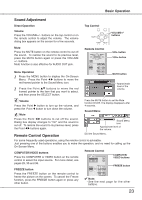
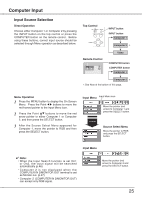
Computer Input Input Source Selection Direct Operation Choose either Computer 1 or Computer 2 by pressing the INPUT button on the top control or press the COMPUTER button on the remote control. Before using these buttons, correct input source should be selected through Menu operation as described below. Top Control INPUT button INPUT button Computer 1 Computer 2 ✳ Remote Control Video COMPUTER button COMPUTER button Computer 1 Computer 2 ✳ ✳ See Note at the bottom of this page. Menu Operation 1 Press the MENU button to display the On-Screen Menu. Press the Point 7 8 buttons to move the red framed pointer to the Input Menu icon. 2 Press the Point ed buttons to move the red arrow pointer to either Computer 1 or Computer 2, and then press the SELECT button. 3 After the Source Select Menu appeared for Computer 1, move the pointer to RGB and then press the SELECT button. Input Menu Input Menu icon Move the pointer (red arrow) to Computer 1 and press the SELECT button. Computer 1 Source Select Menu Move the pointer to RGB and press the SELECT button. Input Menu ✔ Note: • When the Input Search function is set On1 or On2, the input signal will be searched automatically (p.46) • Computer 2 is not displayed when the COMPUTER IN 2/MONITOR OUT terminal is set as Monitor out. (p.47) • Computer 2 (COMPUTER IN 2/MONITOR OUT) can accept only RGB signal. Move the pointer (red arrow) to Computer 2 and press the SELECT button. 25
-
 1
1 -
2
-
3
-
4
-
5
-
6
-
7
-
8
-
9
-
10
-
11
-
12
-
13
-
14
-
15
-
16
-
17
-
18
-
19
-
 20
20 -
 21
21 -
 22
22 -
 23
23 -
 24
24 -
 25
25 -
 26
26 -
 27
27 -
 28
28 -
 29
29 -
 30
30 -
31
-
32
-
33
-
34
-
35
-
36
-
37
-
38
-
39
-
40
-
41
-
42
-
43
-
44
-
45
-
46
-
47
-
48
-
49
-
50
-
51
-
52
-
53
-
54
-
55
-
56
-
57
-
58
-
59
-
60
-
61
-
62
-
63
-
64
-
65
-
66
-
67
 |
 |