Sanyo PLC-XU87 Owners Manual - Page 23
How to Operate the On-Screen Menu, On-Screen Menu, Top Control, Remote Control
 |
UPC - 086483065705
View all Sanyo PLC-XU87 manuals
Add to My Manuals
Save this manual to your list of manuals |
Page 23 highlights
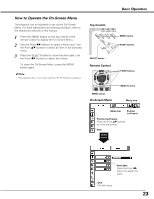
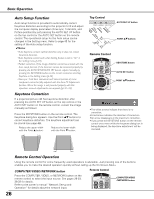
How to Operate the On-Screen Menu The projector can be adjusted or set via the On-Screen Menu. For each adjustment and setting procedure, refer to the respective sections in this manual. 1 Press the MENU button on the top control or the remote control to display the On-Screen Menu. 2 Use the Point 7 8 buttons to select a Menu icon. Use the Point ed buttons to select an item in the selected menu. 3 Press the SELECT button to show the item data. Use the Point 7 8 buttons to adjust the values. To close the On-Screen Menu, press the MENU button again. ✔Note: •The selected item is not active until the SELECT button is pressed. Basic Operation Top Control ON - OFF POWER MENU WARNING INPUT LAMP REP AUTO SET U SELECT - VOLUME + VOLU MENU button POINT buttons SELECT button Remote Control POINT buttons MENU button On-Screen Menu SELECT button Menu icon Menu bar Pointer (red frame) Pointer (red frame) Press the Point ed buttons to move the pointer. Item SELECT button Item data Press the Point 7 8 buttons to adjust the value. Quit Exit this menu. 23
-
 1
1 -
2
-
3
-
4
-
5
-
6
-
7
-
8
-
9
-
10
-
11
-
12
-
13
-
14
-
15
-
16
-
17
-
 18
18 -
 19
19 -
 20
20 -
 21
21 -
 22
22 -
 23
23 -
 24
24 -
 25
25 -
 26
26 -
 27
27 -
 28
28 -
29
-
30
-
31
-
32
-
33
-
34
-
35
-
36
-
37
-
38
-
39
-
40
-
41
-
42
-
43
-
44
-
45
-
46
-
47
-
48
-
49
-
50
-
51
-
52
-
53
-
54
-
55
-
56
-
57
-
58
-
59
-
60
-
61
-
62
-
63
-
64
-
65
-
66
-
67
-
68
-
69
-
70
-
71
-
72
-
73
 |
 |
