Sanyo PLV Z700 Owners Manual - Page 21
Menu and its Functions, Image, Image adj°, Picture adj°, Screen, Input, Setting, Information, Guide - hdmi
 |
UPC - 086483072420
View all Sanyo PLV Z700 manuals
Add to My Manuals
Save this manual to your list of manuals |
Page 21 highlights
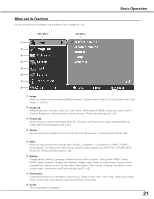
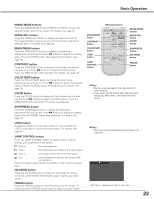
Basic Operation Menu and its Functions For the detailed menu contents, see the Menu Tree on pages 54 - 55. Main Menu Sub-Menu q w e r t y u i q Image Select an image mode from among Brilliant cinema, Creative cinema, Natural, Living, Dynamic, and User image 1 - 5 (p.27). w Image adj. Adjust Brightness, Contrast, Color, Tint, Color temp., White balance (R/G/B), Sharpness, Lamp control, Gamma, Progressive, Noise reduction, Advanced menu, Reset, and Store (pp.28 - 33). e Picture adj. Select Overscan, Horizontal, Vertical, Auto adj., Fine sync, and Total dots to adjust the parameters to match with the input signal format (p.34). r Screen Set the screen size; choose from Full, Zoom, Normal, Natural wide , and Anamorphic (pp.35 - 36). t Input Select an input source from among Video, S-video, Component 1, Component 2, HDMI 1, HDMI 2 , and Computer. For Video and S-video inputs, choose a video system from AUTO, PAL, SECAM, NTSC, NTSC4.43, PAL-M, and PAL-N (pp.24 - 26). y Setting Change various settings; Language, Advanced menu, Menu position, Ceiling, Rear, HDMI 1 setup, HDMI 2 setup, Highland, Background, Rename, Display, Logo, Power off confirmation, Capture, Power management, Remote control, Shutter demo, Test pattern, Filter counter, Cleaning, Fan control, Lamp counter reset, Service port, and Factory default (pp.37 - 42). u Information Display the input source information: Input source, Signal, H-sync freq., V-sync freq., Deep color, Image mode, Screen size, Lamp status, Lamp time and Filter time (p.43). i Guide The key operation is displayed. 21
-
 1
1 -
2
-
3
-
4
-
5
-
6
-
7
-
8
-
9
-
10
-
11
-
12
-
13
-
14
-
15
-
 16
16 -
 17
17 -
 18
18 -
 19
19 -
 20
20 -
 21
21 -
 22
22 -
 23
23 -
 24
24 -
 25
25 -
 26
26 -
27
-
28
-
29
-
30
-
31
-
32
-
33
-
34
-
35
-
36
-
37
-
38
-
39
-
40
-
41
-
42
-
43
-
44
-
45
-
46
-
47
-
48
-
49
-
50
-
51
-
52
-
53
-
54
-
55
-
56
-
57
-
58
-
59
-
60
 |
 |
