Sanyo PLV Z700 Owners Manual - Page 37
Setting, Setting Menu, Menu position, Language, Advanced menu, Ceiling
 |
UPC - 086483072420
View all Sanyo PLV Z700 manuals
Add to My Manuals
Save this manual to your list of manuals |
Page 37 highlights
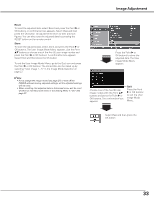
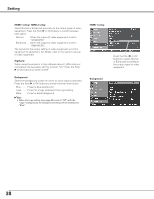
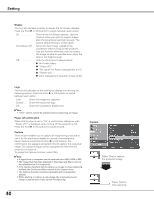
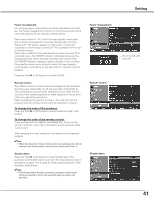
Setting Setting The Setting Menu allows you to set up other various functions described below. 1 Press the Point ed buttons to select the Setting Menu and press the Point 8 or OK buttons to access the submenu items. 2 Use the Point ed buttons to select the desired item and press the Point 8 or OK buttons to access the selected item. 3 Use the Point ed or OK buttons to adjust the setting. Setting Menu Language The language used in the On-Screen Menu is available in English, German, French, Italian, Spanish, Portuguese, Dutch, Swedish, Finnish, Polish, Hungarian, Romanian, Russian, Chinese, Korean, or Japanese. Advanced menu When this function is "On," the Advanced menu in the Image Mode Adjustment can be selected. Press the Point 8 or OK buttons to switch On/Off. See "Advanced menu" on pages 30 - 31 for details. Menu position This function is used to change the position of the On-Screen Menu. Select Menu position and press the Point 8 or OK buttons. The Menu position screen appears. Use the Point ed7 8 buttons to select the desired position and press the OK button. Ceiling When this function is set to "On," the picture is top/bottom and left/right reversed. This function is used to project the image from a ceiling-mounted projector. Press the Point 8 or OK buttons to switch On/Off. Language Press the Point 8 or OK buttons to display the Language Menu. Choose a language and press the Point 8 or OK buttons. The pointer moves to this icon. Press the Point 8 or OK buttons again to activate it. Menu position Rear When this function is set to "On," the picture is left/right reversed. This function is used to project the image to a rear projection screen. Press the Point 8 or OK buttons to switch On/Off. Select Menu position and press the Point 8 or OK buttons. The Menu position screen appears. 37
-
 1
1 -
2
-
3
-
4
-
5
-
6
-
7
-
8
-
9
-
10
-
11
-
12
-
13
-
14
-
15
-
16
-
17
-
18
-
19
-
20
-
21
-
22
-
23
-
24
-
25
-
26
-
27
-
28
-
29
-
30
-
31
-
 32
32 -
 33
33 -
 34
34 -
 35
35 -
 36
36 -
 37
37 -
 38
38 -
 39
39 -
 40
40 -
 41
41 -
 42
42 -
43
-
44
-
45
-
46
-
47
-
48
-
49
-
50
-
51
-
52
-
53
-
54
-
55
-
56
-
57
-
58
-
59
-
60
 |
 |
