Sanyo VPC HD1 Instruction Manual, VPC-HD1E - Page 114
original video clip to be erased
 |
UPC - 086483059766
View all Sanyo VPC HD1 manuals
Add to My Manuals
Save this manual to your list of manuals |
Page 114 highlights
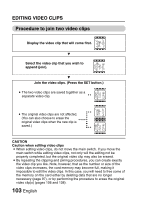
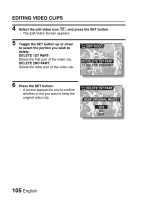
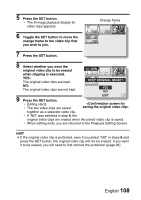
5 Press the SET button. h The 9-image playback display for video clips appears. 6 Toggle the SET button to move the orange frame to the video clip that you wish to join. Orange frame 101 0001 0002 0003 0004 7 Press the SET button. 8 Select whether you want the original video clip to be erased JOIN when clipping is executed. YES: The original video clips are kept. KEEP ORIGINAL IMAGE? NO: The original video clips are not kept. YES NO 9 Press the SET button. h Editing starts. h The two video clips are saved EXIT together as a separate video clip. h If "NO" was selected in step 8, the original video clips are erased when the joined video clip is saved. h When editing ends, you are returned to the Playback Setting Screen. HINT i If the original video clip is protected, even if you select "NO" in steps 8 and press the SET button, the original video clip will not be erased. If you want it to be erased, you will need to first remove the protection (page 95). English 108
-
 1
1 -
2
-
3
-
4
-
5
-
6
-
7
-
8
-
9
-
10
-
11
-
12
-
13
-
14
-
15
-
16
-
17
-
18
-
19
-
20
-
21
-
22
-
23
-
24
-
25
-
26
-
27
-
28
-
29
-
30
-
31
-
32
-
33
-
34
-
35
-
36
-
37
-
38
-
39
-
40
-
41
-
42
-
43
-
44
-
45
-
46
-
47
-
48
-
49
-
50
-
51
-
52
-
53
-
54
-
55
-
56
-
57
-
58
-
59
-
60
-
61
-
62
-
63
-
64
-
65
-
66
-
67
-
68
-
69
-
70
-
71
-
72
-
73
-
74
-
75
-
76
-
77
-
78
-
79
-
80
-
81
-
82
-
83
-
84
-
85
-
86
-
87
-
88
-
89
-
90
-
91
-
92
-
93
-
94
-
95
-
96
-
97
-
98
-
99
-
100
-
101
-
102
-
103
-
104
-
105
-
106
-
107
-
108
-
 109
109 -
 110
110 -
 111
111 -
 112
112 -
 113
113 -
 114
114 -
 115
115 -
 116
116 -
 117
117 -
 118
118 -
 119
119 -
120
-
121
-
122
-
123
-
124
-
125
-
126
-
127
-
128
-
129
-
130
-
131
-
132
-
133
-
134
-
135
-
136
-
137
-
138
-
139
-
140
-
141
-
142
-
143
-
144
-
145
-
146
-
147
-
148
-
149
-
150
-
151
-
152
-
153
-
154
-
155
-
156
-
157
-
158
-
159
-
160
-
161
-
162
-
163
-
164
-
165
-
166
-
167
-
168
-
169
-
170
-
171
-
172
-
173
-
174
-
175
-
176
-
177
-
178
-
179
-
180
-
181
-
182
-
183
-
184
-
185
-
186
-
187
-
188
-
189
-
190
-
191
-
192
-
193
-
194
-
195
-
196
-
197
-
198
-
199
-
200
 |
 |