Seagate Maxtor Central Axis Maxtor Central Axis for Windows User Guide - Page 38
Backup, Simple Backup, Confirmation, Backup Initial View, Simple Backup Confirmation
 |
View all Seagate Maxtor Central Axis manuals
Add to My Manuals
Save this manual to your list of manuals |
Page 38 highlights
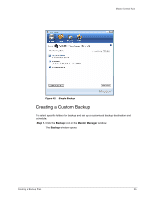
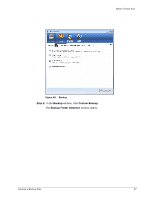
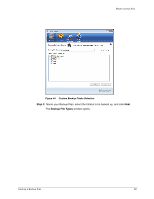
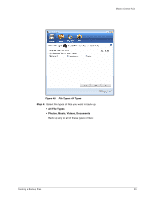
Maxtor Central Axis Figure 40: Backup (Initial View) Step 2: In the Backup window, click Simple Backup. A Simple Backup Confirmation window confirms that you've selected Simple Backup and asks you to name this Backup Plan: Figure 41: Simple Backup Confirmation Step 3: Enter a name for your Backup Plan and click OK. The Backup window now offers the options of editing your backup settings and restoring backed up files and describes your current Backup Plan and the details of your last backup. Creating a Backup Plan 35
-
 1
1 -
2
-
3
-
4
-
5
-
6
-
7
-
8
-
9
-
10
-
11
-
12
-
13
-
14
-
15
-
16
-
17
-
18
-
19
-
20
-
21
-
22
-
23
-
24
-
25
-
26
-
27
-
28
-
29
-
30
-
31
-
32
-
 33
33 -
 34
34 -
 35
35 -
 36
36 -
 37
37 -
 38
38 -
 39
39 -
 40
40 -
 41
41 -
 42
42 -
 43
43 -
44
-
45
-
46
-
47
-
48
-
49
-
50
-
51
-
52
-
53
-
54
-
55
-
56
-
57
-
58
-
59
-
60
-
61
-
62
-
63
-
64
-
65
-
66
-
67
-
68
-
69
-
70
-
71
-
72
-
73
-
74
-
75
-
76
-
77
-
78
 |
 |

Creating a Backup Plan
35
Maxtor Central Axis
Step 2:
In the
Backup
window, click
Simple Backup
.
A
Simple Backup
Confirmation
window confirms that you’ve selected Simple
Backup and asks you to name this Backup Plan:
Step 3:
Enter a name for your Backup Plan and click
OK
.
The
Backup
window now offers the options of editing your backup settings and
restoring backed up files and describes your current Backup Plan and the details
of your last backup.
Figure 40:
Backup (Initial View)
Figure 41:
Simple Backup Confirmation