Sharp AL 1551CS Interactive Manual for the AL-1530CS AL-1540CS AL-1551CS
Sharp AL 1551CS - B/W Laser - All-in-One Manual
 |
UPC - 074000074507
View all Sharp AL 1551CS manuals
Add to My Manuals
Save this manual to your list of manuals |
Sharp AL 1551CS manual content summary:
- Sharp AL 1551CS | Interactive Manual for the AL-1530CS | AL-1540CS | AL-1551CS - Page 1
- Sharp AL 1551CS | Interactive Manual for the AL-1530CS | AL-1540CS | AL-1551CS - Page 2
Uninstalling SHARP Personal MFP Series Software 34 8 9 10 5 Index 3 Scan Scanning Overview 11 Scanning an Image from a TWAIN-Compliant Application 12 Scanning an Image from a WIA-Compliant Application (Windows XP) 16 Scanning an Image from the "Scanner and Camera Wizard" (Windows XP) 18 - Sharp AL 1551CS | Interactive Manual for the AL-1530CS | AL-1540CS | AL-1551CS - Page 3
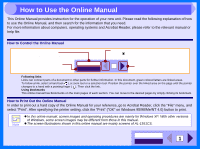
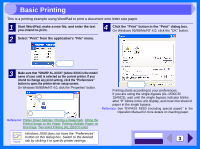
links Links can connect parts of a document to other parts for further information. In printer setting, click the "Print" ("OK" on Windows 95/98/Me/NT 4.0) button to print. Note ! In this online manual, screen images and operating procedures are mainly for Windows XP. With other versions of Windows - Sharp AL 1551CS | Interactive Manual for the AL-1530CS | AL-1540CS | AL-1551CS - Page 4
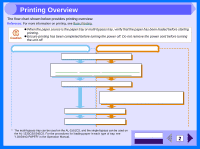
intend to print Open the printer driver setup screen and set the print preferences Reference: Printer Driver Settings, Printing a Watermark, Operation Manual. Printing Exit printing * The multi-bypass tray can be used on the AL-1551CS, and the single bypass can be used on the AL-1530CS/1540CS. - Sharp AL 1551CS | Interactive Manual for the AL-1530CS | AL-1540CS | AL-1551CS - Page 5
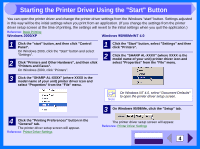
" menu. Click here. 3 Make sure that "SHARP AL-XXXX" (where XXXX is the model name of your unit) is selected as the current printer. If you intend to change any print setting, click the "Preferences" button to open the printer driver setup screen. On Windows 95/98/Me/NT 4.0, click the "Properties - Sharp AL 1551CS | Interactive Manual for the AL-1530CS | AL-1540CS | AL-1551CS - Page 6
from the "File" menu. 3 Click the "SHARP AL-XXXX" (where XXXX is the model name of your unit) printer driver icon and select "Properties" from the "File" menu. On Windows NT 4.0, select "Document Defaults" to open the printer driver setup screen. Note 3 On Windows 95/98/Me, click the "Setup" tab - Sharp AL 1551CS | Interactive Manual for the AL-1530CS | AL-1540CS | AL-1551CS - Page 7
Settings To view Help for a setting, click the ( ) button in the upper right-hand corner of the window and then click the setting. Note The AL-1551CS printer driver setup screen is shown below. The settings and the image of the unit will vary depending on the model. Tab Index which allows you - Sharp AL 1551CS | Interactive Manual for the AL-1530CS | AL-1540CS | AL-1551CS - Page 8
, for example "CONFIDENTIAL", on your document, refer to the following steps. Open the printer driver and click the "Watermarks" tab. Reference: See Basic Printing for details on how to open the printer driver. How to Print a Watermark From the "Watermark" drop-down list, select the watermark - Sharp AL 1551CS | Interactive Manual for the AL-1530CS | AL-1540CS | AL-1551CS - Page 9
2 Fitting the Printed Image to the Paper This printer driver can adjust the zoom ratio for printing according to the paper loaded in the unit. Follow the steps shown below to use this function. The instruction below assumes that you intend to print a Letter size document onto an Invoice size paper. - Sharp AL 1551CS | Interactive Manual for the AL-1530CS | AL-1540CS | AL-1551CS - Page 10
Multiple Pages on One Page This feature allows you to print two or four document pages onto a single page. To use this function, open the printer driver setup screen, select "2-Up" or "4-Up" for "N-Up Printing" on the "Main" tab. Note The "N-Up Printing" setting is not available when "Fit To Paper - Sharp AL 1551CS | Interactive Manual for the AL-1530CS | AL-1540CS | AL-1551CS - Page 11
2 Two-sided Printing (AL-1551CS only) You can print on both sides of the paper. To use this function, open the printer driver setup screen and select "2Sided (Book)" or "2-Sided (Tablet)" from "Document Style" in the "Main" tab. When using two-sided printing, select "Tray 1" or "Tray 2" - Sharp AL 1551CS | Interactive Manual for the AL-1530CS | AL-1540CS | AL-1551CS - Page 12
2 Outline of the Print Status Window When printing begins, the Print Status Window activates and appears on the screen. The Print Status Window is a program designed to show the current printer status including the document name being printed and error messages. Status icon This icon informs you of - Sharp AL 1551CS | Interactive Manual for the AL-1530CS | AL-1540CS | AL-1551CS - Page 13
Camera Wizard" (Windows XP) Scanning Reference: "USING THE SCANNER MODE" in the Operation Manual, Outline of Button Manager *1:TWAIN is an industry standard for interface of image data processing devices including scanners. By installing a TWAIN driver onto your computer, you can scan and work - Sharp AL 1551CS | Interactive Manual for the AL-1530CS | AL-1540CS | AL-1551CS - Page 14
select "Select Scanner". 3 Select "SHARP Personal MFP series", and click the "Select" button. Click here. Click here. Note ! If you are using Windows XP, you can also select "WIA-SHARP AL-XXXX" (where XXXX is the model name of your unit) to scan using the WIA driver. Reference: Scanning an Image - Sharp AL 1551CS | Interactive Manual for the AL-1530CS | AL-1540CS | AL-1551CS - Page 15
an Image from a TWAIN-Compliant Application (part 2) 4 Select "Acquire Image" from the "File" menu, or click the "Acquire" button ( ). The scanner driver setup screen will appear. Reference: Scanner Driver Settings 5 In the "Scanning Position" menu, select the position in which you placed the - Sharp AL 1551CS | Interactive Manual for the AL-1530CS | AL-1540CS | AL-1551CS - Page 16
an Image from a TWAIN-Compliant Application (part 3) Scanner Driver Settings The scanner driver setup screen consists of the "Set-up screen", which lets you select scan settings, and the "Preview screen", which shows the scanned image. For details on the scan settings, click the "Help" button to - Sharp AL 1551CS | Interactive Manual for the AL-1530CS | AL-1540CS | AL-1551CS - Page 17
Compliant Application (part 4) Preview screen "Auto Scan Area Adjustment" button Click when the preview screen is displayed to automatically set the scanning area. Click the "Auto Scan Area Adjustment" button to adjust the scanning area automatically. Entire preview screen Preview window Click the - Sharp AL 1551CS | Interactive Manual for the AL-1530CS | AL-1540CS | AL-1551CS - Page 18
in the Operation Manual. 2 After starting Paint, click the "File" menu and select "From Scanner or Camera". The scan screen of the WIA driver will appear. Note If you have WIA drivers for other devices installed in your computer, the "Select Device" screen will open. Select "SHARP AL-XXXX" (where - Sharp AL 1551CS | Interactive Manual for the AL-1530CS | AL-1540CS | AL-1551CS - Page 19
3 Scanning an Image from a WIA-Compliant Application (Windows XP) (part 2) 3 Select the paper source and picture Paper source" and specify the original size in "Page size". 4 Click the "Scan" button. Scanning begins and the image is acquired into Paint. Use "Save" in your application to select a - Sharp AL 1551CS | Interactive Manual for the AL-1530CS | AL-1540CS | AL-1551CS - Page 20
on setting an original for scanning, refer to "ORIGINAL PLACEMENT" in the Operation Manual. 4 Click the "Next" button. 2 Click the "start" button, click "Control Panel", click "Printers and Other Hardware", and then click "Scanners and Cameras". 3 Click the "SHARP AL-XXXX" (where XXXX is the - Sharp AL 1551CS | Interactive Manual for the AL-1530CS | AL-1540CS | AL-1551CS - Page 21
3 Scanning an Image from the "Scanner and Camera Wizard" (Windows XP) (part 2) 5 Select the "Picture type" and "Paper the "Next" button. JPG, BMP, TIF or PNG can be selected for the format. To begin scanning, click the "Next" button. Note ! If you select "Document Feeder" for the "Paper source - Sharp AL 1551CS | Interactive Manual for the AL-1530CS | AL-1540CS | AL-1551CS - Page 22
an Image from the "Scanner and Camera Wizard" (Windows XP) (part 3) 7 When scanning ends, the following screen will appear. Select the next task you wish to perform, and then click the "Next" button. If you are ready to - Sharp AL 1551CS | Interactive Manual for the AL-1530CS | AL-1540CS | AL-1551CS - Page 23
Manager Button Manager is a utility software to link scanning functions to the SCANNER key on the unit. This software enables you to set scanning functions to six different scan menus, which will be linked the SCANNER key on the unit. Reference: To begin scanning using the unit's operation panel - Sharp AL 1551CS | Interactive Manual for the AL-1530CS | AL-1540CS | AL-1551CS - Page 24
Button Manager normally keeps active under the Windows operating system. Follow the steps shown below to set scan options as you like. For details the "start" button, select "All Programs" ("Programs" on Windows 98/Me/2000), select "SHARP Personal MFP series", and then click "Button Manager" to start - Sharp AL 1551CS | Interactive Manual for the AL-1530CS | AL-1540CS | AL-1551CS - Page 25
a copy. Reference: If any copier trouble occurs, refer to "TROUBLESHOOTING" in the Operation Manual. 1 Check the Connection between the Unit and Computer 2 Check Your Computer Plug and Play Screen does not Appear (when the USB is connected) Failed to Install the MFP Driver (Windows 2000/XP) What - Sharp AL 1551CS | Interactive Manual for the AL-1530CS | AL-1540CS | AL-1551CS - Page 26
which type of cable is supported by your computer, and then the unit's operation, then printing and scanning may be disrupted. If this occurs, restart the computer. The unit's scanning function can only be used if the INTERFACE CABLE" in the Operation Manual for more details on interface connection - Sharp AL 1551CS | Interactive Manual for the AL-1530CS | AL-1540CS | AL-1551CS - Page 27
If you are using Windows XP, the "Found New Hardware Wizard" may appear after you change the port setting. In this case, click the "Cancel" button to close the wizard, and then reinstall the printer driver as explained in "INSTALLING THE SOFTWARE" in the Operation Manual. CONTENTS INDEX 25 - Sharp AL 1551CS | Interactive Manual for the AL-1530CS | AL-1540CS | AL-1551CS - Page 28
power of both devices, follow the manual for USB troubleshooting or contact your computer manufacturer. 4 When you make sure that the USB port is enabled, install the software, referring to "INSTALLING THE SOFTWARE" in the Operation Manual. Note ! If the "System" icon does not appear on Windows - Sharp AL 1551CS | Interactive Manual for the AL-1530CS | AL-1540CS | AL-1551CS - Page 29
?" ("File signature verification" on Windows 2000). If the option "Block" has been selected for your computer, then the MFP driver will not be installable. Select the option "Warn" and then install the MFP driver as explained in "INSTALLING THE SOFTWARE" in the Operation Manual. CONTENTS INDEX 27 - Sharp AL 1551CS | Interactive Manual for the AL-1530CS | AL-1540CS | AL-1551CS - Page 30
in the "Advanced" tab of the printer driver setup screen. When "Photo" is selected cartridge, the indicator will blink. Replace the cartridge and try printing again. Reference: See "TD CARTRIDGE REPLACEMENT", "DRUM CARTRIDGE REPLACEMENT" and "ABOUT SUPPLIES AND OPTIONS" in the Operation Manual - Sharp AL 1551CS | Interactive Manual for the AL-1530CS | AL-1540CS | AL-1551CS - Page 31
partly off the paper, follow the steps listed below. CHECK1 Is the paper size loaded in the tray the same as that specified in the printer driver? visible space between the paper and the paper guides. Reference: See "LOADING PAPER" in the Operation Manual for more details on inserting paper. CHECK4 - Sharp AL 1551CS | Interactive Manual for the AL-1530CS | AL-1540CS | AL-1551CS - Page 32
is shown. If you still cannot print after confirming the "SHARP AL-XXXX" (where XXXX is the model name of your unit) printer driver icon, the printer driver may not have been installed correctly. In this case, delete SHARP Personal MFP series software and then reinstall it. Reference: Uninstalling - Sharp AL 1551CS | Interactive Manual for the AL-1530CS | AL-1540CS | AL-1551CS - Page 33
" setting in the scanner driver satisfies the requirement of the set original. Reference: Scanning an Image from a TWAINCompliant Application, Scanning an Image from a WIA-Compliant Application (Windows XP), Scanning an Image from the "Scanner and Camera Wizard" (Windows XP), CHECK3 Have you - Sharp AL 1551CS | Interactive Manual for the AL-1530CS | AL-1540CS | AL-1551CS - Page 34
the original table. Reference: Refer to "ORIGINAL PLACEMENT" in the Operation Manual for the detail on how to set the original. CHECK3 Have you set the original correctly on the SPF/RSPF? To scan from the SPF/RSPF, align the guide to the original as shown in the illustration below. CHECK2 Have you - Sharp AL 1551CS | Interactive Manual for the AL-1530CS | AL-1540CS | AL-1551CS - Page 35
your application. (Sharpdesk allows multiple originals to be scanned in a single operation.) CHECK7 Does your computer's operating system support the scanner driver? The operating systems that support the unit's scanner driver are Windows 98/Me/2000/XP. CHECK8 Are you using an appropriate interface - Sharp AL 1551CS | Interactive Manual for the AL-1530CS | AL-1540CS | AL-1551CS - Page 36
Scan the Image". If you still cannot solve the problem, follow the steps below to uninstall SHARP Personal MFP series software (MFP driver (printer driver/scanner driver instructions in "INSTALLING THE SOFTWARE" in the Operation Manual. Delete the "SHARP MFP driver" and the "Button Manager (SHARP - Sharp AL 1551CS | Interactive Manual for the AL-1530CS | AL-1540CS | AL-1551CS - Page 37
10 Printer driver 5 Scanner driver TWAIN driver 14 WIA driver 17 How to Use the Online Manual 1 I Interface 24 M Main 5 Margin 28 MFP driver 27 N N-up printing 8 Nothing Prints 30 O Outline of Button Manager 21 Outline of the Print Status Window 10 Overview Print 2 Scan
-
 1
1 -
 2
2 -
 3
3 -
 4
4 -
 5
5 -
 6
6 -
 7
7 -
8
-
9
-
10
-
11
-
12
-
13
-
14
-
15
-
16
-
17
-
18
-
19
-
20
-
21
-
22
-
23
-
24
-
25
-
26
-
27
-
28
-
29
-
30
-
31
-
32
-
33
-
34
-
35
-
36
-
37
 |
 |
