Sharp AL 1551CS Interactive Manual for the AL-1530CS AL-1540CS AL-1551CS - Page 15
Scanning an Image from a TWAIN-Compliant Application part 2 - reset
 |
UPC - 074000074507
View all Sharp AL 1551CS manuals
Add to My Manuals
Save this manual to your list of manuals |
Page 15 highlights
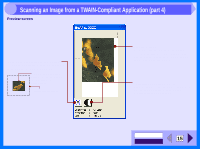
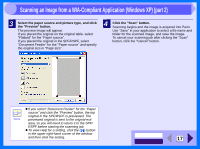
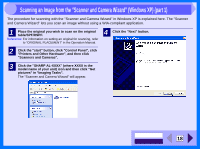
3 Scanning an Image from a TWAIN-Compliant Application (part 2) 4 Select "Acquire Image" from the "File" menu, or click the "Acquire" button ( ). The scanner driver setup screen will appear. Reference: Scanner Driver Settings 5 In the "Scanning Position" menu, select the position in which you placed the original in Step 1 ("Platen" or "SPF"). Select "SPF" when you placed the original in the SPF/RSPF. 7 Specify the scanning area, and set the scan preferences. For information on specifying the scan area and setting the scan preferences, see scanner driver Help. Reference: Scanner Driver Settings Caution Setting a large area with full color together with a high resolution setting, makes the data size large, resulting in extended scanning times. It is recommended to set the scanning preferences depending on the type of the original to be scanned, i.e., Text, Text/Graphics, Photograph, Color, Black & White. 8 Click the "Scan" button after setting your preferences. To cancel your scanning job after clicking the "Scan" button, press the [Esc] key on your keyboard. 6 Click the "Preview" button. The preview image will appear. Note ! If the rotation or angle of the image is different, reset the original, and click the "Preview" button again. ! If you set multiple pages in the SPF/RSPF, the unit previews only the page placed on the top of the originals, and then sends it to the original exit area. Return the previewed page to the SPF/RSPF before starting the scanning job. When you close the scanner driver after scanning, the image data will appear as a new file in Sharpdesk. CONTENTS INDEX 13
-
 1
1 -
2
-
3
-
4
-
5
-
6
-
7
-
8
-
9
-
 10
10 -
 11
11 -
 12
12 -
 13
13 -
 14
14 -
 15
15 -
 16
16 -
 17
17 -
 18
18 -
 19
19 -
 20
20 -
21
-
22
-
23
-
24
-
25
-
26
-
27
-
28
-
29
-
30
-
31
-
32
-
33
-
34
-
35
-
36
-
37
 |
 |
