Singer 9970 Instruction Manual
Singer 9970 Manual
 |
View all Singer 9970 manuals
Add to My Manuals
Save this manual to your list of manuals |
Singer 9970 manual content summary:
- Singer 9970 | Instruction Manual - Page 1
INSTRUCTION MANUAL 9970 - Singer 9970 | Instruction Manual - Page 2
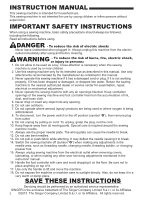
area, such as threading needle, changing needle, threading bobbin, or changing presser foot. 15. Always unplug sewing machine from the electrical outlet when removing covers, lubricating, or when making any other user servicing adjustments mentioned in the instruction manual. 16. Handle the foot - Singer 9970 | Instruction Manual - Page 3
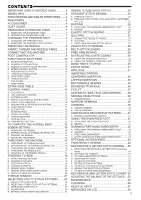
FOOT .......... 42 B. DARNING 42 C. FREE-HAND EMBROIDERY 42 D. AFTER DARNING OR FREE-HAND EMBROIDERY 42 OPTIONAL ACCESSORIES 43 TWIN NEEDLE SEWING 49 DECORATIVE & LETTER STITCH SEWING ... 50 A. SELECTING DECORATIVE & LETTER STITCH (selecting mode 50 B. SHIFTING THE CURSOR 51 C. TO CHECK - Singer 9970 | Instruction Manual - Page 4
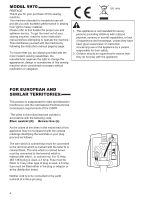
refer to this booklet for proper use and optimum service. To get the most out of your sewing machine, read the entire instruction manual before attempting to operate the machine. Then familiarize yourself with the machine by following the instruction manual page by page. To ensure that you are - Singer 9970 | Instruction Manual - Page 5
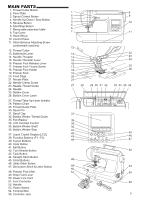
machine) 12. Thread Cutter 13. Buttonhole Lever 14. Needle Threader 15. Needle Threader Lever 16. Presser Foot Release Lever 17. Presser Foot Thumb Screw 18. Presser Foot Holder 19. Presser Foot 20. Feed Dogs 21. Needle Plate 22. Needle Clamp Screw 23. Needle Thread Guide 24. Needle 25. Bobbin - Singer 9970 | Instruction Manual - Page 6
are provided in the accessory case. (See next page, [REMOVABLE EXTENSION 7 TABLE]) 1. Needle Pack 2. 4 Bobbins Class 15 (1 is in the machine) 3. Seam Ripper 8 4. Brush 5. Auxiliary Spool Pin with Felt Washer 6. Screw Driver 1 2 34 5 6 9 7. Driver for Needle Plate 8. Thread Cap (On - Singer 9970 | Instruction Manual - Page 7
ACCESSORY CASE Hook your finger to the left side of accessory case and pull toward you. CHANGING THE PRESSER FOOT The presser foot must be changed according to the stitch you sew FOOT HOLDER When attaching presser feet that have their own shank, or when cleaning the machine, you should remove the - Singer 9970 | Instruction Manual - Page 8
2001 11/80-14/90 green shank Needle for knit and synthetic fabric Sweatshirt, Swim-wear, Double Knit, Sweater Knit All purpose polyester 2001 green shank Leather All purpose polyester, heavy 2032 Leather duty, topstitching thread SINGER brand needles are recommended for this machine. 8 - Singer 9970 | Instruction Manual - Page 9
then remove plug from outlet. FOR UNITED STATES AND CANADA USERS: POLARIZED PLUG INFORMATION This appliance has a polarized feet. 4. Turn on the power switch. 5. A lamp will light up when switch is turned on. 6. The harder you press the foot controller, the faster the machine will sew. The machine - Singer 9970 | Instruction Manual - Page 10
REVERSE STITCH BUTTON The machine will continue to sew in reverse at low speed while this button is pressed and stop when this button is released. Note: When the foot controller is connected, machine will sew in reverse while this button is pressed. When released, machine will sew forward. C. NEEDLE - Singer 9970 | Instruction Manual - Page 11
position. For most sewing, the lever should be in this position. For darning or free motion embroidery or whenever fabric is needle will raise or lower. You should always turn hand wheel toward you. EXTRA WIDE TABLE If you need wide sewing space, attach the extra wide table as shown. Set the machine - Singer 9970 | Instruction Manual - Page 12
top cover. Patterns and letters of this machine are indicated on this chart. They are separated: Utility stitches and Decorative & Letter stitches. D. STRAIGHT STITCH BUTTON By pressing this button, you can select straight stitch directly. E. UTILITY STITCH BUTTON By pressing this button, you may - Singer 9970 | Instruction Manual - Page 13
and at the end of a stitch. (SEE PAGE 19) DECORATIVE & LETTER STITCH SEWING If this button is pressed at the end of a decorative stitch pattern, machine will stop automatically at the end of the stitch pattern and tie off the stitch with a locking stitch. M. TWIN NEEDLE BUTTON If you attach the twin - Singer 9970 | Instruction Manual - Page 14
SETTING Be sure to use only SINGER (Class 15) bobbins in this machine. A. REMOVING THE BOBBIN 1. Pull the bobbin cover latch to the right and remove the bobbin cover. 2. Lift up the bobbin from the machine. B. SETTING SPOOL OF THREAD ON SPOOL PIN 1. Pull up the left end of spool pin and set the - Singer 9970 | Instruction Manual - Page 15
thread does not slip out of notch (a). 4. Pull thread out about 10 cm (4 inches). Replace the bobbin cover. Set the left tab into the hole in needle plate and push the right side of bobbin cover down until it clicks into place. NOTE: Be sure to use only SINGER (Class 15) bobbins in this machine. 15 - Singer 9970 | Instruction Manual - Page 16
thread up and bring thread back down again from right to left along the slit. 6. Pull thread downward along the slit. 7. Draw thread through thread guide from right side opening. 8. Pass through needle eye from front to back. Refer to next page for instructions on how to use - Singer 9970 | Instruction Manual - Page 17
while machine is operating. Note:The needle threader is used for needle sizes 11/80, 14/90, and 16/100. 1. Lower the presser foot. 2. Check that the needle is raised. If it is not so, raise needle by pressing needle up/down button. Note: If desired, you can draw up the bobbin thread manually, by - Singer 9970 | Instruction Manual - Page 18
STARTING TO SEW The machine will be set to sew straight stitch when power switch is turned on. CAUTION: To prevent accidents. While sewing, special care is required around the needle. Machine automatically feeds the fabric, do not pull or push the fabric. A. START AND END OF SEAM 1. Check the - Singer 9970 | Instruction Manual - Page 19
Tack mark " " will appear on the LCD. 2. Start to sew. Machine will sew tacking stitches automatically and then start to sew the selected pattern. 3. When you reach the end of seam, press the reverse button once. Machine will sew tacking stitches and stop automatically. 4. If you want to cancel this - Singer 9970 | Instruction Manual - Page 20
with your hand when sewing over overlapped areas. G.WIDTH OF SEAM ALLOWANCE Guide lines on the needle plate indicate the distance from the center needle positon. To keep the width of seam allowance, guide fabric edge aligning this guide line. Seam Guide Use the seam guide to guide the fabric. Attach - Singer 9970 | Instruction Manual - Page 21
THREAD TENSION This machine adjusts the thread tension automatically when pattern is Stitch information mode). When another stitch pattern is selected, thread tension will return to pre-set. You can start sewing at this mode and change tension while sewing. A. Preset thread tension Upper and bobbin - Singer 9970 | Instruction Manual - Page 22
you turn on the machine, straight stitch will be selected automatically. Select utility stitch pattern as follows. A. DIRECT STITCH PATTERN You can select basic straight stitch pattern directly by pressing the Direct Stitch Selection Button. B. SELECTING OTHER UTILITY STITCH PATTERNS 1. Press the - Singer 9970 | Instruction Manual - Page 23
button, machine will return to preset stitch width and length. When you press the return button (F1), LCD will indicate previous mode (Stitch Information mode). a. For straight stitch patterns (No. 1, 2, 3, 4, 6, 8), Stitch width buttons will change the needle position. To shift the needle to the - Singer 9970 | Instruction Manual - Page 24
TO USE EACH STITCH 01. Straight stitch center needle positon • For top stitching, for basic sewing, zipper sewing etc. 02. Straight stitch left needle position • For top stitching, for basic sewing etc. 03. Straight stitch with auto-reverse stitch center needle position 04. Straight stitch with auto - Singer 9970 | Instruction Manual - Page 25
the upper thread and bobbin thread loosely and start sewing. Machine will sew 4-5 stitches forward and sew 4-5 stitches backward and continue sewing forward. 3. When you reach the end of seam, press the reverse button. Machine will sew a few stitches backward and sew a few stitches forward and stop - Singer 9970 | Instruction Manual - Page 26
under the presser foot and then lower the presser foot lifter. 2. Hold the upper thread and bobbin thread loosely and start to sew. Machine will make one stitch only. 3. Pull the fabric required amount to the rear and sew one stitch. 4. Repeat this as many times as you need to finish the row of - Singer 9970 | Instruction Manual - Page 27
Stitch / Patch Quilting Foot Quilting Bar CAUTION: To prevent accidents. Do not change the needle position. Otherwise, needle could hit the presser foot and break. A. Joining the pieces of fabric Join the pieces of fabric using Pattern No. 1 with a seam allowance of 1/4 inch (6.3 mm) B. Quilting Sew - Singer 9970 | Instruction Manual - Page 28
STITCH SEWING Your machine can sew zigzag stitches of various widths and lengths by changing the settings of the stitch width and stitch length. No. 9 Zigzag Stitch General or Satin Foot (A, B) Zigzag stitches are very good for applique and decorative sewing. SATIN STITCHING To sew a satin stitch - Singer 9970 | Instruction Manual - Page 29
Width 5.0-7.0) Overcasting Foot (C) Press fabric against the guide plate of the overcasting foot so that needle falls near the edge of seam. a. No. 9 (Width=5.0) is used for preventing raveling of fabrics. b-d. No. 15, 16, 30 can sew overcasting and regular stitches at the same time. Therefore it is - Singer 9970 | Instruction Manual - Page 30
) are on the protruding hem edge and the large zigzag stitches just catch one thread of the folded edge (g). Turn the screw so that the needle barely touches the folded edge of fabric. 4. Lower the presser foot and sew hem, guiding fabric evenly along the guide. 5. Turn the fabric over when you have - Singer 9970 | Instruction Manual - Page 31
foot and break. 1. Fix applique on fabric with fabric glue, fusible web or basting stitches. 2. Sew with the right side of the stitch following the right edge of the applique as closely as possible. When sewing sharp angles or curves Bring needle to lowest position and raise the presser foot. Use - Singer 9970 | Instruction Manual - Page 32
Position) Zipper Foot (E) CAUTION: To prevent accidents. Zipper foot should be used for sewing center needle position straight stitch No. 1 only. It is possible that needle could hit the presser foot and break when sewing other patterns. 1. Baste the zipper opening to the seam line. a: Straight - Singer 9970 | Instruction Manual - Page 33
Position) Zipper Foot (E) CAUTION: To prevent accidents. Zipper foot should be used for sewing center needle position straight stitch No. 1 only. It is possible that needle could hit the presser foot and break when sewing other patterns. 1. Baste the zipper opening to the seam line. a: Straight - Singer 9970 | Instruction Manual - Page 34
sides of the buttonhole may be adjusted with stitch length control. 1. Mark position and length of the hole of buttonhole foot and bring upper and bobbin threads to the left. 4. Position fabric under presser buttonhole lever completely. Note: Machine will not start to sew if buttonhole lever is not - Singer 9970 | Instruction Manual - Page 35
the thread cutter button and raise the presser foot to remove the fabric. To sew over same buttonhole, raise presser foot to return to original position. 9. Cut center of buttonhole being careful not to cut stitches on either side. Use a pin as a stopper. CAUTION: To prevent accidents. When using - Singer 9970 | Instruction Manual - Page 36
. a. Right side of fabric b. Wrong side of patch 2. Lower the buttonhole lever and sew buttonhole. (See previous page) Machine will sew the buttonhole in the order as shown and stop automatically after sewing. 3. Press the thread cutter button and raise the presser foot to remove the fabric - Singer 9970 | Instruction Manual - Page 37
. 101 Eyelet Satin Foot (B) You can choose 3 sizes of eyelets by changing the stitch length. 1. Place the fabric under the presser foot and lower the presser foot. Start the machine. Machine will sew the eyelet and stop automatically. 2. Press the thread cutter button and raise the presser - Singer 9970 | Instruction Manual - Page 38
thread through the hole of buttonhole foot and bring upper and bobbin threads to the left. 3. Position fabric under presser foot so that the starting upper thread lightly and start the machine. 6. Machine will sew bar-tack or darning stitch as shown. Machine will stop automatically when the pattern - Singer 9970 | Instruction Manual - Page 39
should have a thread shank to make them stand away from the fabric. Insert a straight pin or sewing machine needle under the center slit of the foot from the front. Sew over the pin or needle. Pull thread to back of button and wind around stitches to form a firm shank. Tie thread ends securely. 39 - Singer 9970 | Instruction Manual - Page 40
Insert needle into the fold by turning the hand wheel toward you, and lower the presser foot. Sew several stitches and stitch width so that the stitches are just cover the cord. Lower the foot and sew slowly, guiding the cord. B. TRIPLE CORDING Set the stitch pattern to No. 12 and set the stitch - Singer 9970 | Instruction Manual - Page 41
fabric scraps until you get the desired length and width. A. SEWING LIGHTWEIGHT FABRICS When sewing lightweight fabrics, it is suggested that you use stabilizer on the backside of the fabric. USING THE EVEN-FEED FOOT The Even-feed Foot accessory equalizes the feeding of the upper and lower layers of - Singer 9970 | Instruction Manual - Page 42
stitched. Start sewing, moving fabric by hand forward and backward with an even motion, stitching embroidery hoop. Note: Embroidery hoop is not included with this machine. 3. Set embroidery hoop under needle and lower the foot. 4. Start the machine at medium speed, guiding hoop carefully so needle - Singer 9970 | Instruction Manual - Page 43
Guide Foot or Stitch in the Ditch Foot. Adjustable Bias Binder Foot : This is an optional accessory. The Adjustable Bias Binder Foot covers fabric edges with bias tapes. This foot adjusts to fit bias tapes 1/4" to 3/4" in width. 1. Thread the top of the machine and bobbin with all-purpose sewing - Singer 9970 | Instruction Manual - Page 44
As you sew, lightly support the trim, braid or cord as it enters the Guide. Chenille Stitching Foot : This is an optional accessory. The Chenille Stitching Foot is used to embellish projects with chenille effects. 1. Thread the top of the machine and bobbin with all-purpose sewing thread. 2. Prepare - Singer 9970 | Instruction Manual - Page 45
trim against the right side of the Edge Joining Foot's guide. Both pieces should have the right sides facing up. 4. Set the machine to ZigZag or Ladder Stitch. 5. Turn the hand wheel toward you, ensuring that the needle does not hit the guide. 6. Sew, keeping both the fabric and the trim next to the - Singer 9970 | Instruction Manual - Page 46
accessory. Use the Fancy Trim Foot to decorate your projects with sequins. This foot guides the sequins through a groove at the front of the foot while your sewing machine stitches sewing thread in the bobbin. 2. Snap on the Fancy Trim Foot and select a Hand Look Appliqué Stitch. Adjust the stitch - Singer 9970 | Instruction Manual - Page 47
Foot : This is an optional accessory. This foot is used when sewing fabrics such as leather or vinyl. 1. Snap on the Non-Stick Foot. Select desired stitch. Verify that the needle will line up with the opening of the foot before starting to sew. 2. Sew slowly and guide the layers. Tip: Try using - Singer 9970 | Instruction Manual - Page 48
Ditch Foot : This is an optional accessory. The Stitch in the Ditch Foot assists with sewing in the finished seam of a quilt or binding. 1. Snap on the Stitch in the Ditch Foot. Thread the top with invisible thread or thread to match the fabric. Thread the bobbin with thread that matches the fabric - Singer 9970 | Instruction Manual - Page 49
If you did not switch to twin needle mode, needle may hit the needle plate and break. 9. Always test sew selected stitch. 10. Sew project. Twin needle mode will remain until you press the twin needle button again or turn off the machine. Note: Twin needle sewing may be used with decorative & letter - Singer 9970 | Instruction Manual - Page 50
area, disappear from the screen, you can check them by pressing the cursor buttons. (See next page) NOTE: Machine can memorize a maximum of 60 patterns. You can combine the tack stitch by pressing the tack button. This is used for sewing a single combination of patterns. (See next page 48) 50 - Singer 9970 | Instruction Manual - Page 51
length of the string increases, patterns will disappear from sight. You can check patterns by shifting cursor to the left. D D. INSERTING PATTERN 1. Machine will insert a pattern to the left of the highlighted letter or pattern. 2. Using the cursor buttons, move the cursor to highlight the pattern - Singer 9970 | Instruction Manual - Page 52
you have completed the editing, press the return button (F1) or edit "E" button. Machine will return to selecting mode. Note: Letter stitches cannot change settings. (except for thread tension) a. Mirror / Reverse stitch Press the function button (F2) directly under mirror/reverse icon, and the - Singer 9970 | Instruction Manual - Page 53
RECALL THE SELECTED PATTERNS If you change the pattern to utility stitch, machine will retain the combination of patterns until the machine is turned off. To recall these patterns, press the decorative & letter stitch button. Machine will recall the selected patterns. (Thread tension will return to - Singer 9970 | Instruction Manual - Page 54
tack button at selecting mode. When you combined the tack stitch or letter stitch at the end of pattern, machine will stop automatically after sewing selected patterns. b. Repeat sewing The pattern combination will sew repeatedly without combining the tack stitch at the end of the pattern sequence - Singer 9970 | Instruction Manual - Page 55
included ADJUSTING THE BALANCE OF THE STITCHES Depending on the type of fabric you sew, it may be necessary to adjust the balance of the stitches. The adjustment is needed when the decorative or letter stitch is distorted. Turn screw which is located bottom of the machine in either direction as may - Singer 9970 | Instruction Manual - Page 56
shown. 6. Replace the needle plate inserting the hook into the machine. Replace the screws and tighten. Note: * An LED lamp is used to illuminate the stitching area. It does not require replacement. In the unlikely event it does not light, call your authorized SINGER retailer for service. * There is - Singer 9970 | Instruction Manual - Page 57
50 Machine skips stitches Needle inserted incorrectly. Bent or blunt needle. Incorrect size of needle. (on stretch fabric) Re-insert needle. 8 Insert new needle. 8 Choose correct size needle for 8 fabric. (use stretch needle) Fabric puckers Machine not properly threaded. Bobbin threaded - Singer 9970 | Instruction Manual - Page 58
Messages on LCD 1. Winding the bobbin. 1 2. Lower the buttonhole lever. 2 3. After sewing buttonhole, raise the presser foot 3 lifter and set the frame of buttonhole foot to starting position. 4. Release the foot controller pedal. 4 5. Lower the presser foot. 5 6. Machine memory is full - Singer 9970 | Instruction Manual - Page 59
59 - Singer 9970 | Instruction Manual - Page 60
9970English 34568 A3
-
 1
1 -
 2
2 -
 3
3 -
 4
4 -
 5
5 -
 6
6 -
 7
7 -
8
-
9
-
10
-
11
-
12
-
13
-
14
-
15
-
16
-
17
-
18
-
19
-
20
-
21
-
22
-
23
-
24
-
25
-
26
-
27
-
28
-
29
-
30
-
31
-
32
-
33
-
34
-
35
-
36
-
37
-
38
-
39
-
40
-
41
-
42
-
43
-
44
-
45
-
46
-
47
-
48
-
49
-
50
-
51
-
52
-
53
-
54
-
55
-
56
-
57
-
58
-
59
-
60
 |
 |
INSTRUCTION MANUAL
9970