Singer H74 Instruction Manual 2 - Page 33
FUNCTION BUTTONS, MODE selection button, Elongation button, Stitch length adjustment buttons
 |
View all Singer H74 manuals
Add to My Manuals
Save this manual to your list of manuals |
Page 33 highlights
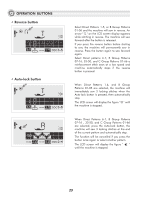
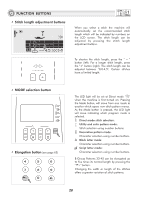
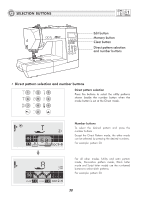
FUNCTION BUTTONS Stitch length adjustment buttons When you select a stitch the machine will automatically set the recommended stitch length which will be indicated by numbers on the LCD screen. The stitch length can be adjusted by pressing the stitch length adjustment buttons. To shorten the stitch length, press the " – " button (left). For a longer stitch length, press the "+" button (right). The stitch length can be adjusted between "0.0-4.5". Certain stitches have a limited length. MODE selection button Elongation button (see page 63) The LED light will be set at Direct mode " " when the machine is first turned on. Pressing the Mode button, will move from one mode to another which opens new stitch pattern menus. As the Mode button is pressed, the LED light will move indicating which program mode is selected. Direct mode stitch selection. Utility and satin pattern mode: Stitch selection using number buttons. Decorative pattern mode: Character selection using number buttons. Block letter mode: Character selection using number buttons. Script letter mode: Character selection using number buttons. B Group Patterns 33-45 can be elongated up to five times its normal length by pressing the " " button. Changing the width or length of the stitches offers a greater variation of stitch patterns. 28
-
 1
1 -
2
-
3
-
4
-
5
-
6
-
7
-
8
-
9
-
10
-
11
-
12
-
13
-
14
-
15
-
16
-
17
-
18
-
19
-
20
-
21
-
22
-
23
-
24
-
25
-
26
-
27
-
 28
28 -
 29
29 -
 30
30 -
 31
31 -
 32
32 -
 33
33 -
 34
34 -
 35
35 -
 36
36 -
 37
37 -
 38
38 -
39
-
40
-
41
-
42
-
43
-
44
-
45
-
46
-
47
-
48
-
49
-
50
-
51
-
52
-
53
-
54
-
55
-
56
-
57
-
58
-
59
-
60
-
61
-
62
-
63
-
64
-
65
-
66
-
67
-
68
-
69
-
70
-
71
-
72
-
73
-
74
-
75
-
76
-
77
-
78
-
79
-
80
-
81
-
82
-
83
-
84
-
85
-
86
 |
 |
