Singer H74 Instruction Manual 2 - Page 80
Trouble Shooting Guide
 |
View all Singer H74 manuals
Add to My Manuals
Save this manual to your list of manuals |
Page 80 highlights
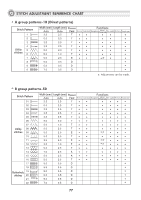
TROUBLE SHOOTING GUIDE Before calling for service, check the following items. If the problem still persists, contact Singer at www.singer.com Problem Cause Correction Reference 1.The machine is not threaded correctly. 1.Rethread the machine. Upper thread breaks 2.The thread tension is too tight. 3.The thread is too thick for the needle. 4.The needle is not inserted correctly. 5.The thread is wound around the spool holder pin. 2.Reduce the thread tension (lower number). 3.Select a larger needle. 4.Remove and reinsert the needle (flat side towards the back). 5.Remove the spool holder and unwind the thread from the spool holder pin. 6.The needle is damaged. 6.Replace the needle. Lower thread breaks 1.The bobbin case is not inserted correctly. 1.Remove and reinsert the bobbin case and pull on the thread. The thread should pull easily. 2.The bobbin case is threaded wrong. 2.Check both bobbin and bobbin case. Page 13 Page 19 Page 22 Page 23 Page 13 Page 23 Page 12 Page 12 1.The needle is not inserted correctly. 2.The needle is damaged. 1.Remove and reinsert needle (flat side towards the back). 2.Insert a new needle. Skipped stitches 3.The wrong size needle has been used. 3.Choose a needle to suit the thread. 4.The foot is not attached correctly. 4.Check and attach correctly. 5.The machine is not threaded correctly. 5.Rethread the machine. 1.The needle is damaged. 1.Insert a new needle. 2.The needle is not correctly inserted. 2.Insert the needle correctly (flat side towards the back). 3.Wrong needle size for the fabric. 3.Choose a needle to suit the thread and fabric. Needle breaks 4.The wrong foot is attached. 4.Select the correct foot. 5.The needle clamp screw is loose. 5.Use the screwdriver to firmly tighten the screw. 6.The presser foot that is used is not 6.Attach the presser foot that is appro- appropriate for the type of stitch that priate for the type of stitch that you wish you wish to sew. to sew. 7.The upper thread tension is too tight. 7.Loosen the upper thread tension. 1.The machine is not correctly threaded. 1.Check the threading. Loose stitches 2.The bobbin case is not correctly threaded. 3.Needle/fabric/thread combination is wrong. 4.Thread tension is wrong. 2.Thread the bobbin case as illustrated. 3.The needle size must suit the fabric and thread. 4.Correct the thread tension. Seam gather or pucker 1.The needle is too thick for the fabric. 2.The stitch length is adjusted wrong. 3.The thread tension is too tight. 1.Select a finer needle. 2.Readjust the stitch length. 3.Loosen the thread tension. Page 23 Page 23 Page 22 Page 20 Page 13 Page 23 Page 23 Page 22 Page 77 Page 23 Page 77 Page 19 Page 13 Page 12 Page 22 Page 19 Page 22 Page 28 Page 19 75
-
 1
1 -
2
-
3
-
4
-
5
-
6
-
7
-
8
-
9
-
10
-
11
-
12
-
13
-
14
-
15
-
16
-
17
-
18
-
19
-
20
-
21
-
22
-
23
-
24
-
25
-
26
-
27
-
28
-
29
-
30
-
31
-
32
-
33
-
34
-
35
-
36
-
37
-
38
-
39
-
40
-
41
-
42
-
43
-
44
-
45
-
46
-
47
-
48
-
49
-
50
-
51
-
52
-
53
-
54
-
55
-
56
-
57
-
58
-
59
-
60
-
61
-
62
-
63
-
64
-
65
-
66
-
67
-
68
-
69
-
70
-
71
-
72
-
73
-
74
-
 75
75 -
 76
76 -
 77
77 -
 78
78 -
 79
79 -
 80
80 -
 81
81 -
 82
82 -
 83
83 -
 84
84 -
 85
85 -
86
 |
 |
