Singer One Instruction Manual 3 - Page 34
stitching.
 |
View all Singer One manuals
Add to My Manuals
Save this manual to your list of manuals |
Page 34 highlights
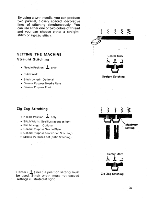
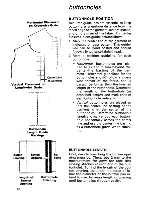
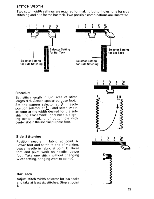
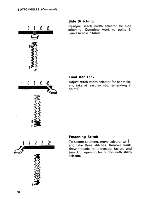
BUTTONHOLES (Continued) Side Stitching Readjust stitch width selector for side stitching. Complete work to point E. Leave needle in fabric. Final Bar Tack .a • Adjust stitch width selector for bar tacks, and take at least six stitches ending at point F. Fastening Stitch To secure stitching, move selector to } and take three stitches. Remove work, draw threads to underside, fasten, and trim. Cut opening for button with sharp scissors. 30
-
 1
1 -
2
-
3
-
4
-
5
-
6
-
7
-
8
-
9
-
10
-
11
-
12
-
13
-
14
-
15
-
16
-
17
-
18
-
19
-
20
-
21
-
22
-
23
-
24
-
25
-
26
-
27
-
28
-
 29
29 -
 30
30 -
 31
31 -
 32
32 -
 33
33 -
 34
34 -
 35
35 -
 36
36 -
 37
37 -
 38
38 -
 39
39 -
40
-
41
-
42
-
43
-
44
-
45
-
46
-
47
-
48
-
49
-
50
-
51
-
52
-
53
-
54
-
55
-
56
 |
 |

BUTTONHOLES
(Continued)
Side
Stitching
Readjust
stitch
width
selector
for
side
stitching.
Complete
work
to
point
E.
Leave
needle
in
fabric.
a
.
•
}
Final
Bar
Tack
Adjust
stitch
width
selector
for
bar
tacks,
and
take
at
least
six
stitches
ending
at
point
F.
Fastening
Stitch
To
secure
stitching,
move
selector
to
and
take
three
stitches.
Remove
work,
draw
threads
to
underside,
fasten,
and
trim.
Cut
opening
for
button
with
sharp
scissors.
30