Singer One Instruction Manual 3 - Page 35
alternately
 |
View all Singer One manuals
Add to My Manuals
Save this manual to your list of manuals |
Page 35 highlights
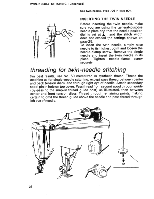
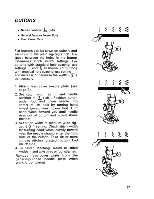
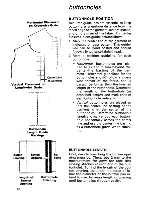
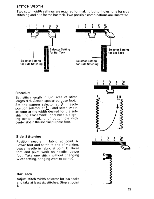
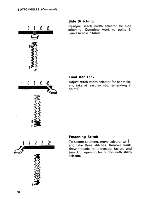
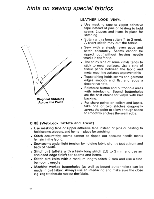
LINGERIE SEAMS To make seams in lingerie durable and flexible, use a combination of straight and zig-zag stitching. Method 1 For '1.5 cm bias seam in woven fabric: • Straight-stitch the seam (with stitch width at ) on wrong side of fabric. • Press both seam allowances in the same direction. Then, from the right side, top-stitch with narrow zig-zag stitching, letting needle alternately enter seam line and seam thickness. itIVVVVWW/VOINtNVWWWWW For a 1.5 cm Seam Trim Away Excess Fabric Method 2 For narrow seams in nylon tricot: • Cut fabric for 1.5 cm seam allowance. • Straight-stitch-seam line on wrong side of fabric. Then place a line of mediumwide, open zig-zag stitching close to the straight stitching. For a Narrow Seam SEAM FINISHES • Needle Position: • Stitch Width: or (maximum) • Stitch Length: 1,2 to 3 mm depending on choice of stitch and fabric • General Purpose Needle Plate and Foot Trimming Seam Edges after Stitching Seam edges support the garment and should be given a durable finish if the fabric is likely to ravel. There are two methods of finishing seams in such fabfics: trimming seam edge or overedging. Make a test sample first to determine which method best suits your fabric. Overedging Trimmed Seam Edge 31
-
 1
1 -
2
-
3
-
4
-
5
-
6
-
7
-
8
-
9
-
10
-
11
-
12
-
13
-
14
-
15
-
16
-
17
-
18
-
19
-
20
-
21
-
22
-
23
-
24
-
25
-
26
-
27
-
28
-
29
-
 30
30 -
 31
31 -
 32
32 -
 33
33 -
 34
34 -
 35
35 -
 36
36 -
 37
37 -
 38
38 -
 39
39 -
 40
40 -
41
-
42
-
43
-
44
-
45
-
46
-
47
-
48
-
49
-
50
-
51
-
52
-
53
-
54
-
55
-
56
 |
 |
