Sony BDV-IS1000/C Operating Instructions - Page 35
catch the speaker cord insulation in the speaker terminals.
 |
View all Sony BDV-IS1000/C manuals
Add to My Manuals
Save this manual to your list of manuals |
Page 35 highlights
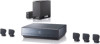
4 Connect the speaker cords to the speaker. Thread the speaker cord through the holes in the bracket (bottom). Getting Started Use the speaker cords as follows: • Front left speaker (L): White • Front right speaker (R): Red • Surround left speaker (L): Blue • Surround right speaker (R): Gray • Center speaker: Green The connector and color tube of the speaker cords are the same color as the label of the jacks to be connected. Be sure to match the speaker cords to the appropriate terminals on the speakers: the speaker cord with the color tube to 3, and the speaker cord without the color tube to #. Do not catch the speaker cord insulation in the speaker terminals. Connector Color tube Ex. Front speaker Check the polarity on the label. Center speaker Left side Front speaker Surround speaker Insert the speaker cords into the speaker terminal of the speaker as far as they will go. Ensure that the cords are secure by gently pulling on them one at a time. Note • When assembling, take care not to touch the speaker units. Tip • When removing the speaker cords from the speaker terminals, pull out the speaker cords while pressing the white button on the speaker terminal with a tool such as a flathead screwdriver. 35US
-
 1
1 -
2
-
3
-
4
-
5
-
6
-
7
-
8
-
9
-
10
-
11
-
12
-
13
-
14
-
15
-
16
-
17
-
18
-
19
-
20
-
21
-
22
-
23
-
24
-
25
-
26
-
27
-
28
-
29
-
 30
30 -
 31
31 -
 32
32 -
 33
33 -
 34
34 -
 35
35 -
 36
36 -
 37
37 -
 38
38 -
 39
39 -
 40
40 -
41
-
42
-
43
-
44
-
45
-
46
-
47
-
48
-
49
-
50
-
51
-
52
-
53
-
54
-
55
-
56
-
57
-
58
-
59
-
60
-
61
-
62
-
63
-
64
-
65
-
66
-
67
-
68
-
69
-
70
-
71
-
72
-
73
-
74
-
75
-
76
-
77
-
78
-
79
-
80
-
81
-
82
-
83
-
84
-
85
-
86
-
87
-
88
-
89
-
90
-
91
-
92
-
93
-
94
-
95
-
96
-
97
-
98
-
99
-
100
-
101
-
102
-
103
-
104
-
105
-
106
-
107
-
108
-
109
-
110
-
111
-
112
-
113
-
114
-
115
-
116
-
117
-
118
-
119
-
120
-
121
-
122
-
123
-
124
-
125
-
126
-
127
-
128
-
129
-
130
-
131
-
132
-
133
-
134
-
135
-
136
-
137
-
138
-
139
-
140
-
141
-
142
-
143
-
144
-
145
-
146
-
147
-
148
-
149
-
150
-
151
-
152
-
153
-
154
-
155
 |
 |
