Sony CX150 Operating Instructions - Page 22
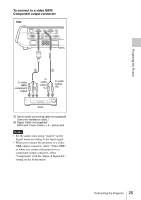
For details on installation, see Installation Diagram - projector vpl
 |
UPC - 027242728158
View all Sony CX150 manuals
Add to My Manuals
Save this manual to your list of manuals |
Page 22 highlights
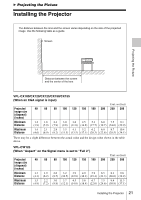
There may be a slight difference between the actual value and the design value shown in the table above. Notes for VPL-CW125 only • When "Aspect" on the Signal menu is set to other than "Full 2", black bands appear at the top and bottom or right and left of the screen. • When "Aspect" in the Signal menu is set to "4:3", the projected image size (diagonal) will be approximately 84 % of "Full 2" size. • When "Aspect" in the Signal menu is set to "16:9", the projected image size (diagonal) will be approximately 99 % of "Full 2" size. For details on installation, see "Installation Diagram" on page 59. 22 Installing the Projector
-
 1
1 -
2
-
3
-
4
-
5
-
6
-
7
-
8
-
9
-
10
-
11
-
12
-
13
-
14
-
15
-
16
-
 17
17 -
 18
18 -
 19
19 -
 20
20 -
 21
21 -
 22
22 -
 23
23 -
 24
24 -
 25
25 -
 26
26 -
 27
27 -
28
-
29
-
30
-
31
-
32
-
33
-
34
-
35
-
36
-
37
-
38
-
39
-
40
-
41
-
42
-
43
-
44
-
45
-
46
-
47
-
48
-
49
-
50
-
51
-
52
-
53
-
54
-
55
-
56
-
57
-
58
-
59
-
60
-
61
-
62
-
63
-
64
-
65
-
66
-
67
-
68
-
69
-
70
 |
 |

22
Installing the Projector
There may be a slight difference between the actual value and the design value shown in the table
above.
•
When “Aspect” on the Signal menu is set to other than “Full 2”, black bands appear at the top and
bottom or right and left of the screen.
•
When “Aspect” in the Signal menu is set to “4:3”, the projected image size (diagonal) will be
approximately 84 % of “Full 2” size.
•
When “Aspect” in the Signal menu is set to “16:9”, the projected image size (diagonal) will be
approximately 99 % of “Full 2” size.
For details on installation, see “Installation Diagram” on page 59.
Notes for VPL-CW125 only