Sony CX150 Operating Instructions - Page 61
Ceiling Installation (Front Projection) - support
 |
UPC - 027242728158
View all Sony CX150 manuals
Add to My Manuals
Save this manual to your list of manuals |
Page 61 highlights
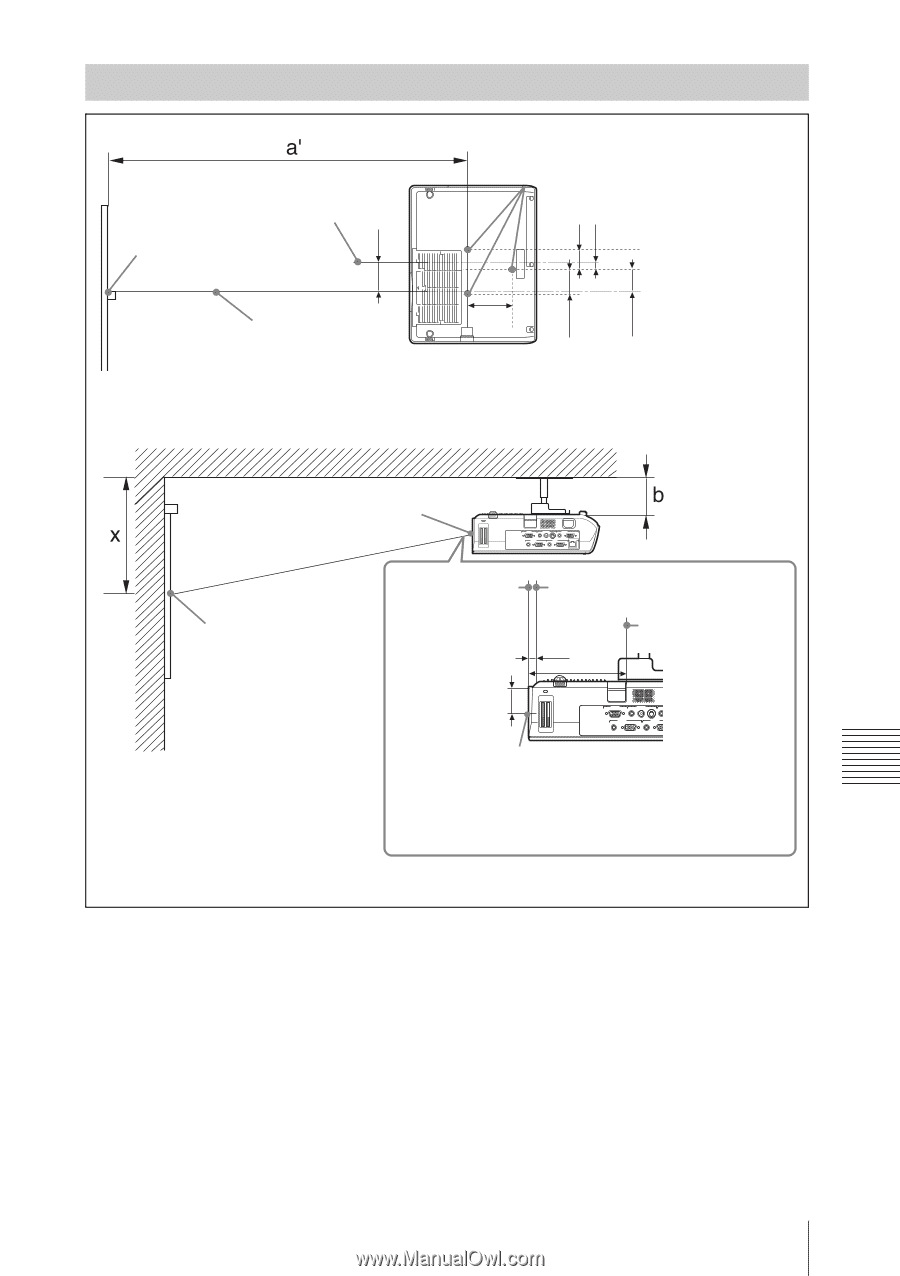
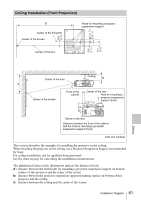
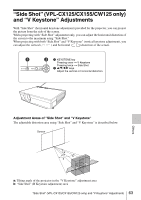
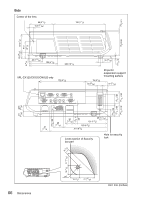
Ceiling Installation (Front Projection) Center of the Projector Center of the screen 64.9 (2 5/8) 46.1 (1 7/8) 12.2 (1/2) Holes for mounting a projector suspension support 56.6 (2 1/4) 52.7 (2 1/8) Center of the lens 104.5 (4 1/8) Others Center of the lens Ceiling OUTPUT MONITOR AUDIO S VIDEO VIDEO AUDIO VIDEO IN RS-232C REMOTE NETWORK INPUT C INPUT A INPUT B RGB AUDIO RGB AUDIO Center of the screen Front of the cabinet Center of the lens Hole for mounting a projector suspension 15.9 (21/32) 137.3 (5 1/2) support (front) 53.2 (2 1/8) AUDIO S VIDEO VIDEO AUDIO VIDEO IN RS-232C REMOTE INPUT A INPUT B RGB AUDIO RGB AUDIO Center of the lens Distance between the front of the cabinet and the hole for mounting a projector suspension support (front) Unit: mm (inches) This section describes the examples for installing the projector on the ceiling. When installing the projector on the ceiling, use a Projector Suspension Support recommended by Sony. For ceiling installation, ask for qualified Sony personnel. See the chart on page 62 concerning the installation measurements. The alphabetical letters in the illustrations indicate the distances below. a': distance between the hole(front) for mounting a projector suspension support on bottom surface of this projector and the center of the screen b: distance between the projector suspension support mounting surface on bottom of this projector and the ceiling x: distance between the ceiling and the center of the screen Installation Diagram 61
-
 1
1 -
2
-
3
-
4
-
5
-
6
-
7
-
8
-
9
-
10
-
11
-
12
-
13
-
14
-
15
-
16
-
17
-
18
-
19
-
20
-
21
-
22
-
23
-
24
-
25
-
26
-
27
-
28
-
29
-
30
-
31
-
32
-
33
-
34
-
35
-
36
-
37
-
38
-
39
-
40
-
41
-
42
-
43
-
44
-
45
-
46
-
47
-
48
-
49
-
50
-
51
-
52
-
53
-
54
-
55
-
 56
56 -
 57
57 -
 58
58 -
 59
59 -
 60
60 -
 61
61 -
 62
62 -
 63
63 -
 64
64 -
 65
65 -
 66
66 -
67
-
68
-
69
-
70
 |
 |