Sony CX150 Operating Instructions - Page 34
Adjustments and Settings Using a Menu, Using a MENU
 |
UPC - 027242728158
View all Sony CX150 manuals
Add to My Manuals
Save this manual to your list of manuals |
Page 34 highlights
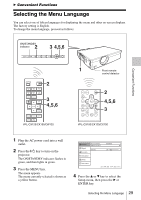
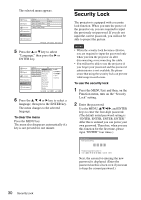
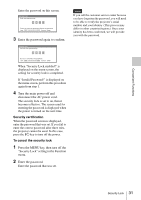
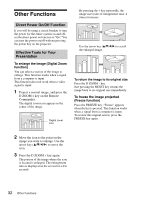
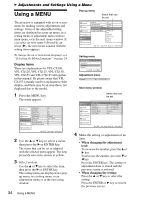
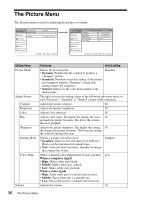
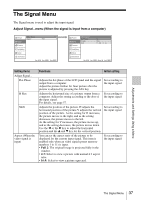
B Adjustments and Settings Using a Menu Using a MENU The projector is equipped with an on-screen menu for making various adjustments and settings. Some of the adjustable/setting items are displayed in a pop-up menu, in a setting menu or adjustment menu with no main menu, or in the next menu window. If you select an item name followed by an arrow (B), the next menu window with the setting items appears. Pop-up menu Items that can be set Picture Signal Function Status: Language: Input-A Signal Sel.: Color System: Lamp Timer Reset Installation Setup Information Sel: Set: On English Auto Auto NTSC3.58 PAL SECAM NTSC4.43 PAL-M PAL-N Back: Exit: To change the on-screen menu language, see "Selecting the Menu Language" on page 29. Setting menu Display items There are explanations for VPL-CX100, VPL-CX120, VPL-CX125, VPL-CX150, VPL-CX155 and VPL-CW125 all together in this manual. Be please aware that VPLCX155 is mainly used for explanation of the display, and there may be an item that is not displayed due to the model. 1 Press the MENU key. The menu appears. Picture Signal Function Installation Setup V Keystone: Side Shot: Image Flip: Background: Lamp Mode: IR Receiver: ID Mode: Direct Power On: High Altitude Mode: Information Sel: Auto 0 Off Blue Standard Front & Rear All Off Off Set: Exit: 2 Use the v or V key to select a menu, then press the B or ENTER key. The items that can be set or adjusted with the selected menu appear. The item presently selected is shown in yellow. 3 Select an item. Use the v or V key to select the item, then press the B or ENTER key. The setting items are displayed in a popup menu, in a setting menu, in an adjustment menu or in the next menu window. Adjustment menu Next menu window Items that can be set Picture Signal Function Installation Adjust Picture Contrast: Brightness: Sharpness: Gamma Mode: Color Temp.: Setup Information Sel: Set: Standard 80 50 50 Graphics High Back: Exit: 4 Make the setting or adjustment of an item. • When changing the adjustment level: To increase the number, press the v or B key. To decrease the number, press the V or b key. Press the ENTER key. The setting or adjustment done is stored and the previous screen is restored. • When changing the setting: Press the v or V key to select the setting. Press the ENTER or B key to restore the previous screen. 34 Using a MENU
-
 1
1 -
2
-
3
-
4
-
5
-
6
-
7
-
8
-
9
-
10
-
11
-
12
-
13
-
14
-
15
-
16
-
17
-
18
-
19
-
20
-
21
-
22
-
23
-
24
-
25
-
26
-
27
-
28
-
 29
29 -
 30
30 -
 31
31 -
 32
32 -
 33
33 -
 34
34 -
 35
35 -
 36
36 -
 37
37 -
 38
38 -
 39
39 -
40
-
41
-
42
-
43
-
44
-
45
-
46
-
47
-
48
-
49
-
50
-
51
-
52
-
53
-
54
-
55
-
56
-
57
-
58
-
59
-
60
-
61
-
62
-
63
-
64
-
65
-
66
-
67
-
68
-
69
-
70
 |
 |
