Sony DCR-DVD910 Operating Guide - Page 21
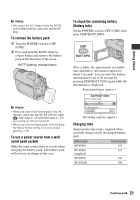
To remove the battery pack, To use a power source from a wall, outlet wall socket
 |
UPC - 689466092851
View all Sony DCR-DVD910 manuals
Add to My Manuals
Save this manual to your list of manuals |
Page 21 highlights
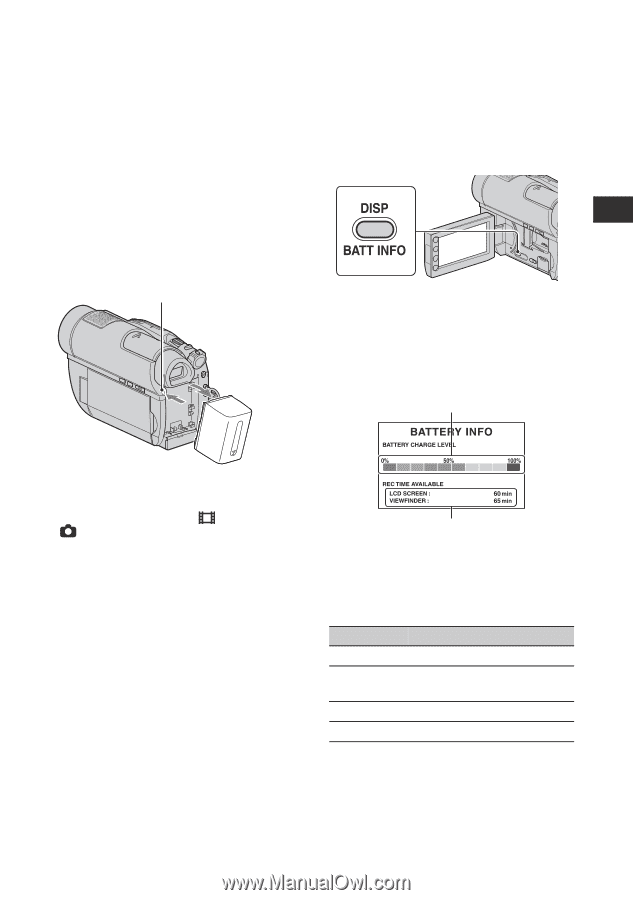
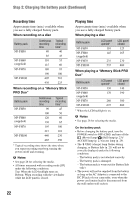
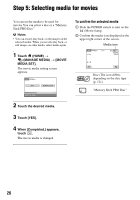
Getting Started b Notes • Disconnect the AC Adaptor from the DC IN jack holding both the camcorder and the DC plug. To remove the battery pack 1 Turn the POWER switch to OFF (CHG). 2 Press and hold the BATT (battery) release button and remove the battery pack in the direction of the arrow. BATT (battery) release button To check the remaining battery (Battery Info) Set the POWER switch to OFF (CHG), then press DISP/BATT INFO. After a while, the approximate recordable time and battery information appear for about 7 seconds. You can view the battery information for up to 20 seconds by pressing DISP/BATT INFO again while the information is displayed. Remaining battery (approx.) b Notes • When you remove the battery pack or the AC Adaptor, make sure that the (Movie) lamp/ (Still) lamp (p. 23)/ACCESS lamp (p. 27)/ access lamp (p. 29) are turned off. • When you store the battery pack, fully discharge the battery before storing it for an extended period (p. 115). To use a power source from a wall outlet (wall socket) Make the same connections as you do when charging the battery pack. The battery pack will not lose its charge in this case. Recording capacity (approx.) Charging time Approximate time (min.) required when you fully charge a fully discharged battery pack. Battery pack Charging time NP-FH50 135 NP-FH60 135 (supplied) NP-FH70 170 NP-FH100 390 Continued , 21
-
 1
1 -
2
-
3
-
4
-
5
-
6
-
7
-
8
-
9
-
10
-
11
-
12
-
13
-
14
-
15
-
 16
16 -
 17
17 -
 18
18 -
 19
19 -
 20
20 -
 21
21 -
 22
22 -
 23
23 -
 24
24 -
 25
25 -
 26
26 -
27
-
28
-
29
-
30
-
31
-
32
-
33
-
34
-
35
-
36
-
37
-
38
-
39
-
40
-
41
-
42
-
43
-
44
-
45
-
46
-
47
-
48
-
49
-
50
-
51
-
52
-
53
-
54
-
55
-
56
-
57
-
58
-
59
-
60
-
61
-
62
-
63
-
64
-
65
-
66
-
67
-
68
-
69
-
70
-
71
-
72
-
73
-
74
-
75
-
76
-
77
-
78
-
79
-
80
-
81
-
82
-
83
-
84
-
85
-
86
-
87
-
88
-
89
-
90
-
91
-
92
-
93
-
94
-
95
-
96
-
97
-
98
-
99
-
100
-
101
-
102
-
103
-
104
-
105
-
106
-
107
-
108
-
109
-
110
-
111
-
112
-
113
-
114
-
115
-
116
-
117
-
118
-
119
-
120
-
121
-
122
-
123
-
124
-
125
-
126
-
127
-
128
-
129
-
130
-
131
-
132
-
133
-
134
-
135
-
136
-
137
-
138
-
139
-
140
-
141
-
142
-
143
-
144
-
145
-
146
-
147
-
148
-
149
-
150
-
151
 |
 |