Sony FDR-AX1 Operating Guide - Page 55
About the remaining battery indicator, About storage of the battery pack, About battery life
 |
View all Sony FDR-AX1 manuals
Add to My Manuals
Save this manual to your list of manuals |
Page 55 highlights
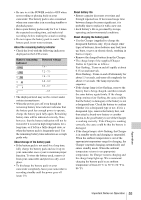
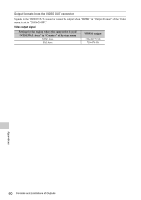
• Be sure to set the POWER switch to OFF when not recording or playing back on your camcorder. The battery pack is also consumed when your camcorder is in recording standby or playback pause. • Have spare battery packs ready for 2 or 3 times the expected recording time, and make trial recordings before making the actual recording. • Do not expose the battery pack to water. The battery pack is not water resistant. About the remaining battery indicator • Check the level with the following indicators displayed on the LCD screen. Battery remaining indicator Detected voltage 7.4 - 7.2 - 7.3 7.0 - 7.1 6.8 - 6.9 6.6 - 6.7 - 6.5 • The displayed level may not be correct under certain circumstances. • When the power goes off even though the remaining battery time indicator indicates that the battery pack has enough power to operate, charge the battery pack fully again. Remaining battery time will be indicated correctly. Note, however, that the battery indication will not be restored if it is used in high temperatures for a long time, or if left in a fully charged state, or when the battery pack is frequently used. Use the remaining battery time indication as a rough guide only. About storage of the battery pack • If the battery pack is not used for a long time, fully charge the battery pack and use it up on your camcorder once a year to maintain proper function. To store the battery pack, remove it from your camcorder and put it in a dry, cool place. • To discharge the battery pack on your camcorder completely, leave your camcorder in recording standby until the power goes off (page 19). About battery life • Battery capacity decreases over time and through repeated use. If decreased usage time between charges becomes significant, it is probably time to replace it with a new one. • Each battery's life is governed by storage, operating and environmental conditions. About charging the battery pack • Use the Charger (supplied) to charge the designated batteries only. If you charge other types of batteries, those batteries may leak, heat up, burst, or give an electric shock, resulting in burns or injury. • Remove the charged battery from the Charger. • The charge lamp of the supplied Charger flashes in 2 patterns as follows: Fast-flashing...Turns on and off rapidly at about 0.15-second intervals. Slow-flashing...Turns on and off alternately for about 1.5 seconds, and turns off completely for about 1.5 seconds. The lamp repeats this sequence. • If the charge lamp is fast-flashing, remove the battery that is being charged, and then reattach the same battery again firmly. If the charge lamp continues fast-flashing, the cause could be that the battery is damaged, or the battery is not a designated type. Check the battery to confirm whether it is a designated type or not. If it is a designated type, remove the battery first, and then attach a brand-new battery or another known-to-be-good battery to see if the Charger is working correctly. If the Charger is working correctly, the cause could be that the battery is damaged. • If the charge lamp is slow-flashing, the Charger is in standby mode and charging is suspended. When the ambient temperature is out of the appropriate temperature range for charging, the Charger suspends charging automatically and enters standby mode. When the ambient temperature returns to an appropriate temperature, the Charger restarts charging and the charge lamp lights up. We recommend charging the battery pack in an ambient temperature of from 10 °C to 30 °C (50 °F to 86 °F). Appendices Important Notes on Operation 55
-
 1
1 -
2
-
3
-
4
-
5
-
6
-
7
-
8
-
9
-
10
-
11
-
12
-
13
-
14
-
15
-
16
-
17
-
18
-
19
-
20
-
21
-
22
-
23
-
24
-
25
-
26
-
27
-
28
-
29
-
30
-
31
-
32
-
33
-
34
-
35
-
36
-
37
-
38
-
39
-
40
-
41
-
42
-
43
-
44
-
45
-
46
-
47
-
48
-
49
-
 50
50 -
 51
51 -
 52
52 -
 53
53 -
 54
54 -
 55
55 -
 56
56 -
 57
57 -
 58
58 -
 59
59 -
 60
60 -
61
-
62
-
63
-
64
-
65
-
66
-
67
-
68
 |
 |
