Sony HDR HC1 Operating Instructions - Page 29
To adjust the movie volume, Recording/playback, To check the remaining battery (Battery Info) - internal
 |
UPC - 027242681330
View all Sony HDR HC1 manuals
Add to My Manuals
Save this manual to your list of manuals |
Page 29 highlights
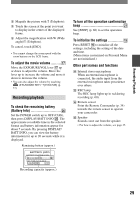
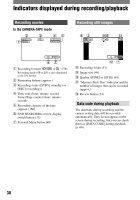
Recording/Playback Magnify the picture with T (Telephoto). Touch the screen at the point you want to display in the center of the displayed frame. Adjust the magnification with W (Wide angle)/T (Telephoto). To cancel, touch [END]. • You cannot change the zoom speed with the zoom buttons on the LCD frame. To adjust the movie volume Move the EXPOSURE/VOL lever up or down to adjust the volume. Move the lever up to increase the volume and move it down to decrease the volume. • You can also adjust the volume by touching (STANDARD SET)[VOLUME] (p. 57). Recording/playback To check the remaining battery (Battery Info Set the POWER switch up to OFF (CHG), then press DISPLAY/BATT INFO . The approximate recordable time in the selected format and battery information appear for about 7 seconds. By pressing DISPLAY/ BATT INFO, you can view the battery information for up to 20 seconds while it is displayed. Remaining battery (approx.) To turn off the operation confirmation beep See [BEEP] (p. 60) to set the operation beep. To initialize the settings Press RESET to initialize all the settings, including the setting of the date and time. (Menu items customized on Personal Menu are not initialized.) Other part names and functions Internal stereo microphone When an external microphone is connected, the audio input from the external microphone takes precedence over others. REC lamp The REC lamp lights up in red during recording (p. 60). Remote sensor Point the Remote Commander (p. 34) towards the remote sensor to operate your camcorder. Speaker Sounds come out from the speaker. • For how to adjust the volume, see page 25. Recording capacity (approx.) 29
-
 1
1 -
2
-
3
-
4
-
5
-
6
-
7
-
8
-
9
-
10
-
11
-
12
-
13
-
14
-
15
-
16
-
17
-
18
-
19
-
20
-
21
-
22
-
23
-
 24
24 -
 25
25 -
 26
26 -
 27
27 -
 28
28 -
 29
29 -
 30
30 -
 31
31 -
 32
32 -
 33
33 -
 34
34 -
35
-
36
-
37
-
38
-
39
-
40
-
41
-
42
-
43
-
44
-
45
-
46
-
47
-
48
-
49
-
50
-
51
-
52
-
53
-
54
-
55
-
56
-
57
-
58
-
59
-
60
-
61
-
62
-
63
-
64
-
65
-
66
-
67
-
68
-
69
-
70
-
71
-
72
-
73
-
74
-
75
-
76
-
77
-
78
-
79
-
80
-
81
-
82
-
83
-
84
-
85
-
86
-
87
-
88
-
89
-
90
-
91
-
92
-
93
-
94
-
95
-
96
-
97
-
98
-
99
-
100
-
101
-
102
-
103
-
104
-
105
-
106
-
107
-
108
-
109
-
110
-
111
-
112
-
113
-
114
-
115
-
116
-
117
-
118
-
119
-
120
-
121
-
122
-
123
 |
 |
