Sony KF-60DX100 Operating Instructions
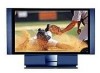
Sony KF-60DX100 - 60" Rear Projection TV Manual
 |
View all Sony KF-60DX100 manuals
Add to My Manuals
Save this manual to your list of manuals |
Sony KF-60DX100 manual content summary:
- Sony KF-60DX100 | Operating Instructions - Page 1
4-086-249-12(2) - Sony KF-60DX100 | Operating Instructions - Page 2
/TV technician for help. You are cautioned that any changes or modifications not expressly approved in this manual could void your warranty and your authority to operate this equipment. This document is for the remote control RM-Y910. MODEL: KF-60DX100 Please keep this notice with the instruction - Sony KF-60DX100 | Operating Instructions - Page 3
blurred or show poor color. In this case, please wait a few hours to let the moisture evaporate before turning on the LCD Projection TV. ❑ To obtain Owner's Record The model and serial numbers are located at the rear of the LCD Projection TV, below the Sony logo, on the sticker, and also on the TV - Sony KF-60DX100 | Operating Instructions - Page 4
7) Do not block any ventilation openings. Install in accordance with the manufacturer's instructions. 8) Do fit into your outlet, consult an electrician for replacement of the obsolete outlet. 10) Protect the instructions placed on the set or described in the operating instructions or service manual - Sony KF-60DX100 | Operating Instructions - Page 5
. It is normal for some TV sets to make occasional snapping or popping sounds, particularly when being turned on or off. Object and Liquid Entry Never push objects of any kind into the set through the cabinet slots as they may touch dangerous voltage points or short out parts that could result in - Sony KF-60DX100 | Operating Instructions - Page 6
and supporting structure, instructions. Adjust only those controls that are specified in the operating instructions servicing to qualified service personnel. Replacement Parts When replacement parts are required, be sure the service technician certifies in writing that he has used replacement parts - Sony KF-60DX100 | Operating Instructions - Page 7
the LCD projection TV for a long period of time, the screen image becomes dark, or no image will appear on the display. If the lamp replacement indicator of the front panel blinks in red, replace the lamp with a new one (not supplied). In some cases, the lamp bursts inside the lamp unit noisily, but - Sony KF-60DX100 | Operating Instructions - Page 8
Contents Introducing the Sony LCD Projection TV Presenting the Sony LCD Projection TV 9 Using This Manual 10 Enjoying Your LCD Projection TV 11 Replacing the Lamp 13 Installing and Connecting the LCD Projection TV Contents 17 Inserting Batteries into the Remote Control ..........17 Carrying - Sony KF-60DX100 | Operating Instructions - Page 9
Introducing the Sony LCD Projection TV Introducing the Sony LCD Projection TV Presenting the Sony LCD Projection TV Thank you for purchasing the Sony LCD Projection TV. This manual is for model KF-60DX100. Features Some of the features that you will enjoy with your new LCD projection TV include: - Sony KF-60DX100 | Operating Instructions - Page 10
you how to begin using your new LCD projection TV. It also shows you how to use your remote control functions. 3 Using the menus This section teaches you how to access on-screen menus and adjust your LCD projection TV settings. Instructions in this manual are written for the remote control. Similar - Sony KF-60DX100 | Operating Instructions - Page 11
the projection lamp wears out, the screen image becomes dark. Replace the lamp with a new Sony XL-2000U replacement lamp (not supplied). ✍ Be sure to attach the lamp cover securely; otherwise, your LCD projection TV will not turn on. For details on lamp replacement, see "Replacing the Lamp" on page - Sony KF-60DX100 | Operating Instructions - Page 12
be blurred or show poor color. This is because moisture has condensed on the lenses inside. If this happens, leave the power on and let the moisture evaporate before using your LCD projection TV. When the LCD projection TV will not be used for a long period of time ❑ Turn off the main power of - Sony KF-60DX100 | Operating Instructions - Page 13
color looks unusual, or the LAMP indicator on the front of the LCD projection TV flashes, it is time to replace the lamp with a new one (not supplied). WARNING Electric appliances can cause fire or high temperature, resulting in injury or death. Be sure to follow the instructions below. ❑ Use a Sony - Sony KF-60DX100 | Operating Instructions - Page 14
. This may reduce picture quality or lamp life. 2 Unplug the power cord after turning off the main power. Wait at least 30 minutes to allow the lamp to cool down before replacing it. Take the new lamp out of the box. 3 Remove the front panel. Hold the LCD projection TV firmly so that it does not - Sony KF-60DX100 | Operating Instructions - Page 15
front glass of the lamp or the surrounding parts. Introducing the Sony LCD Projection TV Loosen the two screws with the hex key supplied with the lamp. Hold the handle and pull straight out. ✍ After it has cooled, place the removed lamp into the empty box of the replacement lamp. Never put the - Sony KF-60DX100 | Operating Instructions - Page 16
as shown in the illustration. ✍ Consult your Sony dealer for a Sony XL-2000U replacement lamp. ✍ Take great care when replacing the lamp or plugging in/unplugging the connecting cords. If you handle them roughly, the LCD projection TV may fall or be moved, and the TV stand or floor surfaces may be - Sony KF-60DX100 | Operating Instructions - Page 17
remote control and two AA batteries. No peripheral cables are included. If you intend to add additional equipment to your LCD projection TV, please check the hookup instructions for your desired setup before you begin. You may need to purchase cables and/or splitters to complete the hookup properly - Sony KF-60DX100 | Operating Instructions - Page 18
two people. Do not grasp the pedestal or the front panel of the LCD projection TV, otherwise these parts might break off. When moving the LCD projection TV, support the screen bottom with one hand while grasping the top part with the other hand, as shown in the illustration below. Do not grasp the - Sony KF-60DX100 | Operating Instructions - Page 19
upper rear sides of the LCD projection TV (left and right sides). 2 Pass TV stand with support belts ❑ You can also use the LCD projection TV stand SU-60DX (not supplied) with support belts. When Installing Your LCD Projection TV Against a Wall Keep your LCD projection TV at least 10 cm (4 inches - Sony KF-60DX100 | Operating Instructions - Page 20
affected by your viewing position. For the best picture quality, install your LCD projection TV within the areas shown below. Sit at least 2.2 m (approx. 7 ft.) away from your LCD projection TV, and within 60° of the vertical viewing area, and 130° of the horizontal viewing area. Horizontal Viewing - Sony KF-60DX100 | Operating Instructions - Page 21
types during set up. Coaxial cable Standard TV cable and antenna cable Plug Type Push quality Align guides and push into connection. Audio/Video cable Push into connection. Video - Yellow Audio ( exclusive to Sony products and allow greater control of all Sony equipment. Push into connection. 21 - Sony KF-60DX100 | Operating Instructions - Page 22
Installing and Connecting the LCD Projection TV LCD Projection TV Controls and Connectors Front Panel Menu Controls The front panel menu controls allow access to the on-screen menus without the use of a remote control. - Sony KF-60DX100 | Operating Instructions - Page 23
LCD Projection TV Rear and Side Panel Connectors Installing and Connecting the LCD Projection TV Rear of LCD projection TV Installing and Connecting the LCD Projection TV Left side of LCD projection TV VIDEO 2 IN S VIDEO VIDEO L (MONO) AUDIO R (Continued) 23 - Sony KF-60DX100 | Operating Instructions - Page 24
about connection, refer to the operating manual supplied with the AV receiver. 8 AUDIO OUT (VAR/FIX) L (MONO)/R Connects to the left jack on the LCD projection TV with the CONTROL S cable. To control the LCD projection TV with a remote control for another Sony product, connect the CONTROL - Sony KF-60DX100 | Operating Instructions - Page 25
/UHF Antenna connector C VHF and UHF 75-ohm coaxial cable 300-ohm twin lead cable U/V Splitter (not supplied) Rear of LCD projection TV VHF/UHF ✍ It is strongly recommended to connect the antenna using a 75-ohm coaxial cable to get optimum picture quality. A 300-ohm twin lead cable - Sony KF-60DX100 | Operating Instructions - Page 26
cable (No connection to TO CONVERTER) Antenna cable AUX Rear of LCD projection TV TO CONVERTER VHF/UHF Select CABLE or antenna (ANT) mode by pressing ANT the remote control. ✍ To receive channels with an antenna, you need to turn your Cable to OFF (see page 62) and perform the Auto Program function - Sony KF-60DX100 | Operating Instructions - Page 27
3 Using a coaxial cable, connect the cable box's OUT jack to the LCD projection TV's AUX jack. Cable box IN OUT Rear of LCD projection TV AUX 75-ohm coaxial cable (not supplied) TO CONVERTER Signal CATV cable (unscrambled channels) VHF/UHF ✍ Pressing ANT on the remote control switches between - Sony KF-60DX100 | Operating Instructions - Page 28
output. If you will be controlling all channel selection through your cable box, consider using the Channel Fix feature to set your LCD projection TV to channel 3 or 4 (see page 63). z Setting the Channel Fix feature in the Channel menu (see "Using the Channel Menu" on page 62), ensures that you do - Sony KF-60DX100 | Operating Instructions - Page 29
3 Using AUDIO and S VIDEO cables, connect the VCR's Audio and S Video OUT jacks to the LCD projection TV's AUDIO and S VIDEO IN jacks. Rear of LCD projection TV Coaxial cable S VIDEO VIDEO (yellow) AUDIO-L (white) AUDIO-R (red) VCR VMC-810S/820S (not supplied) Cable YC-15V/30V (not supplied - Sony KF-60DX100 | Operating Instructions - Page 30
❑ You want to enjoy the Twin View feature. With this setup you can: ❑ Use the LCD projection TV remote control to change channels on your cable box when the signal is scrambled. To program your Sony remote control to operate your cable box, see "Programming the Remote Control" on page 77. ❑ Use - Sony KF-60DX100 | Operating Instructions - Page 31
15V/30V (not supplied) S VIDEO VCR Coaxial cable Cable box S VIDEO VIDEO (yellow) AUDIO-L (white) AUDIO-R (red) Coaxial cable Rear of LCD projection TV ✍ If your VCR is not equipped with S VIDEO, use a VIDEO cable (yellow) instead of the S VIDEO cable. ✍ You will not be able to change channels - Sony KF-60DX100 | Operating Instructions - Page 32
for playback by pressing TV/VIDEO on the remote control. ✍ You may need to change the video input on your VCR. Consult your VCR's operating manual for instructions. ✍ If your VCRs have an S VIDEO jack: For best picture quality, use an S VIDEO connection instead of the yellow video cable on your - Sony KF-60DX100 | Operating Instructions - Page 33
VHF/UHF jack. ✍ If your satellite receiver is not equipped with S VIDEO, use a VIDEO cable (yellow) instead of the S VIDEO cable. Rear of LCD projection TV Coaxial cable S VIDEO VIDEO (yellow) AUDIO-L (white) AUDIO-R (red) VMC-810S/820S (not supplied) Satellite receiver Satellite antenna cable - Sony KF-60DX100 | Operating Instructions - Page 34
. Consult your VCR's operating manual for instructions. ✍ Use TV/VIDEO to select - VIDEO 1 to watch satellite TV or the VCR (your VCR must be turned on). - VHF/UHF to watch cable TV. ✍ If your VCR or satellite receiver is not equipped with S VIDEO, use a VIDEO cable (yellow) instead of the S VIDEO - Sony KF-60DX100 | Operating Instructions - Page 35
an Audio Receiver Disconnect all power sources before making any connections. Using audio cables, connect the LCD projection TV's AUDIO OUT (VAR/ FIX) jacks to the audio receiver's audio LINE IN jacks. Rear of LCD projection TV AUDIO-R (red) RK-74A (not supplied) AUDIO-L (white) Line input 35 - Sony KF-60DX100 | Operating Instructions - Page 36
so, connect the cables to like colors. 2 Using an audio cable, connect the DVD player's Audio OUT jacks to the LCD projection TV's AUDIO IN jacks. Be sure to 6). VMC-10HG (not supplied) PR PB Y Rear of LCD projection TV DVD player 36 AUDIO-R (red) AUDIO-L (white) RK-74A (not supplied) ✍ To - Sony KF-60DX100 | Operating Instructions - Page 37
on your DVD player. For details, refer to the operating instructions supplied with your DVD player. ✍ Use TV/VIDEO on the remote control to switch between the VCR, DVD player and cable TV inputs. ✍ If your VCR is not equipped with S VIDEO, use a VIDEO cable (yellow) instead of the S VIDEO cable. 37 - Sony KF-60DX100 | Operating Instructions - Page 38
Installing and Connecting the LCD Projection TV Connecting a Digital TV Receiver z Be sure to read the Set-top box manual. Disconnect all power sources before making any connections. 1 Using three separate component video cables, connect the Digital TV Set-top box's Y, PB and PR jacks to the LCD - Sony KF-60DX100 | Operating Instructions - Page 39
and S VIDEO IN jacks. ✍ If you have a mono camcorder, connect its left audio output to the LCD projection TV's AUDIO L (MONO) jack. ✍ If your camcorder is not equipped with S VIDEO, use a VIDEO cable (yellow) instead of the S VIDEO cable. VIDEO 2 IN S VIDEO VIDEO L (MONO) AUDIO R S VIDEO VIDEO - Sony KF-60DX100 | Operating Instructions - Page 40
to the AV receiver. 6 Select the Setup menu and set "Video Label" to "Receiver" to fix your LCD projection TV's input to AV receiver (see "Video Label" on page 68). Rear of LCD projection TV Coaxial cable (not supplied) VMC-810S/820S (not supplied) VCR VIDEO AUDIO-L AUDIO-R VIDEO VMC-810S - Sony KF-60DX100 | Operating Instructions - Page 41
the CONTROL S Feature CONTROL S allows you to control your LCD projection TV system and other Sony equipment with one remote control. In addition to allowing you to control multiple devices with one remote control, the CONTROL S feature allows you to always - Sony KF-60DX100 | Operating Instructions - Page 42
the front panel of your LCD projection TV or on the remote control to turn on the LCD projection TV. 2 Press the TV (FUNCTION) button on your remote control. sure to use the main set of buttons ( ). LCD projection TV front panel LAMP STEREO TIMER/STAND BY ✍ You can run Auto Program by selecting it - Sony KF-60DX100 | Operating Instructions - Page 43
the time in minutes (15, 30, 45, 60, or 90) that you want the LCD projection TV to remain on before shutting off automatically. To cancel Sleep timer, press SLEEP repeatedly until SLEEP OFF appears. Pressing down POWER also cancels the Sleep timer and turns off the power. While the Sleep feature is - Sony KF-60DX100 | Operating Instructions - Page 44
in a menu to reset the settings to the factory defaults. qd POWER buttons (GREEN) Turn on and off the LCD projection TV and other audio/ video equipment you have programmed into the remote control. For instructions, see "Programming the Remote Control" on page 77. qf FUNCTION buttons Select the - Sony KF-60DX100 | Operating Instructions - Page 45
Displays the DVD menu. 7 MTS/SAP Press to scroll through the Multi-channel TV Sound (MTS) options: Stereo, Auto SAP, and Mono. 8 CODE SET Used page 77. 9 POWER Press to turn on the DVD/VCR player you have programmed into the remote control. For instructions, see "Programming the Remote Control" - Sony KF-60DX100 | Operating Instructions - Page 46
input. 3 TV (POWER) Turns the LCD projection TV on and off. If a video input indication (e.g., VIDEO 1, VIDEO 2) appears on the screen, press TV/VIDEO or CH 9 FREEZE - (yellow labeled button) This is useful when you need to copy down information that appears on the LCD projection TV's screen (see - Sony KF-60DX100 | Operating Instructions - Page 47
if set). To turn the display off, press DISPLAY again. qs TV/VIDEO Press repeatedly to scroll through available video inputs: TV, VIDEO 1, image. Mild: Select to display a picture with minimum enhancements. When you select each mode, you can also adjust the picture quality (such as Brightness, Color - Sony KF-60DX100 | Operating Instructions - Page 48
1 Connect the DTV receiver to HD/DVD IN 5 or 6 on the LCD projection TV (for details, see page 38). 2 Press TV/VIDEO to select HD/DVD IN 5 or 6. 3 Select a digital channel on the DTV receiver. For details, see the Operating Manual of the DTV receiver. 4 Adjust the volume of the LCD projection - Sony KF-60DX100 | Operating Instructions - Page 49
list of favorite channels that you preset. To display a list of your favorite channels: ✍ Your Favorite Channel options can be set automatically or manually. The factory setting for Favorite Channel is Auto. When Favorite Channel is set to Auto, the last eight channels selected with 0-9 buttons will - Sony KF-60DX100 | Operating Instructions - Page 50
joystick. For an active picture, you can: ❑ Change channels. ❑ Adjust the volume. ❑ Switch the input sources from VHF/UHF to cable by pressing ANT or TV/VIDEO to switch the video input. To activate the right picture ❑ Move the joystick to the right. To activate the left picture ❑ Move the joystick - Sony KF-60DX100 | Operating Instructions - Page 51
your DVD player, VCR or satellite receiver are connected to one of the VIDEO IN 1-6 and AUX inputs on the rear of the LCD projection TV. Pictures from equipment connected to HD/DVD IN 5 and 6, and AUX will only appear in the left picture, not in the right. ✍ The active picture - Sony KF-60DX100 | Operating Instructions - Page 52
joystick up to enlarge the picture and move the joystick down to reduce the picture. ✍ When you adjust the twin screen sizes, the LCD projection TV memorizes the change. The next time you use the Twin View function, the memorized sizes appear. 52 - Sony KF-60DX100 | Operating Instructions - Page 53
numbers, recipes, etc. To use the Freeze function 1 When the program information you want to capture is displayed, press FREEZE. 2 The LCD projection TV switches to Twin View mode and displays the "frozen" picture on the right, while the current program continues on the left. Current program in - Sony KF-60DX100 | Operating Instructions - Page 54
Using the Features Using Scrolling Channel Index Scrolling Channel Index allows you to view and select from all receivable channels scrolling on the screen without leaving the current channel. ✍ Scrolling Channel Index will not function when Parental Lock is activated. To use the Scrolling Channel - Sony KF-60DX100 | Operating Instructions - Page 55
Using the Features Using the Features 3 To enlarge the selected channel into the left frame, press again. The selected channel will be displayed in normal motion picture, and the sound also switches to this channel. 4 Press . The selected channel will be enlarged for normal viewing. To cancel - Sony KF-60DX100 | Operating Instructions - Page 56
Mode settings in the Wide menu. For details, see page 64. Wide Zoom enlarges the 4:3 picture to fill the 16:9 screen, keeping the original image as much as possible. Normal returns the 4:3 picture to its original size. Full Mode stretches the 4:3 picture horizontally only, to fill the 16:9 screen - Sony KF-60DX100 | Operating Instructions - Page 57
the joystick to scroll through the features. 4 See the specific menu page for instructions on moving through the menu. To end a menu session ❑ Press MENU again such as listening to second 60 audio programming (SAP), or customizing the Effect of the sound on your LCD projection TV. Allows you to set - Sony KF-60DX100 | Operating Instructions - Page 58
for Normal viewing conditions. Movie Select for soft, film like, picture. Mild Select to smooth the outline of digital image. ✍ You can alter the Video menu settings (Picture, Brightness, Color, etc.) for each Mode. z To quickly and easily change from one Video Mode to another, use PIC MODE - Sony KF-60DX100 | Operating Instructions - Page 59
give the white colors a neutral tint. Warm Select to give the white colors a red tint. Obtains a smooth picture movement that approaches the original film-like quality when reproducing movies or other video sources on 24 frame per second films. ON The LCD projection TV automatically detects the - Sony KF-60DX100 | Operating Instructions - Page 60
Adjust to emphasize left or right speaker balance. ON Select to stabilize the volume. OFF Select to turn off Steady Sound. ; Virtual Select for surround sound (for stereo programs only). z A virtual surround a surround-like effect to mono programs. OFF Normal stereo or mono reception. 60 - Sony KF-60DX100 | Operating Instructions - Page 61
output from your audio system can still be controlled by the LCD projection TV's remote control. The LCD projection TV's speakers are turned off and the volume, bass and treble output of the LCD projection TV is fixed. Use your audio receiver's volume control to adjust the volume through your audio - Sony KF-60DX100 | Operating Instructions - Page 62
Favorite Channel Auto Select if you want Favorite Channel options to be set automatically to the last eight channels selected with the 0-9 buttons. Manual Select if you want to input your own selections as Favorite Channel options. 1 Press to select a favorite channel number. 2 Use the joystick - Sony KF-60DX100 | Operating Instructions - Page 63
when you have a cable box or satellite receiver connected AUX 2-6 "Fix" your LCD projection TV's channel setting to 3 or 4 and use the cable box, VCR or satellite receiver to change channels. Select one of these settings if you have connected - Sony KF-60DX100 | Operating Instructions - Page 64
a Screen Mode to use for 4:3 sources. Description Wide Zoom Select to enlarge the 4:3 picture, to fill the 16:9 screen, keeping the original image as much as possible. Normal Select to return the 4:3 picture to normal mode. Full Select to enlarge the 4:3 picture horizontally only, to fill - Sony KF-60DX100 | Operating Instructions - Page 65
fill the 16:9 screen, keeping the original image as much as possible. Normal Select to return The 4:3 Default functions only when the LCD projection TV receives 480i signals. z If 4:3 Default is channels (or inputs), Screen Mode is automatically replaced with the 4:3 Default setting. To retain the - Sony KF-60DX100 | Operating Instructions - Page 66
. To set the Timer Before setting the timer, be sure to set your LCD projection TV's clock to the current time and Daylight Saving Mode. 1 Move the joystick to "Timer the Timer by day, time, duration, and channel. OFF Select to turn off the Timer. (Your previous settings will be saved.) Set the - Sony KF-60DX100 | Operating Instructions - Page 67
projection TV to block programs according to their content and rating levels. For details about setting, see "Using the Parent Menu" on page 69. Caption Vision Allows you to select from three closed caption modes (for programs that are broadcast with closed captioning). OFF Turns - Sony KF-60DX100 | Operating Instructions - Page 68
Label, your LCD projection TV's input is fixed (for VIDEO 1 only). Select to display all on-screen menus in your language of choice: English, Español, Français. The factory setting is Auto and your LCD projection TV automatically adjusts the doubled images, ghosts, or merged colors. If the "Auto - Sony KF-60DX100 | Operating Instructions - Page 69
the Menus The Parent menu allows you to set up the LCD projection TV to block programs according to their content and rating levels. These ratings are assigned by a federal rating board. Not all programs are rated. Using the Parental Lock blocks programs with a specific rating, but it does not - Sony KF-60DX100 | Operating Instructions - Page 70
Using the Menus 7 Move the joystick up or down to select U.S.A. or Canada according to the country you reside in, and press . 8 Move the joystick down to select "Parental Lock", and press . 9 Move the joystick up or down to select a desired rating, and press . If you select Child, Youth, Young - Sony KF-60DX100 | Operating Instructions - Page 71
Description Parental Lock OFF Turn ratings on/ off and select a Child rating system Parental lock is off. No programs are blocked from viewing. Maximum ratings permitted are: ❏ US: TV-Y, TV-G, G ❏ Canada: TV-Y, C, G Youth Maximum ratings permitted are: ❏ US: TV-PG, PG ❏ Canada: TV-PG, PG, 8 ans - Sony KF-60DX100 | Operating Instructions - Page 72
and press . 3 Make sure that "Movie Ratings" is selected, and press . 4 Move the joystick up or down to select the rating to be blocked, and press . The indicator automatically appears beside the selected rating and all "higher" ratings, indicating that the programs that match the ratings will be - Sony KF-60DX100 | Operating Instructions - Page 73
Menus Using the Menus 5 Move the joystick left, then down, to select "TV Rating" or "Program," and press . 6 The "TV Rating" setting menu appears. 7 Move the joystick up or down to select the rating to be blocked, and press . The indicator automatically appears beside the selected rating and all - Sony KF-60DX100 | Operating Instructions - Page 74
programs that match the extender can be viewed. If you press again, is displayed to show that the programs that match the extender will be blocked again. 9 Repeat step 8 for other extenders. All programs that match the ratings you select and higher, except for the extenders that were canceled, will - Sony KF-60DX100 | Operating Instructions - Page 75
17 and under allowed. and X TV Rating Age-Based Options Block programs by their rating, content or both TV-Y TV-Y7 TV-G All children. Directed to older children. General Audience. TV-PG Parental Guidance suggested. TV-14 Parents Strongly cautioned. TV-MA Mature Audience only. Content-Based - Sony KF-60DX100 | Operating Instructions - Page 76
young children. 13 ans+ Not recommended for ages under 13. 16 ans+ Not recommended for ages under 16. 18 ans+ Programming restricted to adults. See "TV Rating" on page 75 for details. 76 - Sony KF-60DX100 | Operating Instructions - Page 77
Remote Control AV1 AV2 AV3 DVD Programmable Code Number 303 302 301 751 If you have video equipment other than Sony brand that you want to control with the LCD projection TV's remote control, use the following procedures to program the remote control. ✍ The equipment must have infrared (IR) remote - Sony KF-60DX100 | Operating Instructions - Page 78
buttons. 5 Press ENTER. 6 To check if the code number works, aim the LCD projection TV's remote control at the component, open the panel, and press the green POWER button. If it to operate your component with the Sony remote control. In this case, use the component's own remote control unit. 78 - Sony KF-60DX100 | Operating Instructions - Page 79
, 311 Other Information Manufacturer Wards Yamaha Zenith Code 327, 328, 335, 331, 332 314, 330, 336, 337 331 DVD Players Manufacturer Sony Panasonic Pioneer RCA Toshiba Code 751 753 752 755 754 Cable Boxes Manufacturer Hamlin/Regal Jerrold/G. I. Oak Panasonic Pioneer Scientific Atlanta Tocom - Sony KF-60DX100 | Operating Instructions - Page 80
Other Information Operating Other Components with Your LCD Projection TV Remote Control Operating a VCR Open the panel and move the slide switch to the AV input you coded for this device. To Do This ... Turn on/off Change channels Record Play Stop Fast forward Rewind the tape Pause Search the - Sony KF-60DX100 | Operating Instructions - Page 81
(FUNCTION) 0-9 buttons, ENTER CH +/- JUMP Operating a Satellite Receiver To Do This ... Turn on/off Select Satellite Receiver Select a channel Change channels Back to previous channel Display channel number Display DBS guide Display DBS menu Move highlight (cursor) Select item Press SAT/CABLE - Sony KF-60DX100 | Operating Instructions - Page 82
Troubleshooting If, after reading these operating instructions, you have additional questions related to the use of your Sony television, please call our Customer Information Services Center at 1-800-222-SONY (7669) (U.S. residents only) or (416) 499-SONY (7669) (Canadian residents only). Problem - Sony KF-60DX100 | Operating Instructions - Page 83
TV memory (see page 63). ❏ Check your Channel Fix settings (see page 63). Double images, ghosts, or merged colors ❏ Use a highly directional outdoor antenna or a cable (when the problem available. (see page 67 to reset Setup selections) To turn this feature off, select OFF in the Caption Vision - Sony KF-60DX100 | Operating Instructions - Page 84
page 68. Favorite Channel does not display your choices ❏ Verify that Favorite Channel is set to Manual in the Channel menu (see "Favorite Channel" on page 62). Some video sources do not appear when you press TV/ VIDEO ❏ Ensure that Video Label is not set to "Skip" (see "Video Label" on page - Sony KF-60DX100 | Operating Instructions - Page 85
goes out and the LCD projection TV enters the standby mode (see page 13). The LAMP indicator flashes. ❑ The lamp for the light source burns out. Replace it with new one (see page 13). If the LCD projection TV is not recovered after correcting the problems, contact with qualified Sony personnel. 85 - Sony KF-60DX100 | Operating Instructions - Page 86
Lamp Television System Screen Size (measured diagonally) Channel Coverage VHF UHF CATV Power Requirements Number of Inputs/Outputs Video (IN) S Video (IN) Audio (IN) AUDIO (VAR/FIX) TV for VHF/UHF UHP lamp, 100W XL-2000U NTSC, American TV Standard 60 inches 2-13 14-69 1-125 120V, 60 Hz 4 1 Vp-p, - Sony KF-60DX100 | Operating Instructions - Page 87
Other Information Supplied Accessories Remote Control AA Batteries Cleaning Cloth Hex key wrench Brackets with screws Optional Accessories TV Stand Lamp AV Cable Audio Cable Control S Cable Component Video Cable AV Receiver RM-Y910 2 supplied for remote control 1 1 2 SU-60DX XL-2000U VMC-810/820/ - Sony KF-60DX100 | Operating Instructions - Page 88
to TV OUT 24 B Balance, adjusting 60 Bass, adjusting 60 45 Color temperature, adjusting 59 Color, adjusting TV connecting 38 watching 48 Digital TV program 48 Digital TV receiver, connecting 38 DISPLAY button 43 Display, turning off 43 DRC Service 67 F Favorite Channel auto 62 described 9 manual - Sony KF-60DX100 | Operating Instructions - Page 89
Image Revision 68 Inputs, labeling 68 Installation of the projection TV 25-41 J JUMP button 43 Jump, using 46 L Label channels 63 video inputs 68 Lamp, replacing Problems, troubleshooting 82-85 R Ratings setting 69-71 viewing blocked button 44 Resetting Audio options 60 Timer options 66 Video options - Sony KF-60DX100 | Operating Instructions - Page 90
Treble, adjusting 60 Troubleshooting 82-85 TV function button 44 TV power button 44 TV/VIDEO button 44 Twin View™ activating a picture 50 described 9 using 50 V VCR using with TV remote control 80 with cable box, connecting 30 with cable, connecting 29 with satellite receiver, connecting 34 Video - Sony KF-60DX100 | Operating Instructions - Page 91
- Sony KF-60DX100 | Operating Instructions - Page 92
If, after reading this instruction manual, you have additional questions related to the use of your Sony projection TV, please call one of the following numbers (English only). Customers in the continental United States contact the Direct Response Center at: 1-800-222-SONY (7669) Customers in Canada
-
 1
1 -
 2
2 -
 3
3 -
 4
4 -
 5
5 -
 6
6 -
 7
7 -
8
-
9
-
10
-
11
-
12
-
13
-
14
-
15
-
16
-
17
-
18
-
19
-
20
-
21
-
22
-
23
-
24
-
25
-
26
-
27
-
28
-
29
-
30
-
31
-
32
-
33
-
34
-
35
-
36
-
37
-
38
-
39
-
40
-
41
-
42
-
43
-
44
-
45
-
46
-
47
-
48
-
49
-
50
-
51
-
52
-
53
-
54
-
55
-
56
-
57
-
58
-
59
-
60
-
61
-
62
-
63
-
64
-
65
-
66
-
67
-
68
-
69
-
70
-
71
-
72
-
73
-
74
-
75
-
76
-
77
-
78
-
79
-
80
-
81
-
82
-
83
-
84
-
85
-
86
-
87
-
88
-
89
-
90
-
91
-
92
 |
 |
4-086-249-
12
(2)