Sony KF-60DX100 Operating Instructions - Page 43
Using the Features, Using the Remote Control, Button Descriptions
 |
View all Sony KF-60DX100 manuals
Add to My Manuals
Save this manual to your list of manuals |
Page 43 highlights
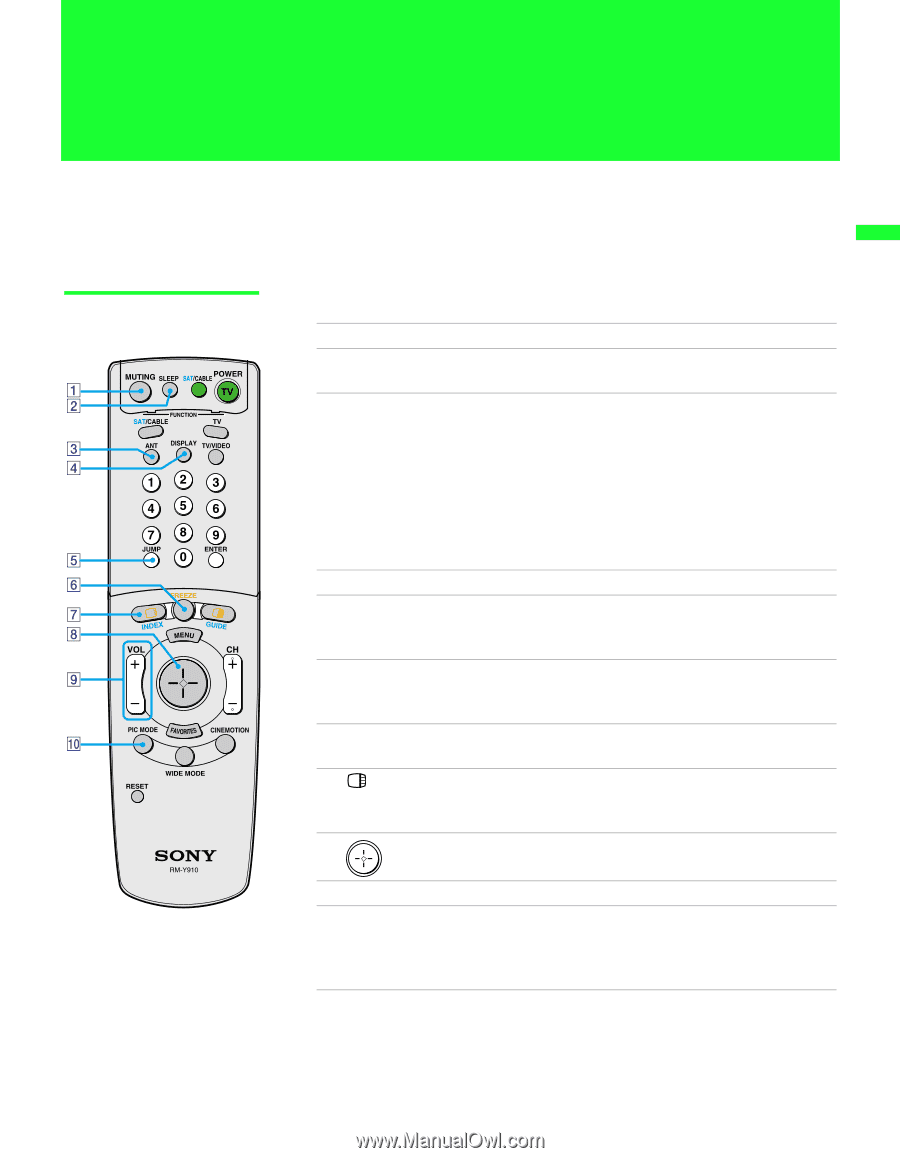
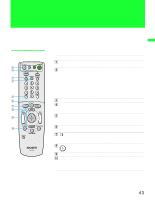
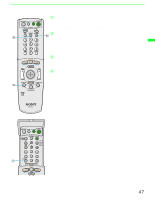
Using the Features Using the Features Using the Remote Control The following table describes the buttons on the remote control that are for more advanced functions. Button Descriptions Outside Panel Button 1 MUTING 2 SLEEP 3 ANT 4 DISPLAY 5 JUMP 6 FREEZE 7 INDEX 8 9 VOL +/- q; PIC MODE Description Press to mute the sound. Press again or press VOL + to restore the sound. Press repeatedly until the LCD projection TV displays the time in minutes (15, 30, 45, 60, or 90) that you want the LCD projection TV to remain on before shutting off automatically. To cancel Sleep timer, press SLEEP repeatedly until SLEEP OFF appears. Pressing down POWER also cancels the Sleep timer and turns off the power. While the Sleep feature is set, press once to view the remaining time. Changes between the VHF/UHF input and the AUX input. Press once to display the current time and channel label (if set) and channel number. Press again to turn Display off. See page 66 for details on setting the time. Press to jump back and forth between two channels. The LCD projection TV alternates between the current channel and the last channel that was selected. Freezes the window picture. Press again to restore the picture. Press to enter the Scrolling Channel Index mode. You can view and select from all receivable channels scrolling on the screen without leaving the current one. The joystick allows for movement of the on-screen cursor. Pressing down on the center of the joystick selects the item. Adjusts the volume. Press repeatedly to step through the available video picture modes: Vivid, Standard, Movie and Mild. Also available in the Video menu. For details, see "Selecting Video Options" on page 58. (Continued) 43
-
 1
1 -
2
-
3
-
4
-
5
-
6
-
7
-
8
-
9
-
10
-
11
-
12
-
13
-
14
-
15
-
16
-
17
-
18
-
19
-
20
-
21
-
22
-
23
-
24
-
25
-
26
-
27
-
28
-
29
-
30
-
31
-
32
-
33
-
34
-
35
-
36
-
37
-
 38
38 -
 39
39 -
 40
40 -
 41
41 -
 42
42 -
 43
43 -
 44
44 -
 45
45 -
 46
46 -
 47
47 -
 48
48 -
49
-
50
-
51
-
52
-
53
-
54
-
55
-
56
-
57
-
58
-
59
-
60
-
61
-
62
-
63
-
64
-
65
-
66
-
67
-
68
-
69
-
70
-
71
-
72
-
73
-
74
-
75
-
76
-
77
-
78
-
79
-
80
-
81
-
82
-
83
-
84
-
85
-
86
-
87
-
88
-
89
-
90
-
91
-
92
 |
 |