Sony MZ-NF810CK Operating Instructions - Page 22
Make connections., Record an MD
 |
View all Sony MZ-NF810CK manuals
Add to My Manuals
Save this manual to your list of manuals |
Page 22 highlights
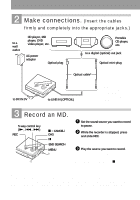
2 Make connections. (Insert the cables firmly and completely into the appropriate jacks.) to a wall outlet CD player, MD player, DVD video player, etc. AC power adaptor Optical plug Portable CD player, etc. to a digital (optical) out jack Optical mini-plug Optical cable* to DC IN 3V to LINE IN (OPTICAL) ∗ When using an optical cable other than the supplied one, see "Optional accessories" (page 77). 3 Record an MD. 5-way control key (N, ., >) REC x • CANCEL/ CHG X END SEARCH MENU 1 Set the sound source you want to record to pause. 2 While the recorder is stopped, press and slide REC. REC indication lights up and recording starts. 3 Play the source you want to record. Track marks are automatically added at the same point as the sound source. To stop recording, press x. Note If you record on a previously recorded disc, the recorder is factory set to overwrite the entire contents of the disc. If you want the recording to start after the existing contents, do the procedure "Recording without overwriting existing material" (page 61) before doing step 3, "Record an MD." (page 22). 22
-
 1
1 -
2
-
3
-
4
-
5
-
6
-
7
-
8
-
9
-
10
-
11
-
12
-
13
-
14
-
15
-
16
-
 17
17 -
 18
18 -
 19
19 -
 20
20 -
 21
21 -
 22
22 -
 23
23 -
 24
24 -
 25
25 -
 26
26 -
 27
27 -
28
-
29
-
30
-
31
-
32
-
33
-
34
-
35
-
36
-
37
-
38
-
39
-
40
-
41
-
42
-
43
-
44
-
45
-
46
-
47
-
48
-
49
-
50
-
51
-
52
-
53
-
54
-
55
-
56
-
57
-
58
-
59
-
60
-
61
-
62
-
63
-
64
-
65
-
66
-
67
-
68
-
69
-
70
-
71
-
72
-
73
-
74
-
75
-
76
-
77
-
78
-
79
-
80
-
81
-
82
-
83
-
84
-
85
-
86
-
87
-
88
-
89
-
90
-
91
-
92
-
93
-
94
-
95
-
96
-
97
-
98
-
99
-
100
-
101
-
102
-
103
-
104
-
105
-
106
-
107
-
108
-
109
-
110
-
111
-
112
-
113
-
114
-
115
-
116
-
117
-
118
-
119
-
120
-
121
-
122
-
123
-
124
-
125
-
126
-
127
-
128
 |
 |
