Sony MZ-NF810CK Operating Instructions - Page 32
Recording from a microphone, To select microphone sensitivity, To select microphone, sensitivity
 |
View all Sony MZ-NF810CK manuals
Add to My Manuals
Save this manual to your list of manuals |
Page 32 highlights
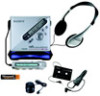
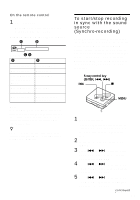
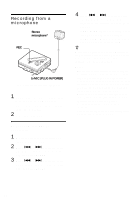
Recording from a microphone Stereo microphone* REC to MIC (PLUG IN POWER) ∗ See "Optional accessories" (page 77). 1 Connect the stereo microphone to the MIC (PLUG IN POWER) jack. The recorder changes to microphone input automatically. 2 Press and slide REC. To select microphone sensitivity 1 While the recorder is recording or stopped, press MENU. 2 Press . or > repeatedly until "REC SET" appears in the display, and then press ENTER. 3 Press . or > repeatedly until "MIC SENS" appears in the display, and then press ENTER. 4 Press . or > repeatedly until "SENS HIGH" or "SENS LOW" appears in the display, and then press ENTER. SENS HIGH: When recording a soft sound or a sound in the distance. SENS LOW: When recording a loud sound or a sound at close range. z When using a plug-in power-type microphone, the microphone can be operated even when its power switch is turned off since power is supplied from the recorder itself. Notes • The recorder automatically switches input in the following order; optical input, microphone input, and analog input. You cannot record through the microphone while an optical cable is connected to the LINE IN (OPTICAL) jack. • The microphone may pick up the operating sound of the recorder itself. Use the microphone away from the recorder in such cases. Please note that the sound of recorder operations may be picked up if the microphone that you use has a short connector. • Only the left-channel sound is recorded when a monaural microphone is used. 32
-
 1
1 -
2
-
3
-
4
-
5
-
6
-
7
-
8
-
9
-
10
-
11
-
12
-
13
-
14
-
15
-
16
-
17
-
18
-
19
-
20
-
21
-
22
-
23
-
24
-
25
-
26
-
 27
27 -
 28
28 -
 29
29 -
 30
30 -
 31
31 -
 32
32 -
 33
33 -
 34
34 -
 35
35 -
 36
36 -
 37
37 -
38
-
39
-
40
-
41
-
42
-
43
-
44
-
45
-
46
-
47
-
48
-
49
-
50
-
51
-
52
-
53
-
54
-
55
-
56
-
57
-
58
-
59
-
60
-
61
-
62
-
63
-
64
-
65
-
66
-
67
-
68
-
69
-
70
-
71
-
72
-
73
-
74
-
75
-
76
-
77
-
78
-
79
-
80
-
81
-
82
-
83
-
84
-
85
-
86
-
87
-
88
-
89
-
90
-
91
-
92
-
93
-
94
-
95
-
96
-
97
-
98
-
99
-
100
-
101
-
102
-
103
-
104
-
105
-
106
-
107
-
108
-
109
-
110
-
111
-
112
-
113
-
114
-
115
-
116
-
117
-
118
-
119
-
120
-
121
-
122
-
123
-
124
-
125
-
126
-
127
-
128
 |
 |
