Sony PEG-N710C Read This First Operating Instructions
Sony PEG-N710C - Personal Entertainment Organizer Manual
 |
View all Sony PEG-N710C manuals
Add to My Manuals
Save this manual to your list of manuals |
Sony PEG-N710C manual content summary:
- Sony PEG-N710C | Read This First Operating Instructions - Page 1
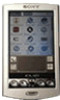
Read This First 4-653-877-11(1) Chapter 1 What is the Sony CLIE Handheld? Chapter 2 Setting up your Sony CLIE Handheld - Basics Chapter 3 Setting up your Sony CLIE Handheld - Advanced Personal Entertainment Organizer PEG-N710C © 2001 Sony Corporation - Sony PEG-N710C | Read This First Operating Instructions - Page 2
trademarks are trademarks of their respective owners. Notes • Sony does not support third-party add-on applications. If you are having a problem with a third-party application, please contact the developer or publisher of that software. • The illustrations in this manual may differ from the actual - Sony PEG-N710C | Read This First Operating Instructions - Page 3
add-on applications onto your Sony CLIE Handheld 48 Installing add-on applications from the Palm™ Desktop for CLIE software ......... 48 Installing add-on applications from "Memory Stick®" media 51 Installing add-on applications by beaming them from another Palm OS® device 52 Removing add-on - Sony PEG-N710C | Read This First Operating Instructions - Page 4
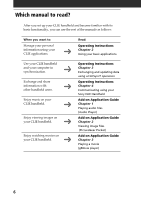
(referred to as CLIE handheld or Sony Handheld in this manual). Your CLIE handheld comes with three manuals: s Read This First (this guide) s Operating Instructions (as a PDF file contained in the CD-ROM) s Add-on Application Guide Before using your CLIE handheld, read this guide for overview of - Sony PEG-N710C | Read This First Operating Instructions - Page 5
Operating Instructions manual is contained in the supplied CD-ROM as a PDF file, allowing you to view or print it as soon as you need it. The manual describes how to use your CLIE handheld and the Personal Information Management (PIM) applications that come with your CLIE handheld. The manual shows - Sony PEG-N710C | Read This First Operating Instructions - Page 6
3 Exchanging and updating data using a HotSync® operation Operating Instructions Chapter 4 Communicating using your Sony CLIE Handheld Add-on Application Guide Chapter 1 Playing audio files (Audio Player) Add-on Application Guide Chapter 2 Viewing image files (PictureGear Pocket) Add-on Application - Sony PEG-N710C | Read This First Operating Instructions - Page 7
CLIE Handheld 8 System requirements 9 Sony CLIE Handheld components 10 Locating front panel controls 10 Locating back panel components 12 Locating cradle components 14 Elements of the CLIE interface 15 What is on the CLIE Installation CD-ROM 17 CD-ROM contents 17 How to read the PDF manuals - Sony PEG-N710C | Read This First Operating Instructions - Page 8
. s Exchange data with your computer, other Sony CLIE handhelds, digital cameras, or other portable devices with Sony's "Memory Stick®" media. s Play back image files with the PictureGear™ Pocket software on your CLIE handheld or with the PictureGear™ Lite software on your computer. s Play back MP3 - Sony PEG-N710C | Read This First Operating Instructions - Page 9
Chapter 1 What is the Sony CLIE Handheld? System requirements To install and operate the Palm™ Desktop software on your computer, your computer system must meet the following requirements: s OS: Microsoft® Windows® 98/Windows® 98 Second Edition/ Windows® 2000 Professional/Windows® Millennium - Sony PEG-N710C | Read This First Operating Instructions - Page 10
" in the Operating Instructions manual. 3 Back Button Releases the selection of an item or cancels the operation. Depending on the application you use, returning to the previous screen or other specific functions are assigned to this button. 4 HOLD Switch Protects your CLIE handheld from accidental - Sony PEG-N710C | Read This First Operating Instructions - Page 11
is the Sony CLIE Handheld? 5 POWER Button Used to turn your CLIE handheld on or off. Also, press the POWER button and hold it down for two seconds or longer to turn the frontlight of the color LCD display on or off. 6 Screen Displays the applications and information stored in your CLIE handheld. It - Sony PEG-N710C | Read This First Operating Instructions - Page 12
slot. 4 Infrared Communication Port Uses infrared technology to transmit data to and receive data from other CLIE or Palm OS® handhelds, and to perform HotSync® operations. For details, see "Beaming between your Sony CLIE Handheld and another Palm OS® PDA" in the Operating Instructions manual. 12 - Sony PEG-N710C | Read This First Operating Instructions - Page 13
, you should not have to use this button. For details, see "Resetting your Sony CLIE Handheld" in the Operating Instructions manual. 6 Interface Connector Used to connect your CLIE handheld to the cradle, AC adapter, or CLIE Modem (not supplied). Removing the supplied protective soft cover from your - Sony PEG-N710C | Read This First Operating Instructions - Page 14
saved on your computer. For details, see "Exchanging and updating data using a HotSync® operation" in the Operating Instructions manual. 4 Cradle Indicator When you connect the cradle to the AC adapter and place your CLIE handheld on the cradle, the indicator lights in green and charging will start - Sony PEG-N710C | Read This First Operating Instructions - Page 15
Chapter 1 What is the Sony CLIE Handheld? Elements of the CLIE interface 1 Battery Icon Displays the remaining charge in the battery. While your CLIE handheld is placed in the cradle or operates on the AC power source, the battery charging icon ( ) is displayed. 2 Home Icon Tap this icon and the - Sony PEG-N710C | Read This First Operating Instructions - Page 16
Sony CLIE Handheld components 5 Application Icon Tap an icon to activate the corresponding application. Note on display resolutions Your CLIE handheld uses original technology to provide a 320 x 320 dot high resolution display. When you start an application supporting the high resolution, the screen - Sony PEG-N710C | Read This First Operating Instructions - Page 17
CLIE specific Palm OS® applications onto your CLIE handheld: - Audio Player Ver.2.0 - AvantGo - PowerOne Personal The following sample data and demonstration files are also available: - Sample data for Audio Player, gMovie player, and PictureGear Pocket - GoAmerica Wireless Service Demo (ISP) - CLIE - Sony PEG-N710C | Read This First Operating Instructions - Page 18
(this guide) - Operating Instructions - Add-on Application Guide - Audio Player manual - gMovie manual - PictureGear Pocket manual - MSGate manual - MSAutorun manual Tip You can view the manuals by clicking Manuals in the installation launcher window of the CLIE handheld. How to read the PDF manuals - Sony PEG-N710C | Read This First Operating Instructions - Page 19
directly from the power supply 21 Step 2: Turning on your Sony CLIE Handheld for the first time ....... 22 Step 3: Entering data into your Sony CLIE Handheld 26 Step 4: Installing the Palm™ Desktop for CLIE software onto your computer 28 Step 5: Connecting your Sony CLIE Handheld and your - Sony PEG-N710C | Read This First Operating Instructions - Page 20
your Sony CLIE Handheld Charging with the cradle Note Before you use your CLIE handheld for the first time, make sure to charge it. Connect the supplied cradle to an AC power source in advance. Charging will start automatically as soon as you place your CLIE handheld on the cradle. The battery - Sony PEG-N710C | Read This First Operating Instructions - Page 21
Chapter 2 Setting up your Sony CLIE Handheld-Basics Chapter 2 Charging directly from the power supply You can also charge your CLIE handheld by connecting the supplied AC adapter directly to your CLIE handheld. The AC adapter operates only on 110-240 V AC power supply. To the wall outlet Connect - Sony PEG-N710C | Read This First Operating Instructions - Page 22
Sony CLIE Handheld for the first time The first time you start your CLIE handheld, setup instructions appear onscreen. Follow their instructions to perform initial settings, digitizer calibration, current time, date, and year settings (required for operation). 1 Press the POWER button. Your CLIE - Sony PEG-N710C | Read This First Operating Instructions - Page 23
2 Setting up your Sony CLIE Handheld-Basics 3 Press lightly on the screen with the stylus. This action is called "tapping." The digitizer calibration screen appears. Calibration aligns the internal circuitry of the handheld with its touch-sensitive screen so your CLIE handheld can detect the task - Sony PEG-N710C | Read This First Operating Instructions - Page 24
Step 2: Turning on your Sony CLIE Handheld for the first time After calibration completes, a screen for setting time and date appears. 6 Tap the Set Time box. The Set Time screen appears. 7 Tap - Sony PEG-N710C | Read This First Operating Instructions - Page 25
Chapter 2 Setting up your Sony CLIE Handheld-Basics 12 Tap the arrow b or B next to the year to select the current year. 13 Tap the screen appears. 16 Tap Done. The initial settings are complete, and the Application Launcher screen (Home screen) appears. Your CLIE handheld is now ready for use! 25 - Sony PEG-N710C | Read This First Operating Instructions - Page 26
Sony CLIE Handheld There are three ways to enter data into your CLIE handheld: - Using Graffiti® writing - Using the onscreen keyboard - Using your computer keyboard Graffiti writing Your CLIE handheld includes Graffiti writing software " in the Operating Instructions manual. Onscreen keyboard When - Sony PEG-N710C | Read This First Operating Instructions - Page 27
keyboard, you can use the Palm™ Desktop for Sony software or any supported PIM (Personal Information Management) to enter information. You can then perform a HotSync® operation to synchronize the information on your computer with the information on your CLIE handheld. All the main applications on - Sony PEG-N710C | Read This First Operating Instructions - Page 28
data between your CLIE handheld and your computer. Notes •Do not connect the cradle to a USB connector of your computer before installing the Palm Desktop for CLIE software. The installation of the software might not be performed correctly. •If other Palm Desktop software is already installed - Sony PEG-N710C | Read This First Operating Instructions - Page 29
Chapter 2 Setting up your Sony CLIE Handheld-Basics 3 Click Install Palm Desktop for CLIE. The setup program starts and the Welcome window is displayed. 4 Click Next. The Palm Desktop for CLIE 3.1 software installation begins. Follow the instructions onscreen. On Intellisync Lite installation The - Sony PEG-N710C | Read This First Operating Instructions - Page 30
4: Installing the Palm™ Desktop for CLIE software onto your computer 5 Fill in the customer registration following the instructions shown onscreen. You need Internet access for the online customer registration. You can take advantage of Sony's commitment to quality customer support and nine months - Sony PEG-N710C | Read This First Operating Instructions - Page 31
You can use the data of the old handheld. For details, see "Using data of another Sony CLIE Handheld" in the Operating Instructions manual. On Intellisync Lite When you follow the steps in this section to install the Palm Desktop for CLIE software, the Intellisync Lite is also installed. Intellisync - Sony PEG-N710C | Read This First Operating Instructions - Page 32
Sony CLIE Handheld and your computer via the cradle The cradle that comes with your CLIE handheld enables you to synchronize the information on your CLIE handheld with the Palm™ Desktop for CLIE software on your computer using HotSync® technology. 1 Connect the USB connector of the cradle to a USB - Sony PEG-N710C | Read This First Operating Instructions - Page 33
to a Palm OS® platform device, is the one-step operation that allows you to synchronize data between your CLIE handheld and your computer, and backup the CLIE data on your computer. For details, see "Exchanging and updating data using a HotSync® operation" in the Operating Instructions manual. When - Sony PEG-N710C | Read This First Operating Instructions - Page 34
not enter power saving mode during a HotSync operation. If your computer enters power saving mode Sony Handheld, and then click Palm Desktop for CLIE. The Palm Desktop for CLIE software starts. All the main applications on your CLIE handheld are also available in the Palm Desktop for CLIE software - Sony PEG-N710C | Read This First Operating Instructions - Page 35
add-on applications onto your Sony CLIE Handheld ....... 48 Installing add-on applications from the Palm™ Desktop for CLIE software 48 Installing add-on applications from "Memory Stick®" media .. 51 Installing add-on applications by beaming them from another Palm OS® device 52 Removing add-on - Sony PEG-N710C | Read This First Operating Instructions - Page 36
Checking the bundled applications on your Sony CLIE Handheld After you make your CLIE handheld ready for use, start the Application Launcher to display all the available applications on your CLIE handheld. Check the basic and other applications. To open an application from the Application Launcher - Sony PEG-N710C | Read This First Operating Instructions - Page 37
your Sony CLIE Handheld-Advanced Overview of basic Palm OS® applications Your CLIE handheld comes with the following Palm OS basic the following: s Enter a description of your appointment and assign it to a specific time and date. s Display a chart of your appointments for an entire week - Sony PEG-N710C | Read This First Operating Instructions - Page 38
Checking the bundled applications on your Sony CLIE Handheld s Define which phone number appears in the message on your CLIE handheld. s Drag and drop memos into popular computer applications like Microsoft® Word when you synchronize using the Palm™ Desktop for CLIE software and HotSync® technology - Sony PEG-N710C | Read This First Operating Instructions - Page 39
Chapter 3 Setting up your Sony CLIE Handheld-Advanced Calculator Calculator enables you to perform addition, subtraction, multiplication, and division. In later) on your computer. (Microsoft Excel is not included in the Personal Entertainment Organizer CLIE package.) Continued on next page 39 - Sony PEG-N710C | Read This First Operating Instructions - Page 40
are created and controlled by the OpenMG Jukebox software on your computer and stored in your "Magic Gate Memory Stick®" media. In Audio Player, you can do the following: s Playback audio files stored in the "Magic Gate Memory Stick" media in your CLIE handheld. s Listen to music with the supplied - Sony PEG-N710C | Read This First Operating Instructions - Page 41
or move data to and from your CLIE handheld and "Memory Stick" media. s Delete data in "Memory Stick" media and in your CLIE handheld. s Format "Memory Stick" media. gMovie player gMovie player is used to play a movie clip created using the PictureGear 4.3Lite software. In gMovie player, you can do - Sony PEG-N710C | Read This First Operating Instructions - Page 42
(check-out) to a Sony digital music player such as your CLIE handheld, for portable listening. 1 Insert the Installation CD-ROM into your computer's CD-ROM drive. The installation launcher window is displayed. 2 Click Install CLIE Audio Software. The Audio Software installation window is displayed - Sony PEG-N710C | Read This First Operating Instructions - Page 43
MP3 file on your CLIE handheld. 1 Insert the Installation CD-ROM into your computer's CD-ROM drive. The installation launcher window is displayed. 2 Click Install CLIE Audio Software. The Audio Software installation window is displayed. 3 Click Install RealJukebox for Sony. OpenMG installer is - Sony PEG-N710C | Read This First Operating Instructions - Page 44
Lite. The PictureGear 4.3Lite software installation starts. Follow the instructions onscreen to finish installation. Installing QuickTime 4 QuickTime 4 allows you to view QuickTime movies and is necessary for PictureGear Lite to convert QuickTime movies for use on your CLIE handheld. 1 Insert the - Sony PEG-N710C | Read This First Operating Instructions - Page 45
Chapter 3 Setting up your Sony CLIE Handheld-Advanced 3 Click Install QuickTime. The QuickTime 4 software installation starts. Follow the instructions onscreen to finish installation. Installing DirectX® 6 DirectX 6, a set of graphics and sound drivers, is necessary for PictureGear Lite to function - Sony PEG-N710C | Read This First Operating Instructions - Page 46
software installation starts. Follow the instructions onscreen to finish the installation. Installing Acrobat Reader® 4.05 Acrobat Reader 4.05 allows you to view, navigate, and print documents in the Adobe Portable Document Format (PDF). To open and read the online manuals in the CLIE Installation - Sony PEG-N710C | Read This First Operating Instructions - Page 47
Chapter 3 Setting up your Sony CLIE Handheld-Advanced Uninstalling the supplied applications In the /Remove. The confirmation dialog box is displayed. 5 Click OK to remove the software. Follow the instructions onscreen to remove the application from your computer's hard disk. Tip Some applications - Sony PEG-N710C | Read This First Operating Instructions - Page 48
for your CLIE handheld, such as games and other software that run on the Palm OS®. For information on the latest thirdparty applications, see our official Sony CLIE Web site (http:// www.sony.com/clie/). Note • Add-on applications reside in the RAM memory of your CLIE handheld. Performing a hard - Sony PEG-N710C | Read This First Operating Instructions - Page 49
Chapter 3 Setting up your Sony CLIE Handheld-Advanced 2 Double-click the Palm Desktop for CLIE software icon on the Windows® desktop or click Start on the task tray, point to Programs, Sony Handheld, and then click Palm Desktop for CLIE. The Palm Desktop for CLIE software starts. 3 Click Install. - Sony PEG-N710C | Read This First Operating Instructions - Page 50
on applications onto your Sony CLIE Handheld 6 Select the application(s) you want to install on your CLIE handheld, and then click operation. The application(s) you selected in step 6 will be installed on your CLIE handheld. See page 33 (Step 6: Performing a HotSync® operation for the first time - Sony PEG-N710C | Read This First Operating Instructions - Page 51
Gate icon on your CLIE handheld. 3 Press the Jog Dial™ navigator. The contents of "Memory Stick" media are displayed. 4 Tap the application you want to install. 5 Tap Copy. The selected application is installed onto your CLIE handheld. Chapter 3 Setting up your Sony CLIE Handheld-Advanced 51 - Sony PEG-N710C | Read This First Operating Instructions - Page 52
Installing add-on applications onto your Sony CLIE Handheld Installing add-on applications by beaming them from another Palm OS® device Your CLIE handheld is equipped with an IR (infrared) port that you can use to beam an application to another Palm OS® PDA device that's close by and also has an IR - Sony PEG-N710C | Read This First Operating Instructions - Page 53
Chapter 3 Setting up your Sony CLIE Handheld-Advanced 4 Tap the application you want to transfer. Note 10 to 20 centimeters) apart, and the path between the two handhelds must be clear of obstacles. Beaming distance to other Palm OS PDA devices may be different. 7 Wait for the Beam dialog box to - Sony PEG-N710C | Read This First Operating Instructions - Page 54
Installing add-on applications onto your Sony CLIE Handheld Removing add-on applications In the event that you run out of memory or decide that you no longer need an add-on application you installed, you can remove an application from your CLIE handheld. Note You can remove only add-on applications, - Sony PEG-N710C | Read This First Operating Instructions - Page 55
support the high resolution mode. • Adds the panel to make detailed settings to the Preferences. 1 Double-click the Palm™ Desktop for CLIE software icon on the Windows® desktop or click Start on the task tray, point to Programs, Sony Handheld, and then click Palm Desktop for CLIE. The Palm Desktop - Sony PEG-N710C | Read This First Operating Instructions - Page 56
the Palm™ Desktop for CLIE software, follow the instructions in this section to complete the registration. 1 Double-click the Sony CLIE Registration icon on the Windows® desktop or click Start on the task tray, point to Programs, Sony Handheld, and then click Sony CLIE Registration. The Sony CLIE - Sony PEG-N710C | Read This First Operating Instructions - Page 57
For the latest support information, check our official Sony CLIE Web site http://www.sony.com/clie Printed in Japan
-
 1
1 -
 2
2 -
 3
3 -
 4
4 -
 5
5 -
 6
6 -
 7
7 -
8
-
9
-
10
-
11
-
12
-
13
-
14
-
15
-
16
-
17
-
18
-
19
-
20
-
21
-
22
-
23
-
24
-
25
-
26
-
27
-
28
-
29
-
30
-
31
-
32
-
33
-
34
-
35
-
36
-
37
-
38
-
39
-
40
-
41
-
42
-
43
-
44
-
45
-
46
-
47
-
48
-
49
-
50
-
51
-
52
-
53
-
54
-
55
-
56
-
57
 |
 |
© 2001 Sony Corporation
PEG-N710C
Read
This
First
Personal Entertainment Organizer
Chapter 1
Chapter 2
Chapter 3
4-653-877-
11
(1)
What is the Sony
CLIE Handheld?
Setting up your Sony
CLIE Handheld
- Basics
Setting up your Sony
CLIE Handheld
- Advanced