Sony STR-DA5600ES Operating Instructions (Large File - 18.8 MB) - Page 47
: Calibrating the appropriate speaker settings automatically (Auto Calibration), Auto Calibration
 |
View all Sony STR-DA5600ES manuals
Add to My Manuals
Save this manual to your list of manuals |
Page 47 highlights
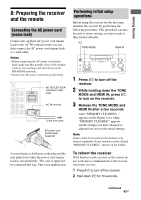
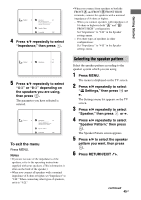
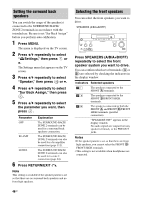
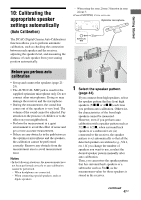
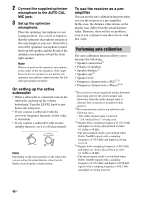
Getting Started 10: Calibrating the appropriate speaker settings automatically (Auto Calibration) The DCAC (Digital Cinema Auto Calibration) function allows you to perform automatic calibration, such as checking the connection between each speaker and the receiver, adjusting the speaker level, and measuring the distance of each speaker from your seating position automatically. - When using the zone 2/zone 3 function in zone 2/zone 3. • Cancel MUTING if it is set to on. Optimizer microphone Before you perform auto calibration • Set up and connect the speakers (page 2124). • The AUTO CAL MIC jack is used for the supplied optimizer microphone only. Do not connect other microphones. Doing so may damage the receiver and the microphone. • During the measurement, the sound that comes out of the speakers is very loud. The volume of the sound cannot be adjusted. Pay attention to the presence of children or to the effect on your neighborhood. • Perform the measurement in a quiet environment to avoid the effect of noise and get a more accurate measurement. • If there are any obstacles in the path between the optimizer microphone and the speakers, the calibration cannot be performed correctly. Remove any obstacle from the measurement area to avoid measurement error. Notes • In the following situations, the measurements have not been performed correctly or auto calibration cannot be performed. - When headphones are connected. - When connecting special speakers, such as dipole speakers. 1 Select the speaker pattern (page 44). If you connect front high speakers, select the speaker pattern that has front high speakers (5/x.x or 4/x.x) each time you perform auto calibration. Otherwise, the characteristics of the front high speakers cannot be measured. However, even if you perform auto calibration with a speaker pattern such as 5/2.x or 4/2.x, when surround back speakers or a subwoofer are (is) connected to the receiver, the speaker pattern is set automatically so that all the detected speakers are utilized (e.g., 5/4.1, etc.). If you change the number of speakers you want to use, reselect the desired speaker pattern manually after auto calibration. Then, you can restore the speaker pattern that has surround back speakers or a subwoofer such as 5/4.x, as the measurement value for those speakers is stored in the receiver. continued 47GB
-
 1
1 -
2
-
3
-
4
-
5
-
6
-
7
-
8
-
9
-
10
-
11
-
12
-
13
-
14
-
15
-
16
-
17
-
18
-
19
-
20
-
21
-
22
-
23
-
24
-
25
-
26
-
27
-
28
-
29
-
30
-
31
-
32
-
33
-
34
-
35
-
36
-
37
-
38
-
39
-
40
-
41
-
 42
42 -
 43
43 -
 44
44 -
 45
45 -
 46
46 -
 47
47 -
 48
48 -
 49
49 -
 50
50 -
 51
51 -
 52
52 -
53
-
54
-
55
-
56
-
57
-
58
-
59
-
60
-
61
-
62
-
63
-
64
-
65
-
66
-
67
-
68
-
69
-
70
-
71
-
72
-
73
-
74
-
75
-
76
-
77
-
78
-
79
-
80
-
81
-
82
-
83
-
84
-
85
-
86
-
87
-
88
-
89
-
90
-
91
-
92
-
93
-
94
-
95
-
96
-
97
-
98
-
99
-
100
-
101
-
102
-
103
-
104
-
105
-
106
-
107
-
108
-
109
-
110
-
111
-
112
-
113
-
114
-
115
-
116
-
117
-
118
-
119
-
120
-
121
-
122
-
123
-
124
-
125
-
126
-
127
-
128
-
129
-
130
-
131
-
132
-
133
-
134
-
135
-
136
-
137
-
138
-
139
-
140
-
141
-
142
-
143
-
144
-
145
-
146
-
147
-
148
-
149
-
150
-
151
-
152
-
153
-
154
-
155
-
156
-
157
-
158
-
159
-
160
-
161
-
162
-
163
-
164
-
165
-
166
-
167
-
168
-
169
-
170
-
171
-
172
-
173
-
174
-
175
-
176
-
177
-
178
 |
 |
