Sony VGC-RA839G VAIO User Guide - Page 83
Replacing the lithium battery, Installing a lithium battery
 |
View all Sony VGC-RA839G manuals
Add to My Manuals
Save this manual to your list of manuals |
Page 83 highlights
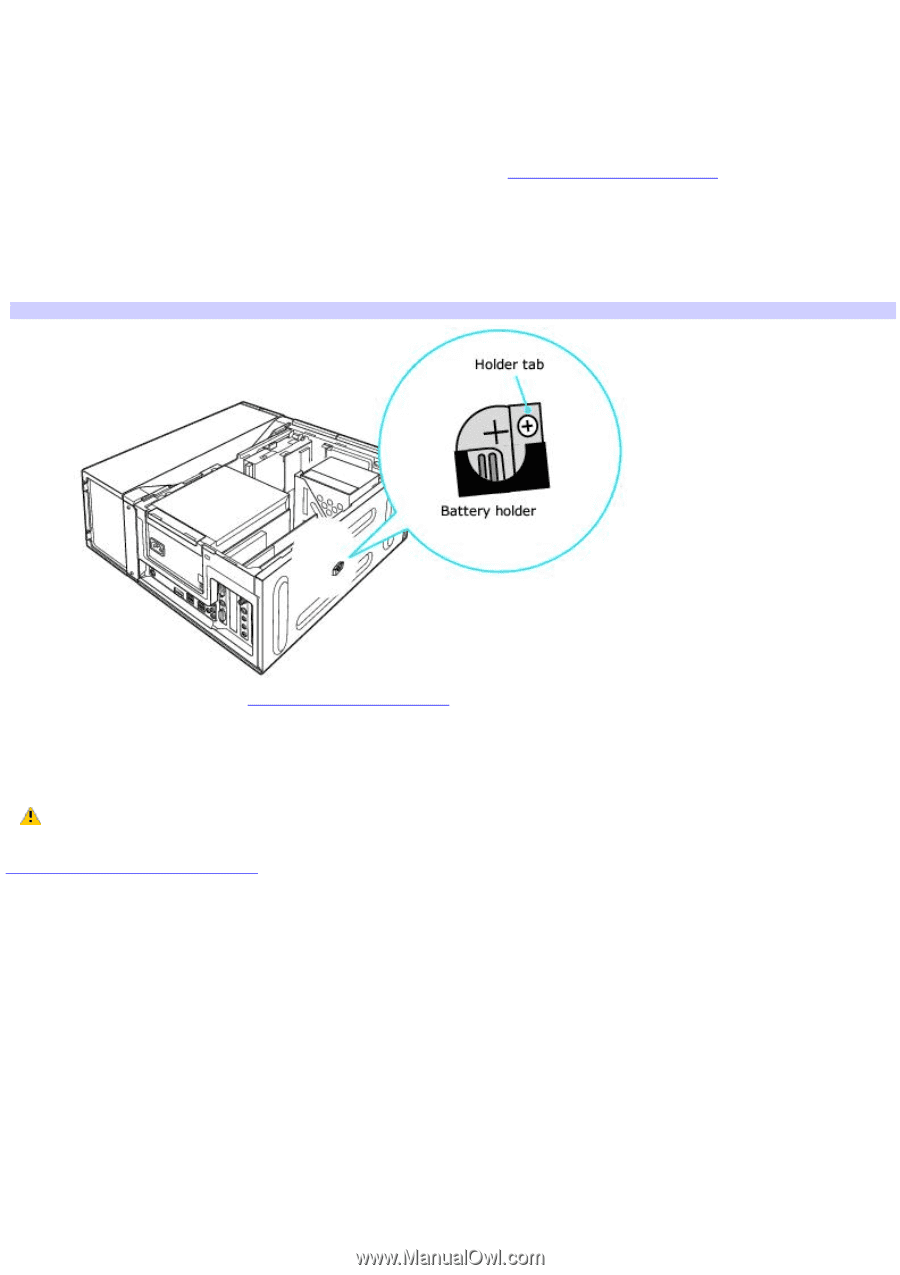
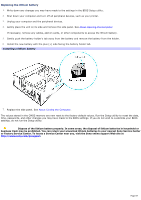
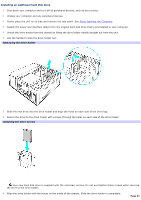
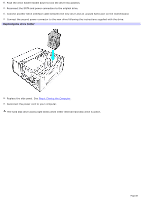
Replacing the lithium battery 1. Write down any changes you may have made to the settings in the BIOS Setup utility. 2. Shut down your computer and turn off all peripheral devices, such as your printer. 3. Unplug your computer and the peripheral devices. 4. Gently place the unit on its side and remove the side panel. See About Opening the Computer If necessary, remove any cables, add-on cards, or other components to access the lithium battery. 5. Gently push the battery holder's tab away from the battery and remove the battery from the holder. 6. Install the new battery with the plus (+) side facing the battery holder tab. Installing a lithium battery 7. Replace the side panel. See About Closing the Computer. The values stored in the CMOS memory are now reset to the factory default values. Run the Setup utility to reset the date, time, passwords, and other changes you may have made to the BIOS settings. If you do not wish to customize your BIOS settings, do not run the Setup utility. Dispose of the lithium battery properly. In some areas, the disposal of lithium batteries in household or business trash may be prohibited. You can return your unwanted lithium batteries to your nearest Sony Service Center or Factory Service Center. To locate a Service Center near you, visit the Sony online support Web site at http://www.sony.com/pcsupport. Page 83
-
 1
1 -
2
-
3
-
4
-
5
-
6
-
7
-
8
-
9
-
10
-
11
-
12
-
13
-
14
-
15
-
16
-
17
-
18
-
19
-
20
-
21
-
22
-
23
-
24
-
25
-
26
-
27
-
28
-
29
-
30
-
31
-
32
-
33
-
34
-
35
-
36
-
37
-
38
-
39
-
40
-
41
-
42
-
43
-
44
-
45
-
46
-
47
-
48
-
49
-
50
-
51
-
52
-
53
-
54
-
55
-
56
-
57
-
58
-
59
-
60
-
61
-
62
-
63
-
64
-
65
-
66
-
67
-
68
-
69
-
70
-
71
-
72
-
73
-
74
-
75
-
76
-
77
-
 78
78 -
 79
79 -
 80
80 -
 81
81 -
 82
82 -
 83
83 -
 84
84 -
 85
85 -
 86
86 -
 87
87 -
 88
88 -
89
-
90
-
91
-
92
-
93
-
94
-
95
-
96
-
97
-
98
-
99
-
100
-
101
-
102
-
103
-
104
-
105
-
106
-
107
-
108
-
109
-
110
-
111
-
112
-
113
-
114
-
115
-
116
-
117
-
118
-
119
-
120
-
121
-
122
-
123
-
124
-
125
-
126
-
127
-
128
-
129
-
130
-
131
-
132
-
133
-
134
-
135
-
136
-
137
-
138
-
139
-
140
-
141
-
142
-
143
-
144
-
145
-
146
-
147
-
148
-
149
-
150
-
151
-
152
-
153
-
154
-
155
-
156
-
157
-
158
-
159
-
160
-
161
-
162
-
163
-
164
 |
 |