Sony VPL CX5 Operating Instructions - Page 15
To install batteries - remote control
 |
UPC - 027242598874
View all Sony VPL CX5 manuals
Add to My Manuals
Save this manual to your list of manuals |
Page 15 highlights
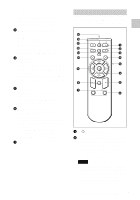
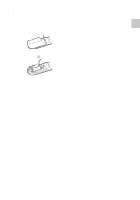
Overview To install batteries 1 Push and slide to open the lid, then install the two size AA (R6) batteries (supplied) with the correct polarity. While pressing the lid, slide it. Be sure to install the battery from the # side. 2 Replace the lid. Notes on batteries • Make sure that the battery orientation is correct when inserting batteries. • Do not mix an old battery with a new one or different types of batteries. • If you do not use the Remote Commander for a long time, remove the batteries to avoid damage from battery leakage. If batteries have leaked, remove them, wipe and dry the battery compartment, and replace the batteries with new ones. Notes on Remote Commander operation • Make sure that nothing obstructs the infrared beam between the Remote Commander and the remote control detector on the projector. Direct the Remote Commander toward the front or rear remote control detector. • The operation range is limited. The shorter the distance between the Remote Commander and the projector is, the wider the angle within which the commander can control the projector becomes. 15 Location and Function of Controls GB
-
 1
1 -
2
-
3
-
4
-
5
-
6
-
7
-
8
-
9
-
 10
10 -
 11
11 -
 12
12 -
 13
13 -
 14
14 -
 15
15 -
 16
16 -
 17
17 -
 18
18 -
 19
19 -
 20
20 -
21
-
22
-
23
-
24
-
25
-
26
-
27
-
28
-
29
-
30
-
31
-
32
-
33
-
34
-
35
-
36
-
37
-
38
-
39
-
40
-
41
-
42
-
43
-
44
-
45
-
46
-
47
-
48
-
49
-
50
-
51
-
52
-
53
-
54
-
55
-
56
-
57
-
58
-
59
-
60
-
61
-
62
-
63
-
64
-
65
-
66
-
67
-
68
-
69
-
70
-
71
-
72
-
73
-
74
-
75
-
76
-
77
-
78
-
79
-
80
-
81
-
82
-
83
-
84
-
85
-
86
-
87
-
88
-
89
-
90
-
91
-
92
-
93
-
94
-
95
-
96
-
97
-
98
-
99
-
100
-
101
-
102
-
103
-
104
-
105
-
106
-
107
-
108
-
109
-
110
-
111
-
112
-
113
-
114
-
115
-
116
-
117
-
118
-
119
-
120
-
121
-
122
-
123
-
124
-
125
-
126
-
127
-
128
-
129
-
130
-
131
-
132
-
133
-
134
-
135
-
136
-
137
-
138
-
139
-
140
-
141
-
142
-
143
-
144
-
145
-
146
-
147
-
148
 |
 |
