TEAC LP-R550USB Owners Manual - Page 29
Erasing or Unfinalizing a CD-RW, Press the FINALIZE/ERASE button in the stop mode.
 |
View all TEAC LP-R550USB manuals
Add to My Manuals
Save this manual to your list of manuals |
Page 29 highlights
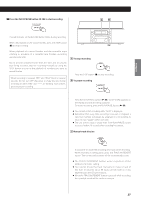
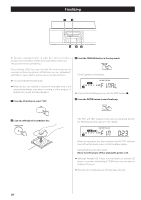
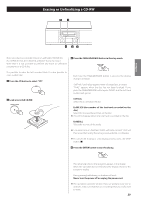
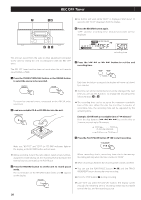
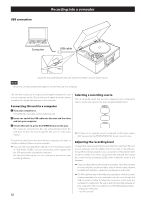
Erasing or Unfinalizing a CD-RW ENGLISH Erase procedures are possible only on an unfinalized CD-RW disc. If a CD-RW disc has been finalized, unfinalize it prior to erasure. Note that it is not possible to perform any erase or unfinalize procedures on a CD-R disc. 3 Press the FINALIZE/ERASE button in the stop mode. It is possible to erase the last recorded track. It is also possible to erase a whole disc. 1 Press the CD button to select "CD". Each time the FINALIZE/ERASE button is pressed, the display changes as follows: "UnFInAL" (unfinalize) appears when a finalized disc is loaded. "FInAL" appears when the disc has not been finalized. If you press the FINALIZE/ERASE button again, "ErASE" and the last track number will appear. 2 Load a recorded CD-RW. UnFInAL Select this to unfinalize the disc. ErASE XX (the number of the last track recorded on the disc) Select this to erase the last track on the disc. < This will not appear when only one track is recorded on the disc. ErASEALL Select this to erase all the tracks. < To erase a track in a finalized CD-RW, unfinalize (UnFInAL) first and then erase the track by the same procedure (ErASE or ErASEALL). < To cancel the erasing or unfinalizing process, press the STOP button (H). 4 Press the ENTER button to start finalizing. The remaining time for the operation appears in the display. When the operation has been finished, the display returns to the track/time display. During erasing/unfinalizing, no buttons will work. Never turn the power off or unplug the power cord. < This operation cannot be undone. If you are going to erase one or all tracks, make sure that they are recordings that you really want to erase. 29
-
 1
1 -
2
-
3
-
4
-
5
-
6
-
7
-
8
-
9
-
10
-
11
-
12
-
13
-
14
-
15
-
16
-
17
-
18
-
19
-
20
-
21
-
22
-
23
-
 24
24 -
 25
25 -
 26
26 -
 27
27 -
 28
28 -
 29
29 -
 30
30 -
 31
31 -
 32
32 -
 33
33 -
 34
34 -
35
-
36
-
37
-
38
-
39
-
40
-
41
-
42
-
43
-
44
-
45
-
46
-
47
-
48
-
49
-
50
-
51
-
52
-
53
-
54
-
55
-
56
-
57
-
58
-
59
-
60
-
61
-
62
-
63
-
64
-
65
-
66
-
67
-
68
-
69
-
70
-
71
-
72
-
73
-
74
-
75
-
76
-
77
-
78
-
79
-
80
-
81
-
82
-
83
-
84
-
85
-
86
-
87
-
88
-
89
-
90
-
91
-
92
-
93
-
94
-
95
-
96
-
97
-
98
-
99
-
100
 |
 |
