TEAC TN-175 Owners Manual English Francais Espanol Deutsch Italiano Nederlands - Page 4
Connections, Dust cover, Attaching the dust cover, Opening and closing the dust cover
 |
View all TEAC TN-175 manuals
Add to My Manuals
Save this manual to your list of manuals |
Page 4 highlights
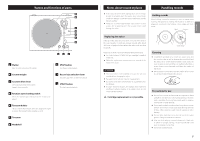
Connections Dust cover Attaching the dust cover Dust cover A B Connect to line input connectors of amplifier, etc. Set the PHONO EQ swtich to ON. Connect to phono input connectors of amplifier, etc. Set the PHONO EQ swtich to THRU. RL Amplifier D C Included AC adapter VV Precautions when making connections oo Do not plug the unit in until after making all connections. oo Carefully read the manuals of the devices that you are connecting and follow their instructions when making connections. A Analog audio output connectors (L/R) These output analog audio signals. The PHONO EQ switch setting changes the type of output signal. Use the included audio cable (or commercially-available ones) to connect other equipment to the output connectors of this unit. White (L) Red (R) White (L) Red (R) B PHONO EQ (audio output setting) switch ON Signals that have been amplified by the built-in equalizer amp are output from the analog audio output connectors (L/R). THRU The MM cartridge signal is output directly through the analog audio output connectors (L/R). Use this when connecting to equipment that has PHONO inputs. oo When shipped new from the factory, this is set to ON. 4 ATTENTION When set to ON, if connected to the PHONO inputs of an amplifier, for example, the output from speakers and headphones will be very loud, which could damage equipment or harm hearing. C DC input connector After completing all other connections, connect the included AC adapter to this connector. Confirm that the power plug of the AC adapter is plugged into a power outlet. oo Do not use any AC adapter other than the one included. oo The included AC adapter has plugs that can be changed. Attach the plug that suits the region where it is being used. VV Be sure to connect the power cord to an AC outlet that supplies the correct voltage. Connection to an outlet that supplies incorrect voltage could cause fire or electric shock. VV Hold the power plug when plugging it into an outlet or unplugging it. Never pull or yank on the power cord. VV Unplug the power cord from the outlet when you are not planning to use the unit for an extended period of time. D STANDBY/ON button Press the STANDBY/ON button to turn the unit on or put it in standby. Main unit Hinge 1 Insert the hinges completely into the hinge holders at the left and right ends of the back of the main unit. 2 Align the tops of the hinges with the dust cover hinge holders and insert them. oo Close the dust cover during playback. Since doing this prevents skipping caused by unintended contact and blocks external sound pressure, it makes noise less likely to occur. oo Do not open or close it when a record is playing. Doing so could, for example, cause the stylus to skip. oo Keep it closed whenever possible to keep dust out. Removing the dust cover Hold both edges of the dust cover and lift it slowly to remove it along with the hinges from the unit. Then, remove the hinges from the dust cover. Opening and closing the dust cover Opening Hold the front edge of the dust cover and gently lift it open completely until it stops. The dust cover will stay open in this position. Closing Gently lower the dust cover until it is closed. VV Be careful not to pinch your fingers, for example, when opening and closing the dust cover.
-
 1
1 -
 2
2 -
 3
3 -
 4
4 -
 5
5 -
 6
6 -
 7
7 -
 8
8 -
 9
9 -
 10
10 -
11
-
12
-
13
-
14
-
15
-
16
-
17
-
18
-
19
-
20
-
21
-
22
-
23
-
24
-
25
-
26
-
27
-
28
-
29
-
30
-
31
-
32
-
33
-
34
-
35
-
36
-
37
-
38
-
39
-
40
-
41
-
42
-
43
-
44
-
45
-
46
-
47
-
48
-
49
-
50
-
51
-
52
 |
 |
