TP-Link TL-WA901ND User Guide - Page 18
TL-WA901ND, Use the following IP address, IP address, Subnet mask, Start > Run, Enter - set up
 |
UPC - 845973051426
View all TP-Link TL-WA901ND manuals
Add to My Manuals
Save this manual to your list of manuals |
Page 18 highlights
TL-WA901ND Wireless N Access Point User Guide 4. Configure the IP address manually. 1) Select Use the following IP address. 2) Enter 192.168.1.* (* is any integer between 1 to 253) into the IP address filed, and 255.255.255.0 into the Subnet mask filed. 3) Click OK to keep your settings. Figure 3-4 5. Verify the network connection between your PC and the AP via the Ping command. The following example is in Windows XP Operating System. 1) Click Start > Run tab. Enter cmd in the filed and click OK. 2) Type ping 192.168.1.254 on the screen that displays and then press Enter. If the result displayed is similar to that shown in Figure 3-5 below, the connection between your PC and the AP has been successfully established. Figure 3-5 11
-
 1
1 -
2
-
3
-
4
-
5
-
6
-
7
-
8
-
9
-
10
-
11
-
12
-
 13
13 -
 14
14 -
 15
15 -
 16
16 -
 17
17 -
 18
18 -
 19
19 -
 20
20 -
 21
21 -
 22
22 -
 23
23 -
24
-
25
-
26
-
27
-
28
-
29
-
30
-
31
-
32
-
33
-
34
-
35
-
36
-
37
-
38
-
39
-
40
-
41
-
42
-
43
-
44
-
45
-
46
-
47
-
48
-
49
-
50
-
51
-
52
-
53
-
54
-
55
-
56
-
57
-
58
-
59
-
60
-
61
-
62
-
63
-
64
-
65
-
66
-
67
-
68
-
69
-
70
-
71
-
72
-
73
-
74
-
75
-
76
 |
 |
TL-WA901ND
Wireless N Access Point User Guide
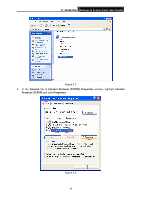
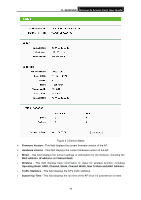
4.
Configure the IP address manually.
1)
Select
Use the following IP address
.
2)
Enter 192.168.1.* (* is any integer between 1 to 253) into the
IP address
filed, and
255.255.255.0 into the
Subnet mask
filed.
3)
Click
OK
to keep your settings.
Figure 3-4
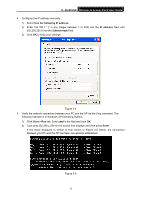
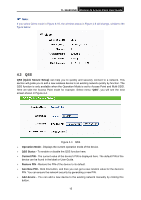
5.
Verify the network connection between your PC and the AP via the
Ping
command. The
following example is in Windows XP Operating System.
1)
Click
Start > Run
tab. Enter
cmd
in the filed and click
OK
.
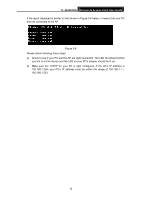
2)
Type
ping 192.168.1.254
on the screen that displays and then press
Enter
.
If the result displayed is similar to that shown in Figure 3-5 below, the connection
between your PC and the AP has been successfully established.
Figure 3-5
11